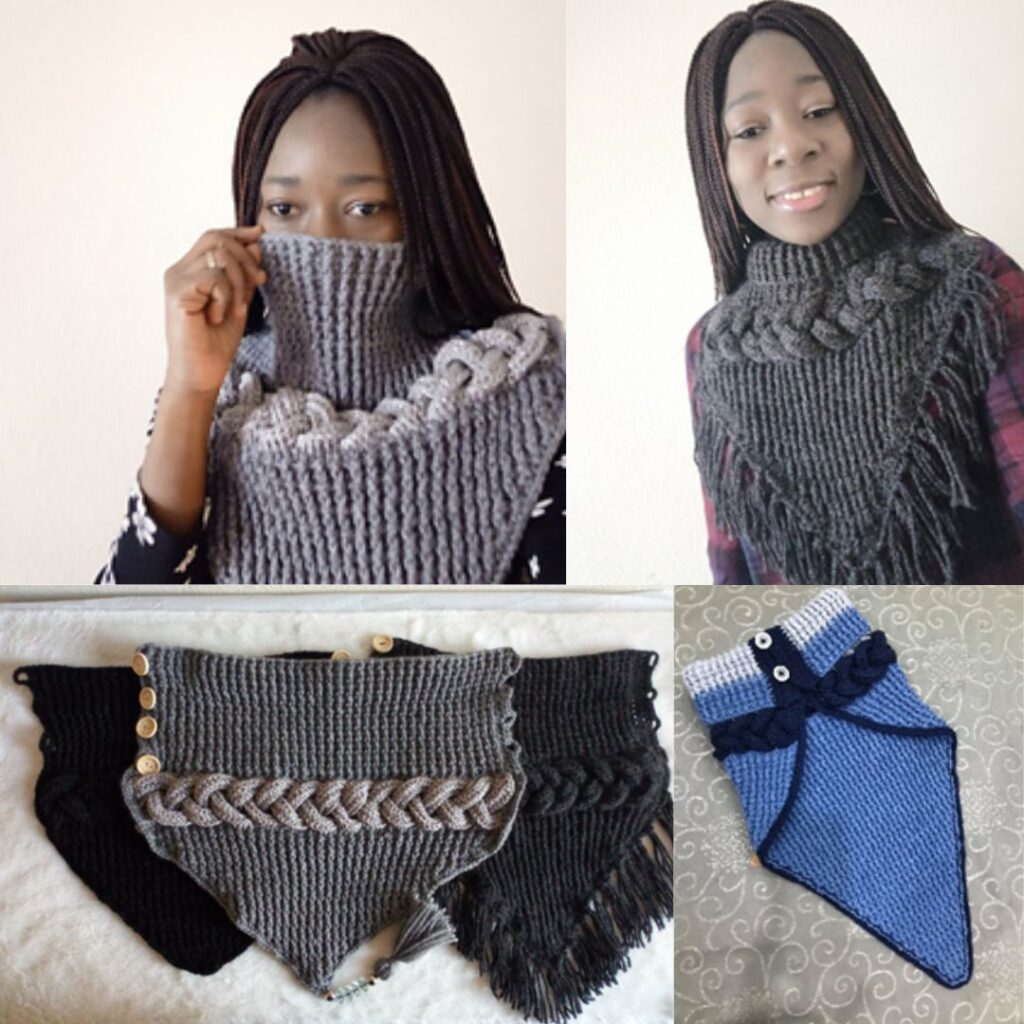
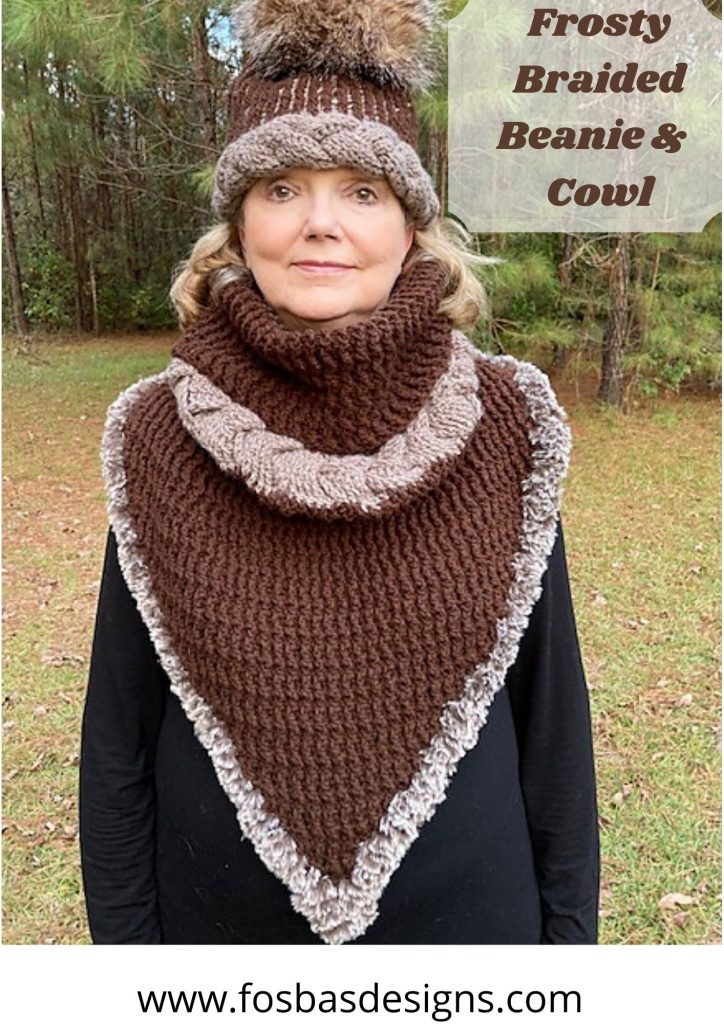
Easy crochet cowl pattern with buttons
Crochet cowl with buttons – an easy way to get your cowl on and off with each use. The beauty of this braided cowl pattern is that the added buttons are at the back.
These buttons help with the ease of using this cowl. You could even button it up for a double layer around your neck.
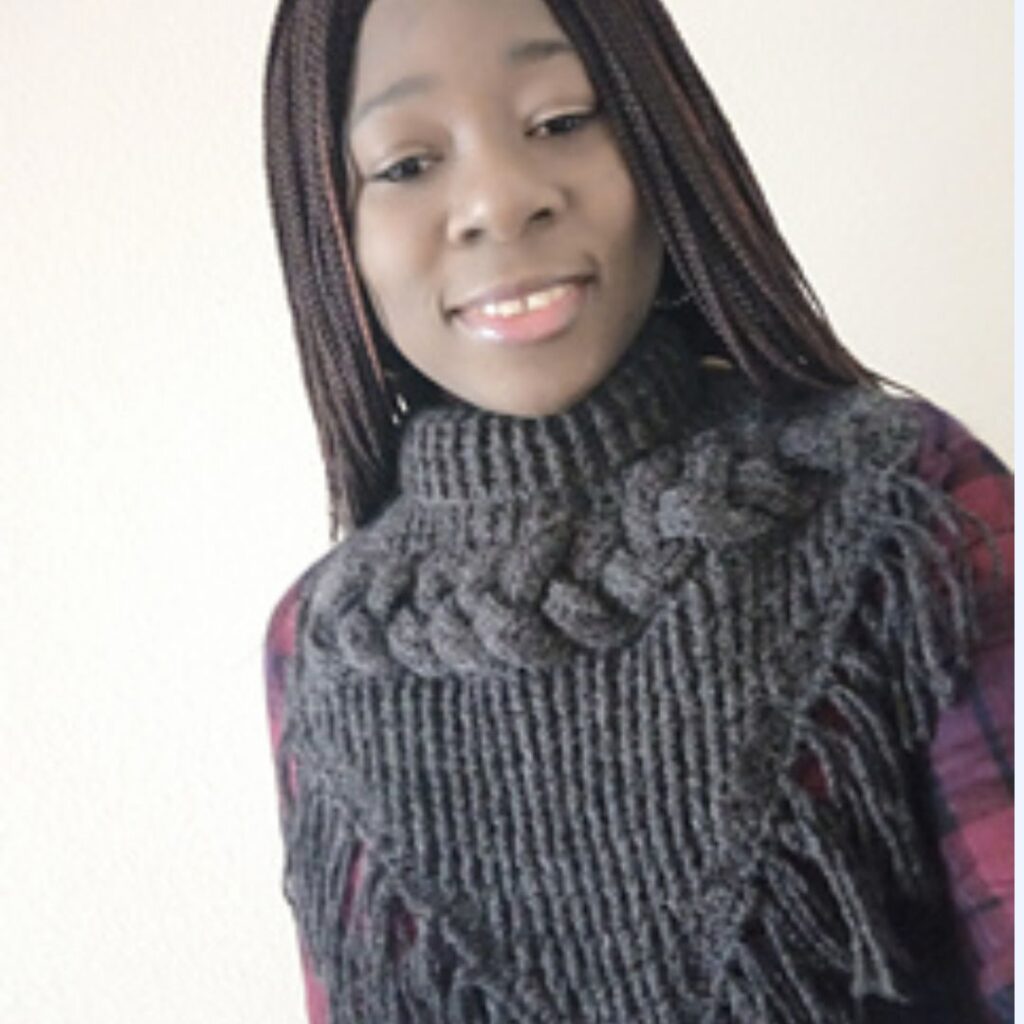
This easy crochet cowl with buttons comes in three different sizes. There is the option to make yours into a shorter or longer version.
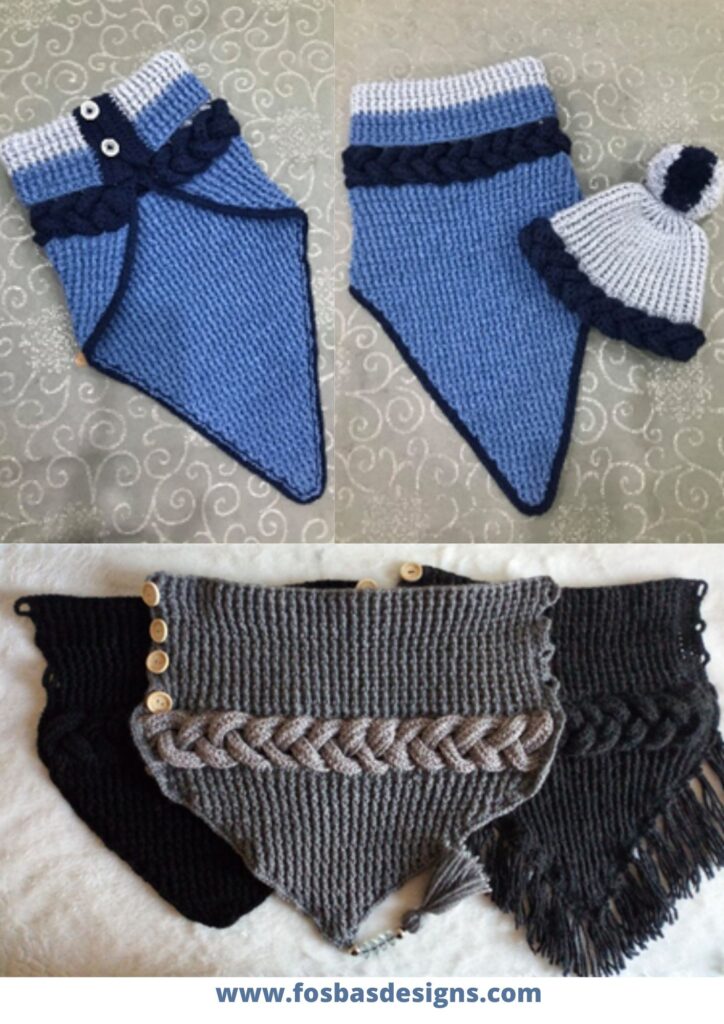
Want to make a matching beanie to go with your cowl? Here is the free pattern
If you would prefer the Ad-free version of this pattern, you can get it on either Ravelry or Etsy.
Crochet button cowl on Ravelry
Materials needed for this easy crochet cowl pattern
YARN
Section A = Ice Yarn Worsted weight yarn, #4 (50% Wool, 38% Acrylic, 12% Metallic, 80m, 1.75 oz/50gball)
Section B = Stylecraft special Aran yarn, #4 (100% Acrylic, 196m, 3.5 per 100g ball)
ESTIMATED YARDAGE
Color A = 100 (120, 160, 200) yards
Color B = 202 (320, 420, 580) yards.
HOOK AND OTHER MATERIALS
- 4.5 mm Crochet Hook
- US size G (4 mm) CrochetHook
GAUGE
Using 4 mm hook 18 sts over 16 rows = 10cm/4” made in hdc
Adjust hook size if necessary, to obtain gauge.
DIFFICULTY LEVEL – Intermediate
TERMS – US Terminology
ADJUSTMENT
Too Big? Go down a size
PATTERN NOTES
- Please kindly read through the pattern before starting.
- Any #4 weight of yarns can be substituted
- Chains at the beginning of Rows do not count as a stitch.
STITCH ABBREVIATIONS
Ch – Chain
Sl.st – Slip stitch
Sc – sc
Dc – Double Crochet
FPhdc – Front Post Half Double Crochet
BPhdc – Back Post Half Double Crochet
BPdc – Back Post Double Crochet
FPdc – Front Post Double Crochet
Dc2tog – Double Crochet 2 together
SUGGESTED YARNS (USED BY TESTERS)
1. Lion Brand Pound of Love.
2. Caron One Pound.
3. Red Heart Super Saver.
FINISHED MEASUREMENT
Size(s) XS (S, M, L and XL)
| Size | Length |
| Toddler (S) | 12” |
| Child (M) | 14” |
| Teen/Adult (L) Adult Large (XL) | 16” 18” |

Instruction for the easy crochet cowl with buttons
Section 1: Braid
Using hook size 4.5mm and color A
Chain 100 (110, 120, 130)
Row 1: Hdc in the 3rd chain from hook, hdc in each of the remaining stitches, turn. 98 (108, 118, 128) hdc
Row 2: Ch 2, BPhdc in each of the stitches, turn. 98 (108, 118, 128) BPhdc
Row 3: Ch 2, FPhdc in each of the stitches, turn. 98 (108, 118, 128) FPhdc
Row 4: Ch 2, BPdc in each of the stitches. 98 (108, 118, 128) BPhdc
Cut yarn.
Set aside, Make 2 more

To Assemble the braids for this crochet braided cowl
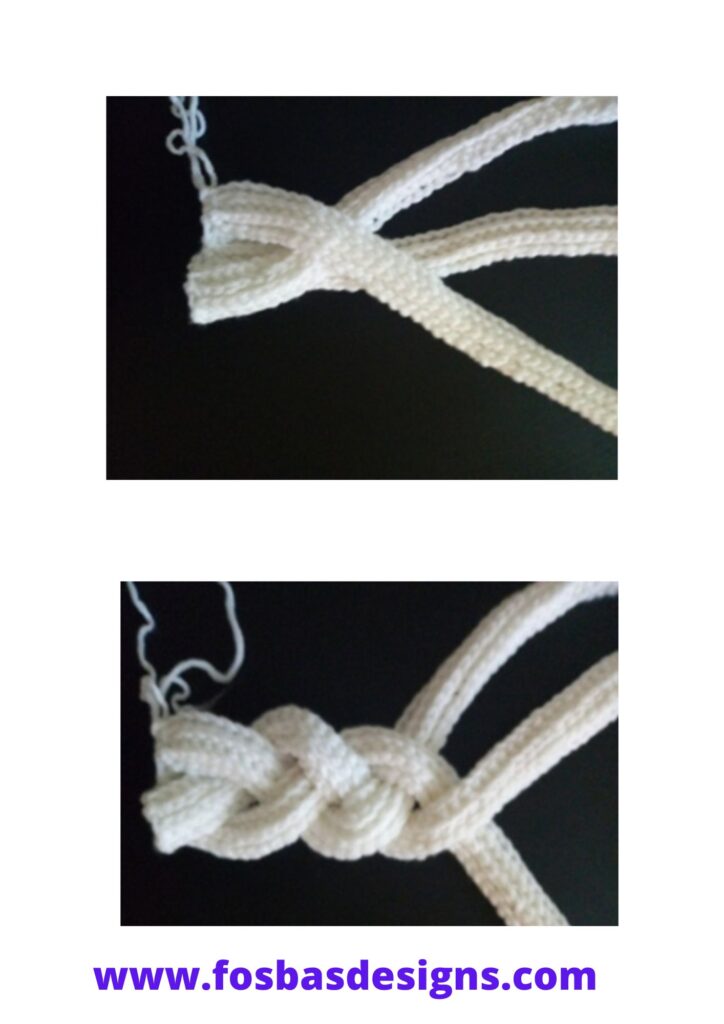
Lay the 3 strands side by side with wrong sides facing up
- Join the ends of one side with a slip stitch
- Labeled as A, B and C
- Braid into a cord as seen in the picture
- Place A over B, and C over A
- Place B over C and A over B
- Continue braiding till the end
- Join the 3 ends with a slip stitch
- Do not join both ends of the braided cord.
- The braided part should be a loose fit around your neck.
- Number of arcs – 14 (15, 16, 17)
Section 2: Neck
- Change to size 4 mm hook, working in rows.
- Working on the sides of your braids, using color A, attach yarn with a slip stitch to the end of the first arc.
- Place each arc over the next, dc over the two arcs placed on each other.
- Arc in this pattern refers to a bump after braiding. When you have both overlapping each other, crochet a dc over both bumps/arcs.
Lay the braided cord flat with right side facing you
Note – there is no joining of the braided cord to form a circle, it is worked in rows
Row 1: Ch 2, dc in next 5 sts, *place the arcs on each other, dc over both, dc in next 5 sts, place the arcs on each other, dc over both, rep from * to end, turn. 84 (90, 96, 102) dc
Note:
- Aim for 6 dc on each arc.
- Having more than 6 would make the cowl too large and having less than 6 means a smaller cowl.
Fasten off A, Join B (if using 2 different colors)
Row 2: Ch 2, *FPdc in next st, BPdc in next, repeat from * till the end, turn. 84 (90, 96, 102) dc.
Rows 3 – 16 (18, 22, 22, 22): Repeat Row 2;
You can increase or decrease the number of repeats.
Fasten off.
Section 3 of this crochet cowl with buttons: Body
- Lay the cowl flat with right side facing you.
- Attach yarn (B) to the braided side with a slip stitch.
Row 1: Ch 2, dc in next 5 sts, * place the arcs on each other, dc over both, dc in next 5 sts, rep from * to end, turn. 84 (90, 96, 102) dc.
Note
- You should have 6 dc on each arc, if you make more than 6 dc in to the arcs, you would end up having more sts which would be without shape!!!
- If you desire to have a shorter scarf, skip row 2 – 5 below and continue to Row 6. Prototype was done this way and tested with Row 2 – 5.
Row 2: Ch 2,*FPdc into the next st, BPdc in to the next st, repeat from * to the end of the row, turn. 84 (90, 96, 102) sts
Rows 3 – 5: Rep Row 2
- Start decreasing from here.
- The decrease is done both at the beginning and at the end of each row.
Row 6: Ch 2,dc2tog, *FPdc, BPdc, rep from * till the last 2 sts, dc2tog, turn. 82 (88, 94, 100) sts
Row 7: Ch 2,dc2tog, *BPdc, FPdc, repeat from * to till the last 2 sts, dc2tog, turn. 80 (86, 92, 98) sts
Rep row 6 – 7 till you have only 4 sts left.
Figure A – Rows 2 – 5 skipped for a shorter version.
Figure B – Longer version with all the Rows worked as in the pattern. (Photo Credit – One of My Testers)
Finishing: Edges
Chain 1, hdc into each of the sides around the cowl.
Cut yarn.
Button holes
- Attach yarn to the last row on the neck – Row 16 (18, 22, 22, 22) with a slip stitch.
- Adjust the number of chs as required to create a perfect fitting.
*Chain 5, skip next 2 sts, hdc into next 4 sts, repeat from * 2 (2, 3, 3, 3) more times. 2 (3, 4, 4, 4) ch sp, 10 (12, 14, 14, 14) sc
Cut yarn.
Optional – sc in each st/ch to make the button holes sturdier
Sew in ends.
Sew buttons to the opposite side
FRINGE
Cut 15 inches of yarn fold into two and attach 3-5 into each end with a slip stitch and trim.
This would give 7” long of fringe, if you want a longer fringe – increase the length of your yarn
Accordingly.
Tassel
Cut 15 pcs of 10” of yarn, fold into 2
Wrap one piece of yarn around the bundle and secure with a knot.
Trim off the ends.
Thread in beads if desired.
Attach to the tip of scarf.
Fur (Pictures not shown)
Crochet a round around the cowl using any fur yarn.
I hope to see your beautiful versions of this easy crochet cowl with buttons, when you do make yours, kindly tag me using the links below.
About the Designer
Susanna Biaye is the designer behind Fosbas Designs. A mother to an adorable Toddler whose pregnancy rekindled her love for designing, her designs are aimed at helping you feel confident while making your crochet wardrobe.
Come say Hi on Instagram, Blog and Subscribe To My Email List for pattern discounts and freebies.