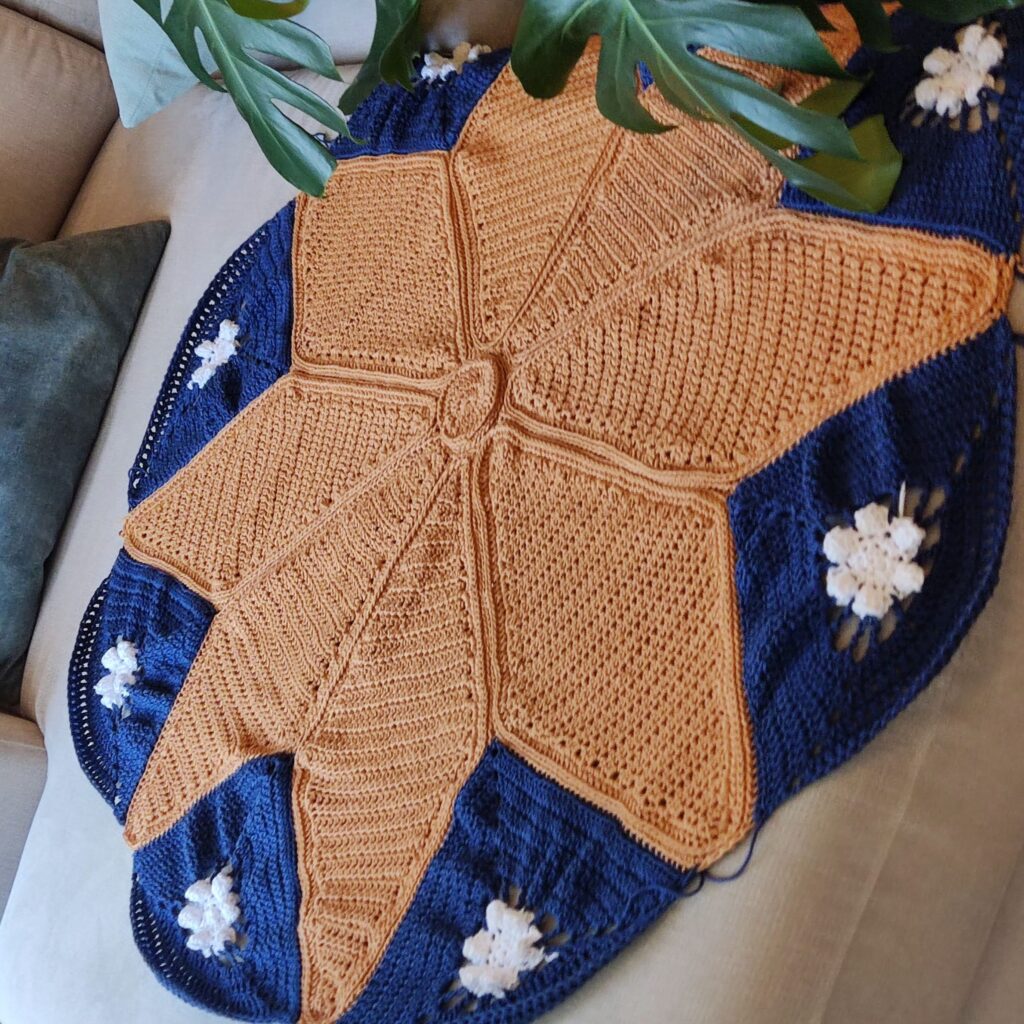
Easy Crochet Throw Blanket Pattern
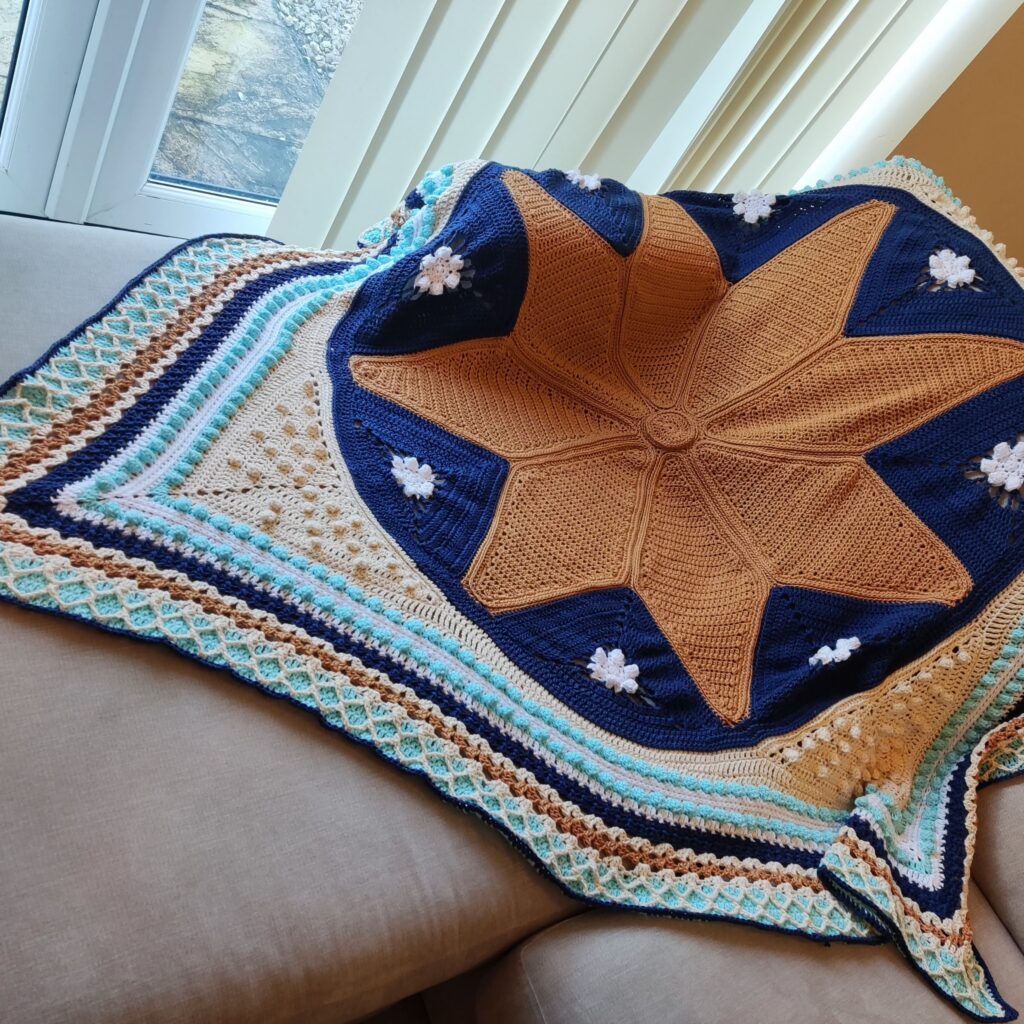
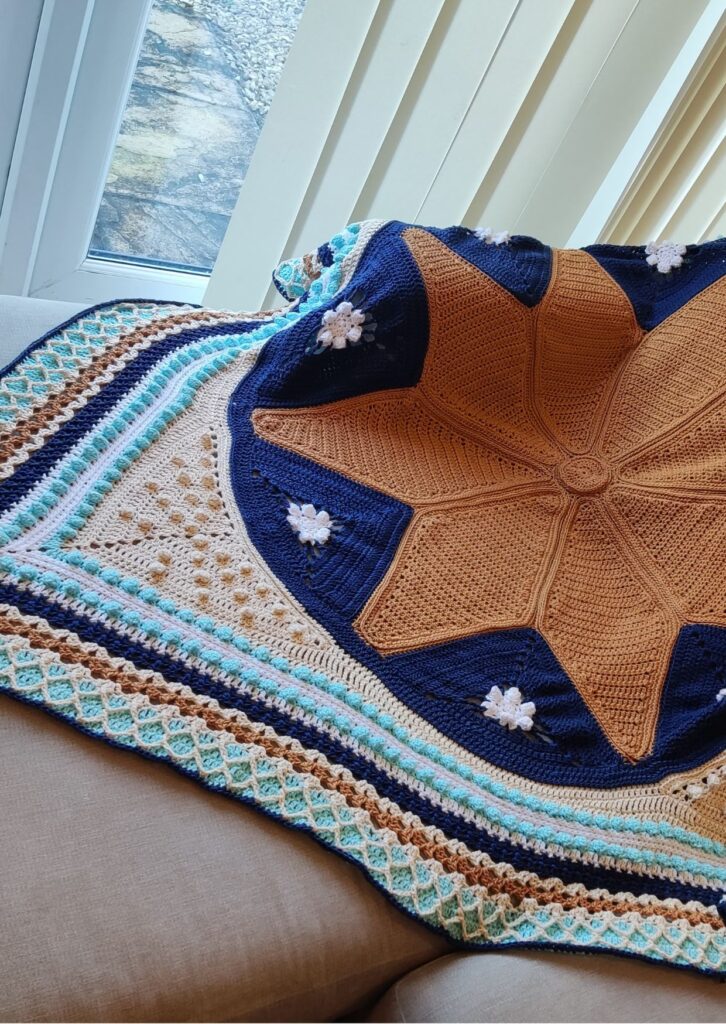
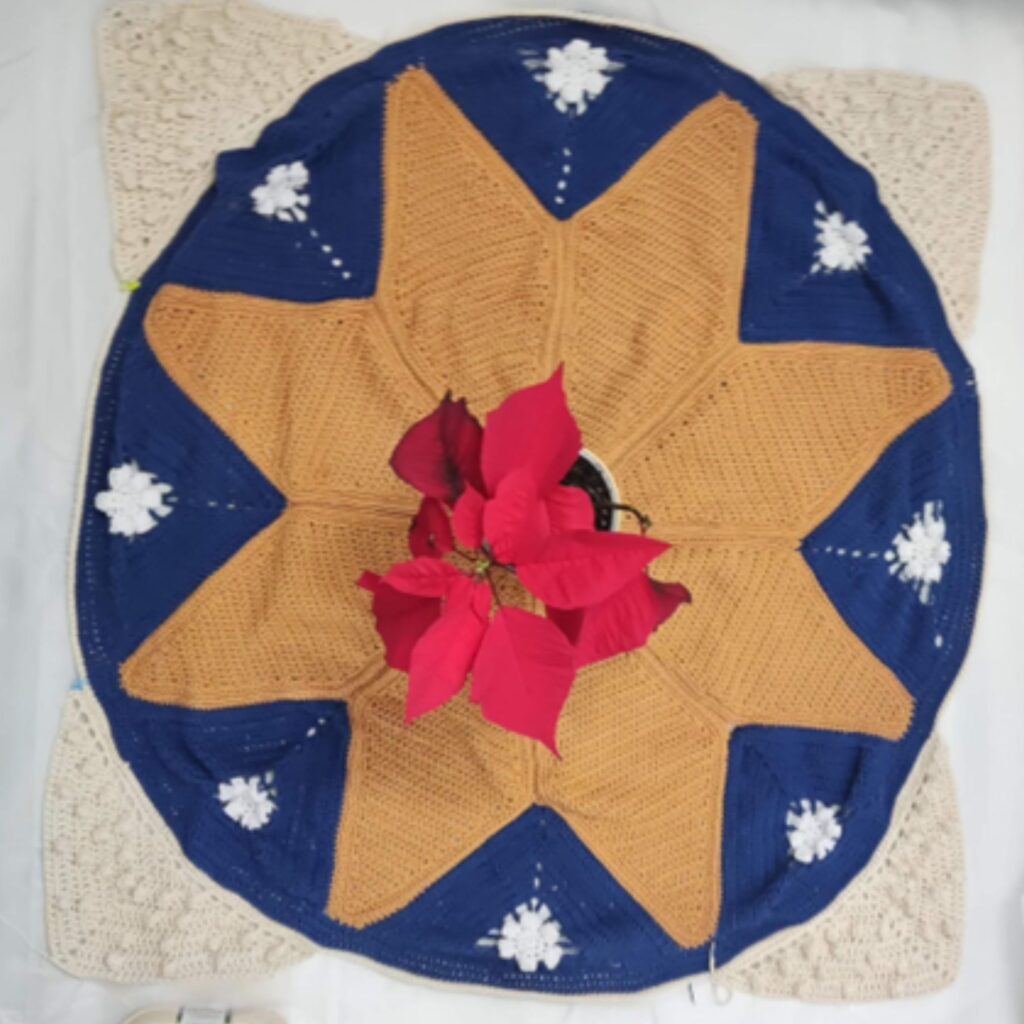
If you are looking for a new and easy crochet throw blanket either for yourself or to decorate your space, the Poinsettia crochet throw blanket is your go to! Perfect texture, stash busting crochet throw pattern.
This easy crochet throw pattern is perfect for beginners. Not only is this a beautiful throw to make, it is also the perfect throw to perfect some crochet stitches and techniques. Oh, these stiches are the basic every day crochet stitches!
The Poinsettia crochet throw blanket is a stash-busting project that can be made in colors of your choice.
The beautiful construction and stitches make this blanket a super fun project, as the next section is different from the previous one.
Poinsettia crochet throw blanket.
Scroll down for the details which includes the supplies, crochet stitches and instructions (to be added at the start of the CAL) for this easy crochet Afghan pattern.
The post would include detailed and free instructions for the Poinsettia crochet throw blanket.
Get the Ad-free version here
Time line for Poinsettia crochet throw blanket crochet along
The Poinsettia crochet throw blanket crochet along would begin on January 20th, 2023 and would run for a total of 10 weeks! This is enough time for you to crochet at your pace and still have fun making your favorite crochet throw blanket.
Supplies needed for the crochet throw blanket
Yarn – This easy crochet throw pattern is designed and tested using worsted weight yarn. This is a #4 weight yarn.
The prototype in this post was made using –Lion brand 24/7 Cotton, #4 Medium, Worsted weight (100% Mesmerized Cotton, 186 yards/ 170m per 3.5 oz/100g skein)
Other yarns that can be substituted for this crochet throw blanket includes –
Estimated total Yardage – 4110 yards. The prototype was made using 5 colors – Camel, White, Off white, Aqua and Navy
A = Camel = 980 yards
B = White – 650 yards
C = Navy = 880 yards
D = Off white – 800 yards
E = Aqua – 800 yards
Hook and other Materials
5 mm Crochet Hook
Darning needles
Gauge – 14 sts over 8 rows = 10 cm/4” square made in dc
Please note that gauge is not important for this project.
Pattern Notes
- Please kindly read through the pattern before starting.
- Any other #4 weight yarn can be substituted.
Difficulty Level – Intermediate
Terms – US Terminology
Don’t want to miss any updates?
Subscribe to my news letter here
The crochet stitches needed for the Poinsettia crochet throw
Chain/chains – ch/chs
Single Crochet – sc
Half double crochet – hdc
Double crochet – dc
3rd loop
Finished Measurement – 70″ by 70″
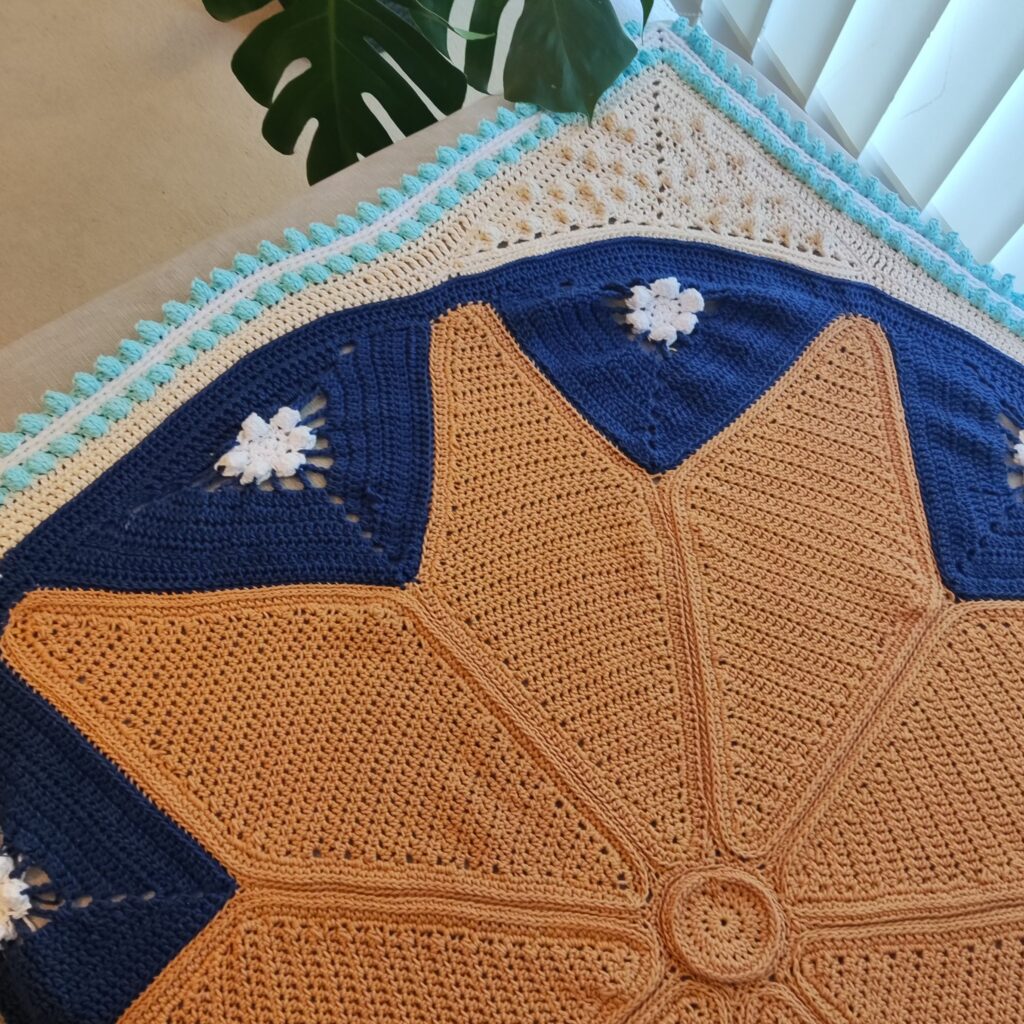
Construction note
This blanket is worked in sections with the first 2 sections made in rows and joined together.
The remaining sections of this easy crochet throw are then made in rounds.
The Throw Blanket Pattern
Section one of this easy throw blanket pattern
Make 8 pieces
With A
Row 1: Ch 4 (counts as first hdc), hdc in 4th ch from hook, turn – 2 hdc
Row 2: Ch 1, 2 hdc in each st, turn – 4 hdc
Row 3: Ch 1, hdc in each st across, turn – 4 hdc
Row 4: Ch 1, 2 hdc in first st, hdc in each st until last st, 2 hdc in last st, turn – 6 hdc
Row 5: Rep Row 3
Row 6: Rep Row 4 – 8 hdc
Row 7: Rep Row 3
Row 8: Rep Row 4 – 10 hdc
Row 9: Rep Row 3
Row 10: Rep Row 4 – 12 hdc
Row 11: Rep Row 3
Row 12: Rep Row 4 – 14 hdc
Row 13: Rep Row 3
Row 14: Rep Row 4 – 16 hdc
Row 15: Rep Row 3
Row 16: Rep Row 4 – 18 hdc
Row 17: Rep Row 3
Row 18: Rep Row 4 – 20 hdc
Row 19: Rep Row 3
Row 20: Rep Row 4 – 22 hdc
Row 21: Rep Row 3
Row 22: Rep Row 4 – 24 hdc
Row 23: Rep Row 3
Row 24: Rep Row 4 – 26 hdc
Rows 25 – 26: Ch 1, hdc in each st across, turn – 26 hdc
Row 27: Ch 1, hdc2tog, hdc in each st until last 2 sts, hdc2tog, turn – 24 hdc
Row 28: Ch 1, hdc in each st across, turn – 24 hdc
Row 29: Rep Row 27 – 22 hdc
Row 30: Rep 28
Row 31: Rep Row 27 – 20 hdc
Row 32: Rep 28
Row 33: Rep Row 27 – 18 hdc
Row 34: Rep 28
Row 35: Rep Row 27 – 16 hdc
Row 36: Rep 28
Row 37: Rep Row 27 – 14 hdc
Row 38: Rep 28
Row 39: Rep Row 27 – 12 hdc
Row 40: Rep 28
Row 41: Rep Row 27 – 10 hdc
Row 42: Rep 28
Row 43: Rep Row 27 – 8 hdc
Row 44: Rep 28
Row 45: Rep Row 27 – 6 hdc
Row 46: Rep 28
Row 47: Rep Row 27 – 4 hdc
Row 48: Rep 28
Row 49: Ch 1, hdc2tog twice – 2 hdc
Do not fasten off
Edging
Crocheting around the whole petal
Round 1: Ch 1, 2 sc in each st/ch sp around, aim for 3 sc at the tips, join with a sl st to the beginning ch. 202 sc
Round 2: Ch 1, hdc in each st around, aim for 3 hdc at the tips to prevent curling, join with a sl st to the beginning ch. 208 hdc
Round 3: Ch 1, sc in each 3rd loop around, aim for 3 sc in each tip, join with a sl st to the beginning ch. 214 sc
Set aside and make 7 more.
To assemble / join the leaves together
Finishing of the first part
- Join A with a sl st to any part of the center of the joined panel.
- Crocheting into the 3 stitches with the stitch markers Left unjoined when joining the leaves together.
- Note that there would be one or two sts between leaves, make sure to crochet into these also.
Round 1: Ch 1, sc in each st around, join with a sl st to the beginning chain. 36 sc
Fasten off.
Center piece
With A
Round 1: In a magic ring, ch 1, 12 hdc, join with a sl st to the beginning chain. 12 hdc
Round 2: Ch 1, 2 hdc in each st around, join with a sl st to the beginning chain. 24 hdc
Round 3: Ch 1, *2 hdc in first st, hdc in next st, rep from * until the end, join with a sl st to the beginning chain. 36 hdc
Round 4: Ch 1, in 3rd loop, sc in each st around, join with a sl st to the beginning chain. 36 sc
Fasten off.
Sew the centerpiece to the center of the leaves.
- Place the centerpiece on the center of the panels already joined.
- Using A, sew the centerpiece to the hole left on the center of the panel.
Tips for a neat sewing
- Turn to the wrong side, use the Front loop of the centerpiece and the back loop of the panels.
More free crochet throw blankets on the blog to check out includes the followings
Beginner friendly crochet blanket
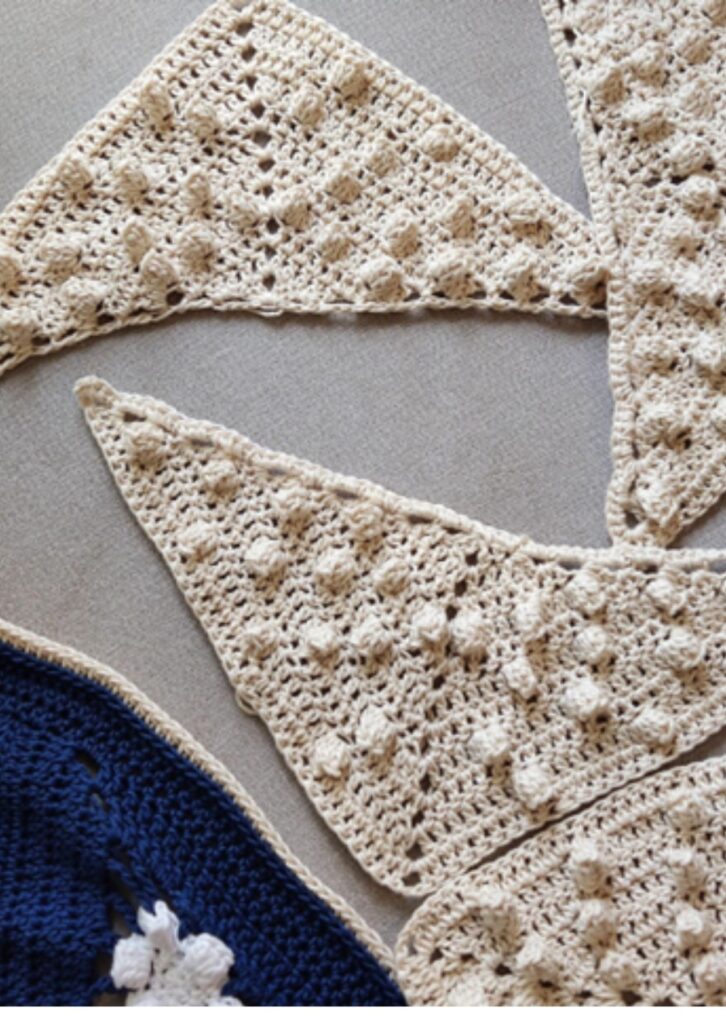
Section 2 – Poinsettia throw blanket
Special Stitch for section 2
Popcorn stitch – 5 dc in indicated st, remove your hook from the last st, and insert your hook into the top of the first dc, pass hook through the loop left from the 5th st, sl st to complete the stitch.
Make 8 pieces
With B (White)
Round 1: In a magic ring, ch 1, 6 hdc, join with a sl st to the beginning chain. 6 hdc
Round 2: Ch 1, 2 hdc in each st around, join with a sl st to the beginning chain. 12 hdc
Round 3: *Ch 3, popcorn stitch in next stitch, ch 3, sc in next st, rep from * until the end, join with a sl st to the 3rd ch from the beginning chain. 6 sc/popcorn, 12 ch-sp
Keep all the popcorn stitches on the right side of your work.
Fasten off B, join C (Blue)
sl st to the top of the first popcorn.
Note for Round 4 – all ch sps from round 3 are skipped. You only crochet into the top of the popcorn and the sc.
Round 4: Ch 6 (counts as first tr + ch 3). tr in same st, (first V-corner made) *ch 3, tr in next st, ch 3, sc into top of popcorn, ch 3, tr in next st, ch 3, tr into the top of next popcorn, ch 3, tr in same stitch, second V-corner made), rep from * one more time, ch 3, tr in next st, ch 3, sc into top of popcorn, ch 3, tr in next st, ch 3, join with a sl st to the 3rd ch from the beginning chain. 3 sc, 12 tr 15 ch sp
Round 5: Ch 5 (counts as dc + ch 3), 2 dc in ch 3 sp from Round 4, [*dc in next st, 3 dc in next ch sp**, rep from * to ** 3 more times, dc in next st, 2 dc, ch 3, 2 dc in ch sp], rep [] one more time, rep from * to ** until the end, dc in last st, dc into the base of the ch 5 from the beginning, join with a sl st to the 3rd ch from the beginning chain. 63 dc, 3 ch sp
Round 6: Ch 5, 2 dc in ch 3 sp, dc in each st until next ch 3 sp, *2 dc, ch 3, 2 dc in ch – sp, dc in each st until next ch 3 sp, rep from * until the last st, dc in last st, dc into the base of the ch 5 from the beginning, join with a sl st to the 3rd ch from the beginning chain. 75 dc, 3 ch sp
The next rows are made across just 2 sides.
Row 7: Ch 2 (does not count as a stitch), 2 dc in ch 3 sp, dc in each st until next ch 3 sp, *2 dc, ch 3, 2 dc in ch – sp, dc in each st until next ch 3 sp, 2 dc in next ch sp, turn. 58 dc, 1 ch sp
Rows 8 – 10: Ch 2, dc in each st until next ch 3 sp, *2 dc, ch 3, 2 dc in ch – sp, dc in each of the remaining sts, turn. 70 dc, 1 ch sp
Fasten off.
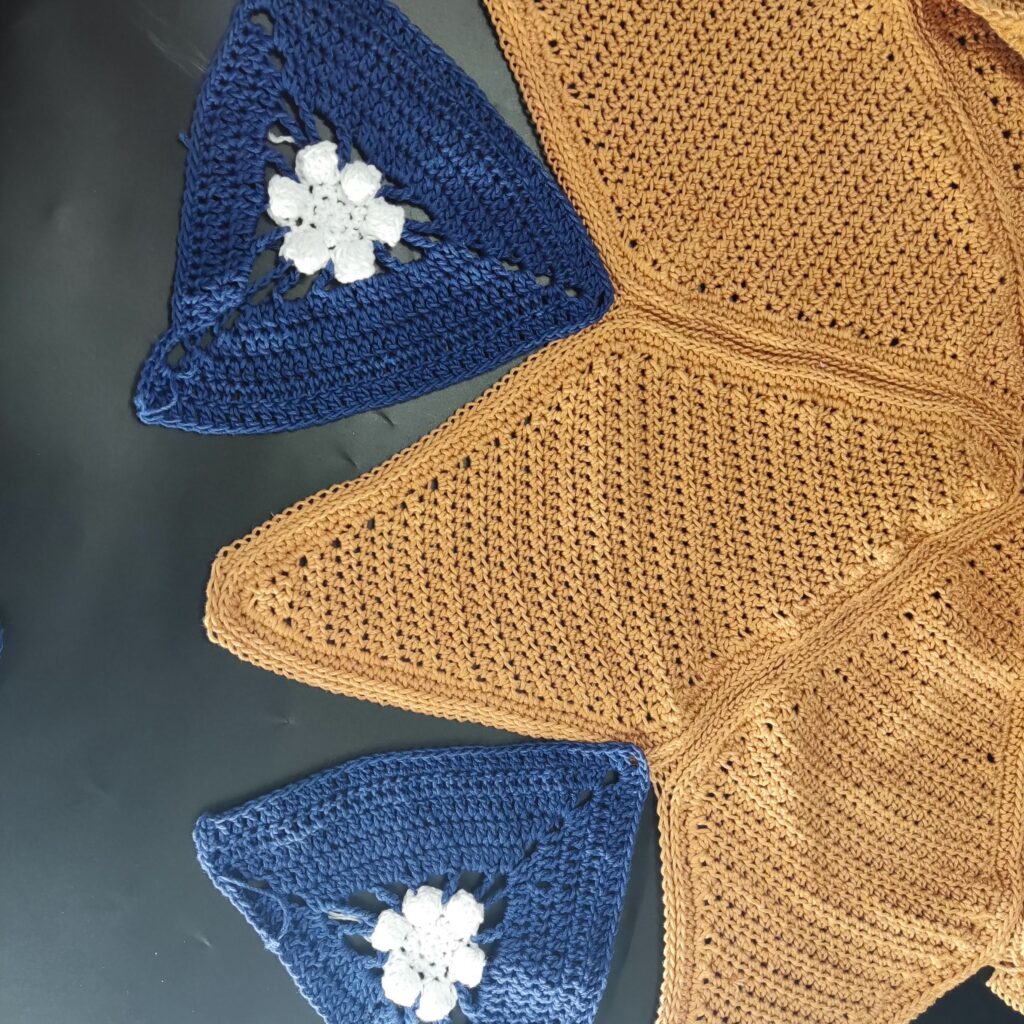
Finishing / Joining to the leaves made in Section 1
Place each triangle between the spaces left un-joined between the leaves.
- Make sure to have the wider sides between the leaves.
- Using sl st or mattress stitch, with either hook or needle, join each side of the triangle to the opened part of the panels in part 1.
- Repeat with each of the triangles.
Fasten off
Make sure to have 3 sts left on the tip of each panel (made in part 1)
After completing your joining, the finished piece would be round with some curling on the triangles, this would be fixed in the next section
Section 3 of this easy crochet throw blanket free pattern
· With C (Blue)
· Join yarn with a sl st to any side of the triangles.
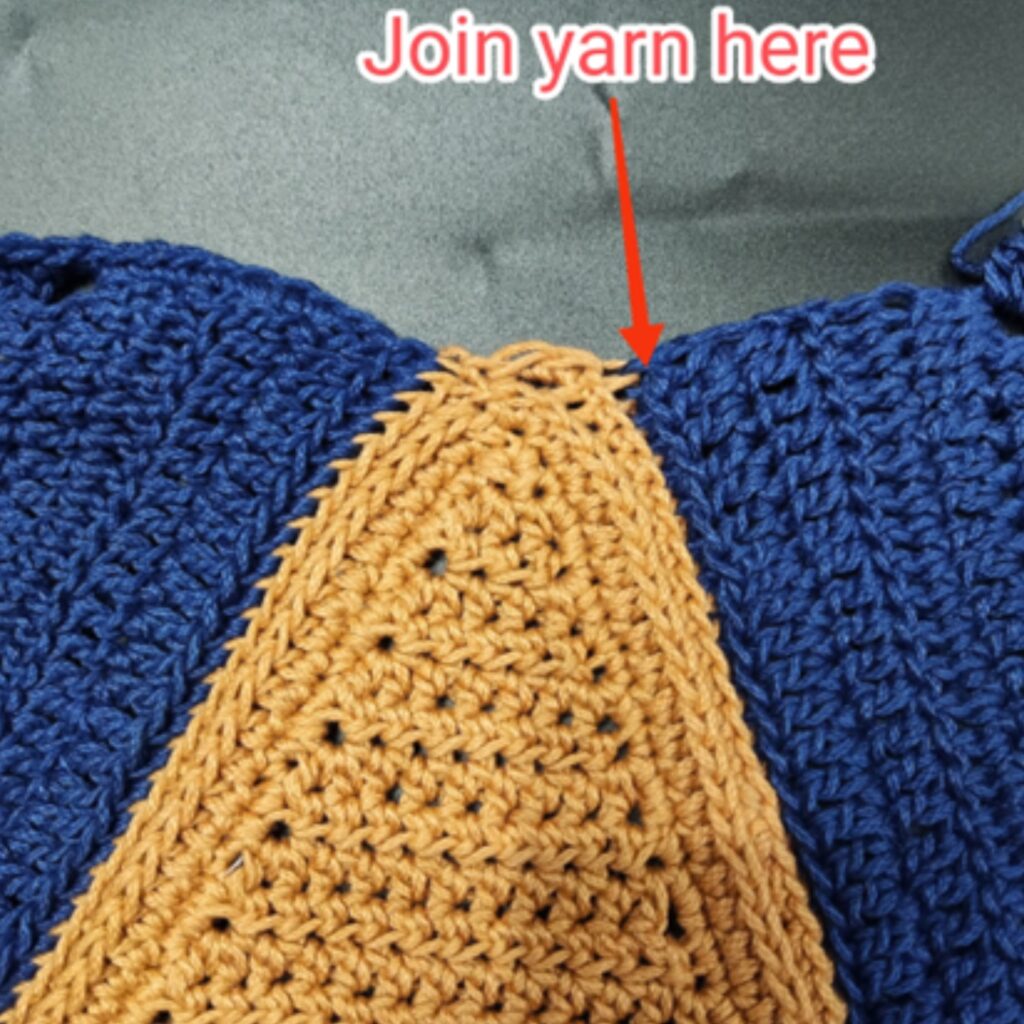
- Crocheting in rounds.
- Aim for 8 sts per each apex of the leaves made in Part 1 and 3 sc in each ch 3 sp
Round 1: Ch 2, *dc in next st of the leaf, 2 dc in next 3 sts, dc in next st, continue with the next triangle, sc in each of the sts, rep from * to the end, join with a sl st to the beginning chain. 400 sts
Round 2: Ch 2, *dc in next 7 sts, 2 dc in next st, rep from * to the end, join. 450 dc
Round 3: Ch 2, hdc in each st around, join. 450 hdc
Fasten off C, join D (cream)
Round 4: In 3rd loop, hdc in each st around, join with a sl st to the beginning ch. 450 hdc
Note – it is important that your counts for rounds 1 – 4 above are the same as with the pattern!
Fasten off.
Make 4
With D
Round 1: In a magic ring, Ch 4 (counts as dc + ch 1 here and throughout), 2 dc, ch 1, 2 dc, ch 1, dc, turn. 6 dc
Round 2: Ch 4, 2 dc in ch 1 sp, dc in next 2 sts, (dc, ch 1, dc in ch 1 sp), dc in next 2 sts, 2 dc in ch sp, ch 1, dc in last st, turn. 12 dc
Round 3: Ch 4, 2 dc in ch 1 sp, dc in each st until ch 1 sp, (dc, ch 1, dc in ch 1 sp), dc in remaining sts until last ch sp, 2 dc in ch sp, ch 1, dc in last st, turn. 18 dc
Round 4: Ch 4, 2 dc in ch 1 sp, *popcorn st in next st, dc in next 3 sts**, popcorn st in next st, dc in next 2 sts, popcorn stitch in next st, (2 dc, ch 1, 2 dc in ch 1 sp), popcorn st in next st, DC in next 2 STS, rep from * to ** Once more, popcorn st in the next st, 2 dc in ch sp, ch 1, dc in last st, turn. 6 popcorn st 20 dc
Make sure not to skip any stitch, especially the st next to the popcorn st!
Round 5: Rep Row 3 – 32 dc
Round 6: Ch 4, 2 dc in ch 1 sp, *popcorn st in next st, dc in next 4 sts**, rep from * to ** until ch sp, (dc, ch 1, dc in ch 1 sp), {dc in next 4 sts, popcorn st in next}, rep {} until ch sp, 2 dc in ch sp, ch 1, dc in last st, turn. 6 popcorn st 32 dc
Round 7: Rep Row 3 – 44 dc
Round 8: Ch 4, 2 dc in ch 1 sp, *popcorn st in next st, dc in next 5 sts**, rep from * to ** 2 more times, popcorn st in next st, dc in next 2 sts, (dc, ch 1, dc in ch 1 sp), dc in next 2 sts, popcorn st in next st, {dc in next 5 sts, popcorn st in next st}, rep {} until ch sp, 2 dc in ch sp, ch 1, dc in last st, turn. 8 popcorn st 42 dc
Round 9: Rep Row 3 – 56 dc
Round 10: Ch 4, 2 dc in ch 1 sp, *popcorn st in next st, dc in next 6 sts**, rep from * to ** 2 more times, popcorn st in next st, dc in next 5 sts (dc, ch 1, dc in ch 1 sp), dc in next 5 sts, rep from * to ** until last st before ch sp, popcorn st in next st, 2 dc in ch sp, ch 1, dc in last st, turn. 8 popcorn st 54 dc
Round 11: Rep Row 3 – 68 dc
Do not fasten off
Edging across the edge –
Row 1: Ch 1, 3 sc in each ch /dc across. Fasten off. 66 sc
To join the triangles to the main panel
- Lay the panel flat.
- Position each corner triangle across the alternating triangles made in section 2.
- Each corner triangle should be strategically placed in order to have each at the corner of the round panel.
Joining
- Using the point at which you fasten off yarn on the main panel as a landmark.
- Count 66 sts away, and secure with markers.
- Count 46 sts away from the next marker, place another stitch marker
- Repeat steps 2 – 3 around your blanket.
- Secure each corner triangle to each large triangle, corresponding triangle with 66 sts.
- Using either a darning needle or crochet hook, and either mattress stitch or sl st, join the long edge of the corner triangle to the part marked on the blanket.
- Repeat step 6 for the remaining 3 corner triangles.
- Do not fasten off the 4th square.
Section 4 of the Poinsettia Crochet throw blanket
Special stitch for this section
Crossed double crochet (Xdc)
First row of xdc = *Skip next st, dc in next st, crocheting over the dc just made into the skipped st, yarn over, insert hook into skipped stitch and yarn over (3 loops on the hook), yarn over, pull through 2 loops, yarn over, pull through the remaining 2 loops
The first xdc made.
Rep from * to the end
Subsequent rows of xdc =
*Skip the first leg of xdc, dc in the second leg of xdc, crocheting over the dc just made into the first leg of xdc, yarn over, insert hook into skipped stitch and yarn over (3 loops on the hook), yarn over, pull through 2 loops, yarn over, pull through the remaining 2 loops
Rep from * to the end
Aim is to transform the blanket into a square.
With D
Round 1: Ch 2, *dc in next 46 sts (stitches between the corner triangles), continue towards the next corner triangle, sc in next 35 sts, (2 sc, ch 2, 2 sc) in ch sp, sc in next 35 sts, dc in next 46 sts, sc in next 35 sts, (2 sc, ch 2, 2 sc) in ch sp, sc in next 35 sts, rep from * to the end, join with a sl st. 480 sts
Fasten off.
Lay your piece flat, there would be some redundancies around the edges.
Join D with a sl st to any of the ch 2 sp.
Round 2: Ch 1, *sc in next 19 sts, hdc in next 4 sts, dc in next 6 sts, tr in next 12 sts, dc in next 6 sts, hdc in next 4 sts, sc in next 18 sts, hdc in next 4 sts, dc in next 6 sts, tr in next 12 sts, dc in next 6 sts, hdc in next 4 sts, sc in next 19 sts, (2 sc, ch 2, 2 sc) in ch 2 sp, rep from * to end, join with a sl st to the beginning ch. 496 sts
Round 3: Ch 1, *hdc in next 25 sts, dc in next 26 sts, hdc in next 22 sts,dc in next 26 sts, hdc in next 25 sts, (2 hdc, ch 2, 2 hdc) in next ch sp, rep from * to the end. 512 sts
Fasten off D, join E to any ch 2 sp
Check – the panel should be close to being a proper square. If not, kindly let me know
Round 4: Ch 2, {*dc in next 2 sts, popcorn st in next st, rep from * until 1 st before next ch 2 sp, dc in next st, (2 dc, ch 2, 2 dc) in ch 2 sp}, rep {} to the end. 168 popcorn, 360 dc
Fasten off E, join B to ch 2 sp
Round 5: Ch 1, hdc in each st around, (2 hdc, ch 2, 2 hdc) in each ch 2 sp, join with a sl st to the beginning ch. 544 hdc
Round 6: Ch 1, in 3rd loop, hdc in each st around, (2 hdc, ch 2, 2 hdc) in each ch 2 sp, join with a sl st to the beginning ch. 560 hdc
Rounds 7: Rep Round 6 – 576 hdc
Fasten off B, join E to ch 2 sp
Round 8: Rep Round 4 – 288 popcorn, 304 dc
Fasten off E, join B to ch 2 sp
Round 9: Ch 1, hdc in each st around, (2 hdc, ch 2, 2 hdc) in each ch 2 sp, join with a sl st to the beginning ch. 608 hdc
Fasten off D, join C to ch 2 sp
Round 10: Ch 2, 2 dc in ch 2 sp, *xdc across until next ch 2 sp, (2 dc, ch 2, 2 dc), rep from * until the end, 2 dc in last ch 2 sp, ch 2, join with a sl st to the beginning ch. 624 dc
Round 11: Ch 2, *xdc across until next ch 2 sp, (2 dc, ch 2, 2 dc), rep from * until the end, (2 dc, ch 2, 2 dc) in last ch 2 sp, ch 2, join with a sl st to the beginning ch. 640 dc
Fasten off B, join D to ch 2 sp
Round 12: Ch 2, * skip next 3 sts, (2 dc, ch 2, 2 dc) in next st, rep from * to the next ch 2 sp, (2 dc, ch 2, 2 dc) at the next corner, join with a sl st to the beginning ch. 656 dc
Fasten off D, join A to ch 2 sp
Round 13: Ch 2, dc in next 2 sts, *(2 dc, ch 2, 2 dc) in each ch 2 sp, rep from * until 2 sts before the next corner, dc in next 2 sts, (2 dc, ch 2, 2 dc) at the next corner, dc in next 2 sts**, rep from * to ** until the last ch 2 sp, (2 dc, ch 2, 2 dc) in last ch 2 sp sp, join with a sl st to the beginning ch. 672 dc
Fasten off A, join D ch 2 sp
Round 14: Ch 2, *dc in next 4 sts, skip next 2 sts, (2 dc, ch2, 2 dc) in each ch 2 sp across until 6 sts before the corner ch 2 sp, skip next 2 sts, dc in 4 sts. (2 dc, ch 2, 2 dc) in corner ch 2 sp, rep from * around, join with a sl st to the beginning ch. 688 dc
Fasten off D, join E ch 2 sp
Round 15: Ch 2, *dc in each st and ch 2 sp until next corner ch 2 sp, (2 dc, ch 2, 2 dc) in next corner}, rep from * to end, join with a sl st to the beginning ch. 704 dc
Do not fasten off E
Section 5 of this amazing crochet throw blanket pattern
Continue with E
Round 1: Ch 2, *dc in each st until next ch 2 sp, (2 dc, ch 2, 2 dc) in next corner}, rep from * until the end, join with a sl st to the beginning ch. 720 dc
Round 2 is crocheted over the last 3 rounds.
Fasten off E, join D to any ch 2 sp


Round 2: Ch 1, sc in ch sp, {ch 4, FPsc around the first dc from round 14, ch 4, skip next 4 sts on round 1, sc in next st, ch 4, skip next 2 sts on round 14, FPsc around next st, ch 4, skip next 4 sts on round 1, sc in next st, *ch 4, FPsc around the middle 2 dc from round 14, ch 4, skip next 4 sts on round 1, sc in next st in round 1, rep from * until the last 7 sts before the next ch 2 sp on round 14, skip next 3 sts, ch 4, FPsc around next st, ch 4, skip next 4 sts on round 1, sc in next st, ch 4, FPsc around last dc from round 14, ch 4, (2 sc, ch 2, 2 sc) in next ch 2 sp}, rep {} around, join with a sl st to the beginning ch.
Fasten off D, join E
Note – The DC’s in round 3 into round 1 and the corner STS into the SC from round 2
Round 3: Ch 2 in ch 2 sp, 2 dc in ch 2 sp, *dc in each st until next ch 2 sp, (2 dc, ch 2, 2 dc) in next corner}, rep from * until the last ch 2 sp, 2 dc in last ch 2 sp, ch 2, join with a sl st to the beginning ch. 740 dc
Round 4: Ch 2 in ch 2 sp, *dc in each st until next ch 2 sp, (2 dc, ch 2, 2 dc) in next corner}, rep from * until the end, join with a sl st to the beginning ch. 756 dc
Fasten off E, join D to any ch 2 sp
Note – Kindly let me know if the stitches are centralized (does the chains create a diamond shape)
Round 5: Ch 1, sc in ch sp, ch 5, FPsc around sc from round 2, ch 4, skip next 5 sts from round 4, *{sc in next st (from round 4), ch 4, FPsc around next st (sc) from round 2, skip next 4 sts from round 4, rep from * until next ch 2 sp, ch 4, FPsc around last sc from round 2, ch 4, (2 sc, ch 2, 2 sc) in ch 2 sp}, rep from { to }, join with a sl st to the beginning ch.
Fasten off E, Join C to any ch 2 sp.

Fasten off E, join C to ch 2 sp
Round 6: Ch 2, *hdc in each st until next ch 2 sp, (2 hdc, ch 2, 2 hdc) in next corner}, rep from * until the end, join with a sl st to the beginning ch. hdc
Round 7: Ch 2, *in 3rd loop, hdc in each st until next ch 2 sp, (2 hdc, ch 2, 2 hdc) in next corner}, rep from * until the end, join with a sl st to the beginning ch. hdc
Round 8: Ch 2, *in 3rd loop, sl st in each st until next ch 2 sp, ch 2 in next corner}, rep from * until the end, join with a sl st to the beginning ch. sl st
Fasten off
Sew in ends
Block to measurement.
I hope you have had lots of fun making this crochet throw blanket?
I can’t wait to see your beautiful makes! Come share your projects with me and the crochet community on Facebook and on Instagram.
Fosbas