
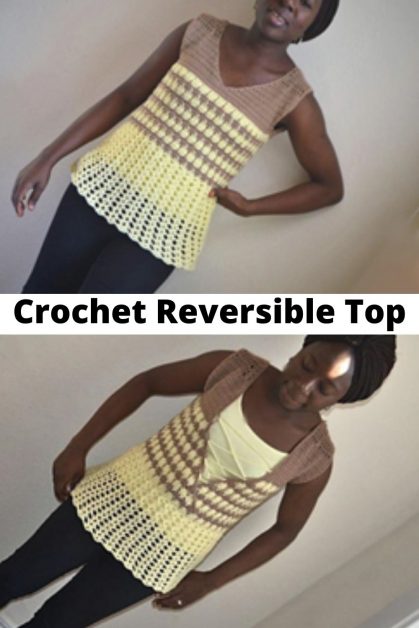
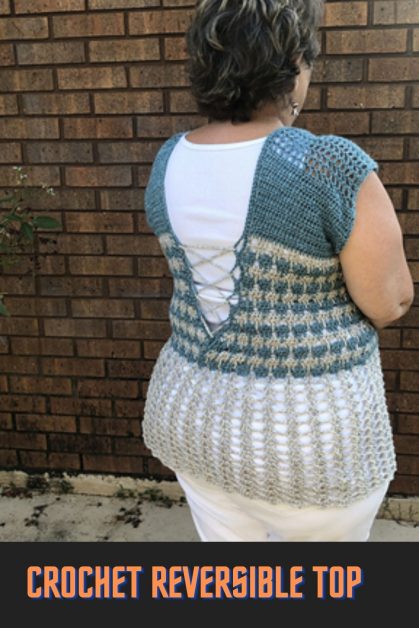
Crochet Summer Reversible Tee Pattern
About 2 years ago, I designed this cute crochet summer tee! You see, I’ve always loved garments that can be styled in different ways! This top is no exemption as it is reversible. You actually do not need any major adjustment to make this reversible!. All that is needed is to wear the tee with the front or the back interchangeably.
Have you noticed the peplum/flare on this tee? It’s another thing I love about this tee.
Materials for the summer reversible tee pattern
Yarn – Stylecraft special DK, #3 lightweight (100% acrylic 322 yards/295m per 3.5 oz/100g skein)
2 (2, 3, 3, 3, 3, 4, 4, 4) skein(s) in cream, main color
1 (2, 2, 2, 2, 2, 3, 3, 3) skein(s) in Oatmeal, contrasting color
Get the Ad-free PDF copy with step wise pictures on Ravelry
Estimated Yardage
Main Color = 540(600, 650, 720, 800, 950, 1050, 1180, 1280) yards
Contrasting Color = 250(350, 420, 500, 580, 640, 740, 840, 940) yards
Hook and other materials
4.5 mm Crochet hook
Gauge – 16 dc and 9 Rows = 4”/10 cm square, before blocking.
Difficulty level – Intermediate
Terms – US Terminology
Stitches
Chains – ch(s)
Single Crochet – sc
Half double crochet – hdc
Double Crochet – dc
Double crochet 2 together – dc2tog
Half double crochet 2 together – hdc2tog
Back Loop Only – BLO
Main Color – MC
Contrasting Color – CC
Sizing info for the summer reversible tee
As with all of my other garment patterns, this the is also size inclusive!

Finished Measurements
Sizes/Color – XS(S, M, L, XL, 2Xl, 3XL, 4XL, 5XL)
Bust Measurement: 30(34, 38, 42, 46, 50, 54, 58, 60)”
Armhole Depth – 7(7, 7.25, 7.5, 8, 8, 8.25, 8.5, 9)”
Top Length – 22(23, 24, 25, 25, 26, 26, 26, 27)”
Modelled garment is shown in Medium.
Pattern Notes:
- Chains at the beginning of each row count as a stitch (ch 3 = dc, ch 4 = dc+ch1)
- When working with 2 colors, do not cut yarn, simply drop the unused yarn which would be picked again when needed
- Section 1 uses LARKSFOOT stitch
Construction Notes
- This pattern is worked from the waist up, after which ribbed lace is added to the bottom
- You can adjust the length of your top by reducing or increasing the repeats for the flare.
INSTRUCTIONS
Section 1: FRONT PANEL
Using MC, Chain 66 (70, 74, 78, 82, 86, 90, 94, 98) (multiples of 4 + 2)
Row 1: Dc in 3rd ch from hook, dc in next 2 chs, *ch 1, skip next ch sp, dc in next 3 chs, repeat from * to last ch, dc in last chs, turn.
50 (53, 56, 59, 62, 65, 68, 71, 74) dc
15 (16, 17, 18, 19, 20, 21, 22, 23) ch 1 sp
Row 2: Ch 3, dc in first 3 sts, *ch 1, skip ch sp, dc in next 3 sts, repeat * to last st, dc in last st, turn.
50 (53, 56, 59, 62, 65, 68, 71, 74) dc
15 (16, 17, 18, 19, 20, 21, 22, 23) ch 1 sp
Drop MC, Pick up CC
Row 3: Ch 3, dc in next st, *ch 1, skip 1 st, dc in next st, dc into the gap which is 2 rows below (Row 1, make sure it’s not too tight!!!), dc in next st, repeat from * to last 2 sts, dc in last 2 sts, turn.
49 (52, 55, 58, 61, 64, 67, 70, 73) dc
16 (17, 18, 19, 20, 21, 22, 23, 24) ch 1 sp
Figure 1 – Row 3
Row 4: Ch 3, dc in next st, *ch 1, skip next st, dc in next 3 sts, repeat from * to last 2 sts, dc in last 2 sts, turn.
49 (52, 55, 58, 61, 64, 67, 70, 73) dc
16 (17, 18, 19, 20, 21, 22, 23, 24) ch 1 sp
Drop color CC, Pick up color MC
Row 5: Ch 3, *dc in next st, dc into the gap which is 2 rows below (i.e Row 3, make sure it’s not too tight!!!), dc in next st, ch 1, skip 1 st, repeat from * to last st, dc in last st, turn. 50 (53, 56, 59, 62, 65, 68, 71, 74) dc
15 (16, 17, 18, 19, 20, 21, 22, 23) ch 1 sp
Row 6: Ch 3, dc in first 3 sts, *ch 1, skip ch sp, dc in next 3 sts, repeat * to last st, dc in last st, turn.
50 (53, 56, 59, 62, 65, 68, 71, 74) dc
15 (16, 17, 18, 19, 20, 21, 22, 23) ch 1 sp
Drop MC, Pick up CC
Rows 7 –20 (20, 22, 24, 24, 26, 26, 28, 28): Repeat Rows 3 – 6
Neck line
With CC
Row 21 (21, 23, 25, 25, 27, 27, 29, 29): Ch2, hdc in each st across, turn.
65 (69, 73, 77, 81, 85, 89, 93, 97) hdc
Rows 22 (22, 24, 26, 26, 28, 28, 30, 30) – Row 25 (25, 27, 29, 29, 32, 32, 34, 34): Repeat Row 21 (21, 23, 25, 25, 27, 27, 29, 29)
Neckline
Right strap
Place stitch marker on the 33 (35, 37, 39, 41, 43, 45, 47, 49) st from hook
With CC, working towards the stitch marker
Row 26 (26, 28, 30, 30, 33, 33, 35, 35): Ch 2, hdc in each st till last 2 sts before st marker, hdc2tog, turn. 31 (33, 35, 37, 39, 41, 43, 45, 47) hdc
Row 27 (27, 29, 31, 31, 34, 34, 36, 36): Ch 2, hdc2tog, hdc in each st across, turn. 30 (32, 34, 36, 38, 40, 42, 44, 46) hdc
Row 28 (28, 30, 32, 32, 35, 35, 37, 37) – 32 (34, 37, 38, 40, 42, 44, 46, 48): Repeat Row 26 (26, 28, 30, 30, 33, 33, 35, 35) and Row 27 (27, 29, 31, 31, 34, 34, 36, 36) turn. 25 (25, 25, 25, 25, 25, 25, 25, 25) hdc
Row 33 (35, 38, 39, 41, 43, 45, 47, 49): Ch 4, skip next st, *dc in next, ch 1, skip next st repeat from* till end of row, turn.
13 (13, 13, 13, 13, 13, 13, 13, 13) dc
12 (12, 12, 12, 12, 12, 12, 12, 12) ch 1 sp
Row 34 (36, 39, 40, 42, 44, 46, 48, 50) – 38 (40, 43, 44, 46, 48, 50, 50, 54): Repeat Row 33 (35, 38, 39, 41, 43, 45, 47, 49)
Fasten off.
Note
- Reduce the repeats for a shorter neckline.
- If you reduce or increase the repeats, do not forget to correspond the changes on the left side and also on the back panel.
Left Strap
- Crocheting from the opposite side and working towards the st marker.
- Join yarn with a sl st
Row 26 (26, 28, 30, 30, 33, 33, 35, 35) – 38 (40, 43, 44, 46, 48, 50, 50, 54) just as for right shoulder
Fasten off.
Section 2 – BACK PANEL
Using MC, Chain 66 (70, 74, 78, 82, 86, 90, 94, 98) (must be the same number of stitches as you made in for the front)
Row 1: Dc in 3rd ch from hook, dc in next 2 chs, *ch 1, skip next ch, dc in next 3 chs, repeat from * to last ch, dc in last ch, turn. 50 (53, 56, 59, 62, 65, 68, 71, 74) dc
15 (16, 17, 18, 19, 20, 21, 22, 23) ch 1 sp
Row 2: Ch 3, dc in next 3 sts, *ch 1, skip ch sp, dc in next 3 sts, repeat from * to last st, dc in last st, turn.
50 (53, 56, 59, 62, 65, 68, 71, 74) dc
15 (16, 17, 18, 19, 20, 21, 22, 23) ch 1 sp
Drop MC, Pick up CC
- Special note for the later part of Row 3 – i.e 2 (3, 2, 3, 4, 5, 4, 5, 6) times, is made in Front Loop Only (FLO). The stitches not worked into would be used when making the other side and this forms the crisscross look in the pattern
- The dc across ch 1 sp is to be made from the back, just like when making FPDC!!!
- Get the Ad-free Copy with step by step pictures of the tricky parts on Ravelry
Row 3: Ch 3, dc in next st, *ch 1, skip next st, dc in next st, dc into the gap which is rows below (make sure it’s not too tight!!!), dc in next st, repeat from * 5 (5, 6, 6, 6, 6, 7, 7, 7) more times, working in FLO – **ch 1, skip next st, dc in next st, working behind ch 1, dc into ch 1 sp which is 2 rows below, dc in next st, repeat from ** 2 (3, 2, 3, 4, 5, 4, 5, 6) more times, leave the remaining sts un-worked, turn.
29 (32, 32, 35, 38, 41, 41, 44, 47) dc
9 (10, 10, 11, 12, 13, 13, 14, 15) ch 1 sp
Make sure to work in the indicated loops as you would need the unworked loops when making the other side!
Now in both loops
Row 4: Ch 3, dc2tog, *ch 1, skip ch sp, dc in next 3 sts, repeat * till end of the row, ch 1, skip ch sp, dc in last 2 sts, turn.
29 (31, 31, 34, 37, 40, 40, 43, 46) dc
9 (10, 10, 11, 12, 13, 13, 14, 15) ch 1 sp
Drop CC, pick up MC.
Row 5: Ch 3, dc in next st, dc into the gap which is 2 rows below, dc in next st, *ch 1, skip 1 st, dc in next st, dc into the gap which is 2 rows below, repeat from * till last 2 sts, dc2tog, turn.
28 (30, 30, 33, 36, 39, 39, 42, 45) dc
8 (9, 9, 10, 11, 12, 12, 13, 14) ch 1 sp
Row 6: Ch 3, dc2tog, *ch 1, skip ch sp, dc in next 3 sts, repeat from* to last st, dc in last st, turn.
27 (29, 29, 32, 35, 38, 38, 41, 44) dc
8 (9, 9, 10, 11, 12, 12, 13, 14) ch 1 sp
Drop MC, pick up CC,
Row 7: Ch 3, dc in next st, *ch 1, skip next st, dc in next st, dc into the gap which is 2 rows below, dc in next st, repeat from * to last 2 sts, dc2tog, turn.
26 (28, 28, 31, 34, 37, 37, 40, 43) dc
8 (9, 9, 10, 11, 12, 12, 13, 14) ch 1 sp
Row 8: Ch 3, dc2tog, *ch 1, skip 1 ch sp, dc in next 3 sts, repeat from * to last 2 sts, dc in last 2 sts, turn.
25 (27, 27, 30, 33, 36, 36, 39, 42) dc
8 (9, 9, 10, 11, 12, 12, 13, 14) ch 1 sp
Drop CC, pick up MC
Row 9: Repeat Row 5
25 (27, 27, 30, 33, 36, 36, 39, 42) dc
7 (8, 8, 9, 10, 11, 11, 12, 13) ch 1 sp
Row 10: Repeat Row 6
24 (26, 26, 29, 32, 35, 35, 38, 41) dc
7 (8, 8, 9, 10, 11, 11, 12, 13) ch 1 sp
Row 11: With MC, repeat Row 7
23 (25, 25, 28, 31, 34, 34, 37, 40) dc
7 (8, 8, 9, 10, 11, 11, 12, 13) ch 1 sp
Row 12: Repeat Row 6
22 (24, 24, 27, 30, 33, 33, 36, 39) dc
7 (8, 8, 9, 10, 11, 11, 12, 13) ch 1 sp
Row 13: Repeat Row 5
22 (24, 24, 27, 30, 33, 33, 36, 39) dc
6 (7, 7, 8, 9, 10, 10, 11, 12) ch 1 sp
Stop decreasing here
Row 14: Ch 3, dc in next 2 sts, *ch 1, skip 1 st, dc in next 3 sts, repeat from * to last st, dc in last st, turn.
22 (24, 24, 27, 30, 33, 33, 36, 39) dc
6 (7, 7, 8, 9, 10, 10, 11, 12) ch 1 sp
Row 15: With MC, ch 3, dc, ch 1, skip next st, *dc in next st, dc into the gap which is 2rows below, 1 dc in next st, repeat from * to last st, dc in last st, turn.
22 (24, 24, 27, 30, 33, 33, 36, 39) dc
6 (7, 7, 8, 9, 10, 10, 11, 12) ch 1 sp
Row 16: Ch 3, dc in first 4 sts, *ch 1, skip ch sp, dc in next 3 sts, repeat from * to last st, dc in last st, turn.
22 (24, 24, 27, 30, 33, 33, 36, 39) dc
6 (7, 7, 8, 9, 10, 10, 11, 12) ch 1 sp
Rows 17 – 25: Repeat Rows 14 – 16
22 (24, 24, 27, 30, 33, 33, 36, 39) dc
6 (7, 7, 8, 9, 10, 10, 11, 12) ch 1 sp
Fasten off.
Fasten off MC, join CC
- working from the edge towards the center
Row 1: Ch 2, hdc in each st till last 2 sts, hdc2tog, turn. 27 (30, 30, 34, 38, 42, 42, 48, 50) hdc
Row 2: Ch 2, hdc2tog, hdc in each st across, turn. 26 (29, 29, 33, 37, 41, 41, 47, 49) hdc
XS = only make Row 3 and proceed to Row 4.
Rows 3 – 0 (6, 6, 10, 14, 18, 18, 24, 26): Repeat Rows 1 – 2. 25 (25, 25, 25, 25, 25, 25, 25, 25) hdc
Rows 4 (7, 7, 11, 15, 19, 19, 25, 27): Ch 4, skip next st, *dc in next, ch 1, skip next st repeat from* till end of row, turn.
13 (13, 13, 13, 13, 13, 13, 13, 13) dc
12 (12, 12, 12, 12, 12, 12, 12, 12) ch 1 sp
Rows 5 (8, 8, 12, 16, 20, 20, 26, 28) – 10 (15, 18, 19, 21, 25, 25, 25, 31): Repeat Row 4 (7, 7, 11, 15, 19, 19, 25, 27)
Fasten off.
Left side
Join yarn (CC) with a sl st to edge, working towards the middle
Repeat as with the right side.
Make sure to use corresponding colors as with the right side
Note that you work into the BLO for the crisscross as shown in the picture below
Finishing
- Joining – Shoulder strap/seam
- Place both panels with wrong side facing you, join the shoulder straps by sewing together
- Shape arm-hole
- On both sides – working from the front panel to the back panel.
- Place stitch markers on each side at the start of color B for the neckline, this should be about 7(7, 7.25, 7.5, 8, 8, 8.25, 8.5, 9)” away from the shoulder tip
Using B, join with a sl st, ch 1, sc in edge across till second stitch marker, join with a sl st to ch 1
Leave a long yarn, sew the side together.
Fasten off
- Neckline
With B, join yarn at the beginning of the Criss cross, ch 1, hdc in each st around the edges till neck line and back to the other Criss cross.
Do not fastening off, turn.
Eyelet for lace (Rope) = Ch 1, sc in next 2 sts, *ch 4, skip 3 sts, sc in next 4 sts, repeat * 3 more times, sc in each st across the neckline, **ch 4, skip 3 sts, sc in next 4 sts, repeat from ** till end of row.
Fasten off.
Section 3: Flare/Peplum
With right side facing you, using MC, join yarn with a sl st to Row 1 of front panel (foundation chain)
Working in round
Round 1: Ch 4 (counts as a dc and ch1), 2 dc in same st, *ch 1, skip 3 sts, (2 dc, ch 2, 2 dc) in next st, repeat from * to end of the round with a sl st, join to the 3rd ch
Round 2: Ch 4, 2 dc in same st, *ch 1, (2 dc, ch 2, 2 dc) in ch 2 sp of the previous row, repeat from * to end of the round, with a sl st, join to the 3rd ch
Rounds 3 – 12 (13, 14, 15, 16, 16, 17, 18): Repeat Round 2
Fasten off.
Rope
- Chain 200 or as long as would pass through the eyelet made, Weave in ends
- Pass the rope through the eyelets made at the neckline, you can thread the rope as if tying shoelaces.
- Secure the rope by knotting it together.
- You can leave the rope out completely.
Get the Ad-free PDF copy with step wise pictures on Ravelry
I hope you love this Top as much as I did designing and wearing mine. When you make your own version of the summer reversible top, kingly tag me.

One Comment
Comments are closed.