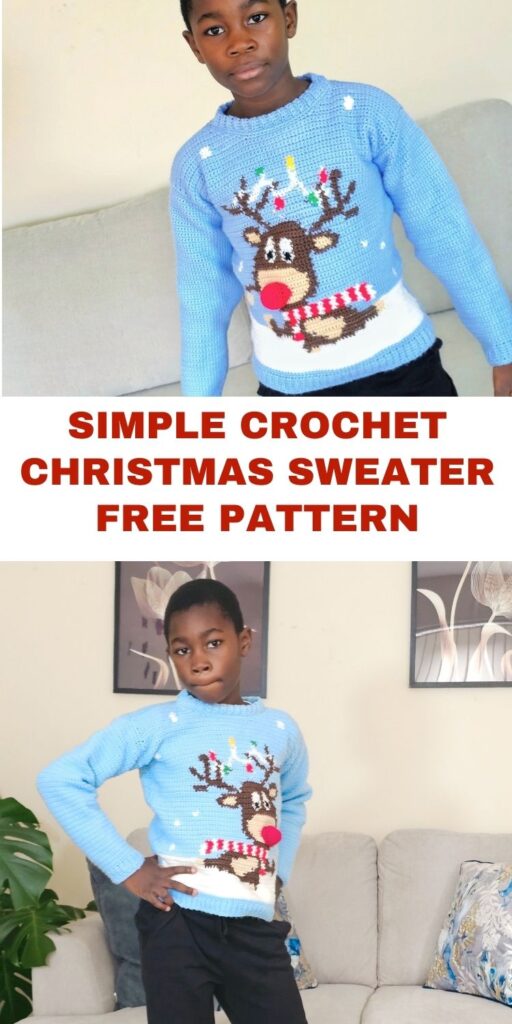
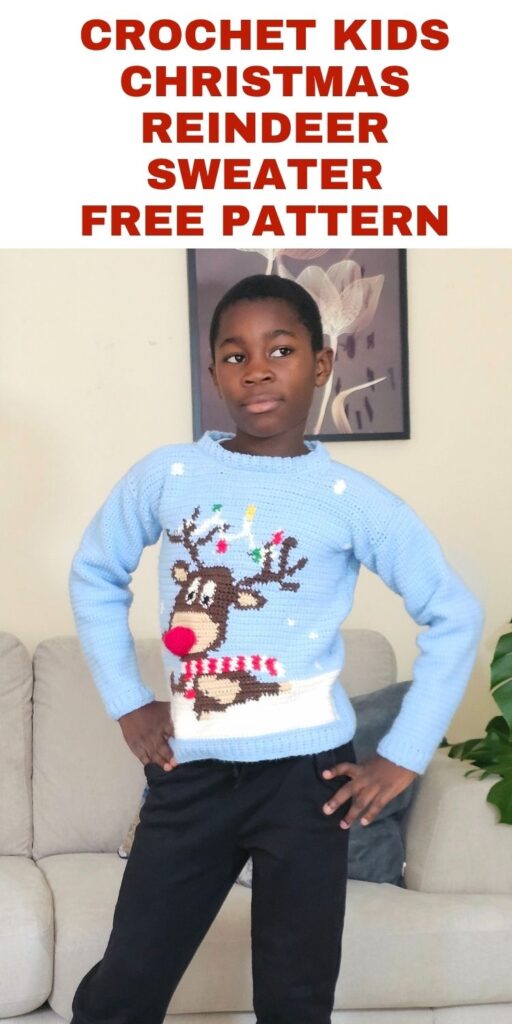
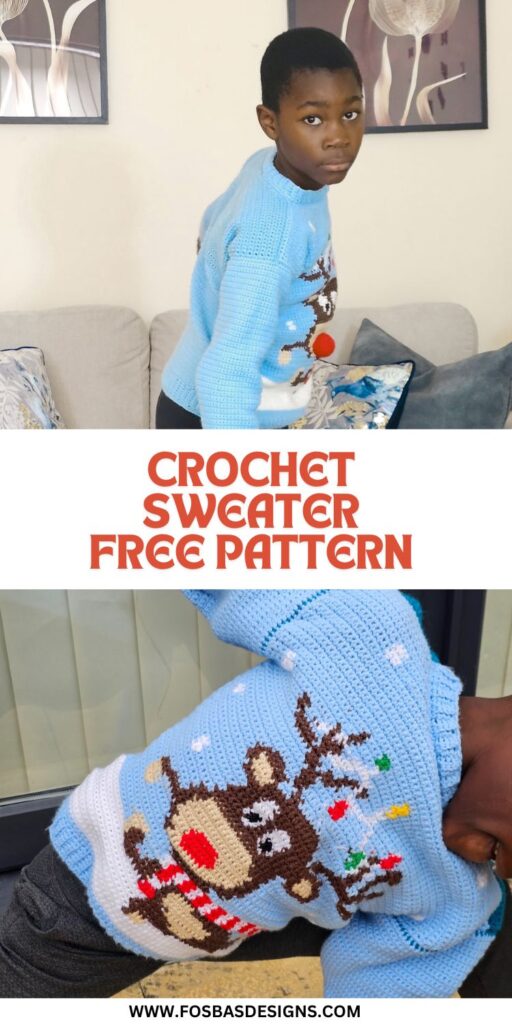
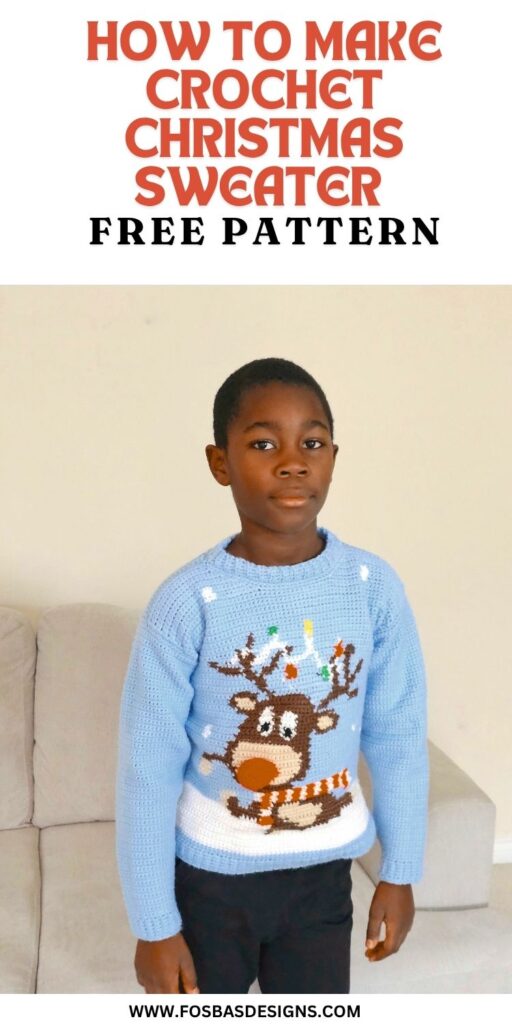
Crochet Kids Christmas Sweater Pattern
Nothing says festive quite like a handmade Christmas sweater! This Crochet Kids Christmas Sweater Pattern is designed to keep little ones warm and merry all season long. Featuring a cheerful reindeer on the front panel wrapped in twinkling lights, this design combines classic holiday charm with comfort and fun.

Whether you’re making it for a Christmas photo shoot, family gathering, or as a handmade gift, it’s a pattern that brings instant smiles and festive spirit. See the Adult version here.
Crocheting this sweater is easier than it looks — perfect for confident beginners or intermediate makers looking for a joyful seasonal project.
With simple stitches, clear color changes, and a fun graphic detail, this Christmas jumper will quickly become a family favorite.
Inspiration Behind the Pattern
Every Christmas season deserves a touch of handmade magic. This design was inspired by the nostalgia of classic holiday jumpers, the kind that spark laughter and warmth. The adult version can be seen here.
The reindeer centerpiece adds a playful twist that kids love, while the soft yarn makes it cozy and comfortable for all-day wear. It’s the perfect balance between festive and practical — ideal for layering or wearing on its own for Christmas morning excitement.
Yarn and Materials
Choose soft, washable yarns that are gentle on the skin — especially for kids. Acrylic yarns work beautifully for this project, offering warmth, durability, and easy care.
You’ll need several colors to bring your reindeer to life — typically light blue for the background, brown and cream for the reindeer, red for the nose and scarf, and pops of bright colors for the Christmas lights.
Yarn – Any Worsted-weight yarns in colors of your choice.
I used Vanna’s choice – you can have a look at the colors here.
Estimated Total Yardage
Color A – Navy Blue: 300 (400, 500, 600, 700, 800, 900, 1000, 1300) Yards
Color B – White:
100 (120, 150, 160, 180, 290, 220, 240, 260) Yards
Color C – Dark Brown
80 (90, 100, 110, 120, 130, 140, 150, 160) Yards
Color D – Light Brown
80 (90, 100, 110, 120, 130, 140, 150, 160) Yards
Green – 10 yards
Yellow – 5 yards
Red – 30 yards
Black – 5 yards
A simple crochet hook and a yarn needle for weaving in ends complete your tool list.
Pro Tips for the Best Christmas Sweater
Keep your color changes neat by carrying the unused yarn along the wrong side — it helps maintain clean transitions and prevents tangling.
If working on colorwork is new to you, consider using small bobbins for each color section. Always measure your gauge before starting; ensuring a consistent tension will make sure the sweater fits perfectly.
Finally, block your finished piece for a polished, professional look.
How to Personalize the Pattern
One of the joys of this crochet kids Christmas sweater is how customizable it is!
Change up the background color to match your child’s favorite — try red, green, or even snow-white.
Swap the reindeer for another holiday design like a snowman or Santa face.
You can also adjust sleeve lengths or add a ribbed collar for extra warmth.
Don’t forget to stitch the child’s name or the year inside the neckline for a keepsake touch.
Sizing and Fit
This pattern includes multiple sizing options, making it easy to create matching sweaters for siblings or cousins.
It’s designed with a comfortable fit — roomy enough for movement but not bulky.
The pattern works well for both boys and girls, and you can easily modify the sleeve or body length to suit individual measurements.

Use ocde “BABYREINDEER for a 40% discount. Valid for both Adult and Kid’s version until November 1st, 2025.


Finished Measurements
Size(s) and color codes – XS (S, M, L, XL, 2XL, 3XL, 4XL)
3-6 mths (12 – 18 mths, 1 – 2, 3 – 4, 5 – 6, 7 – 8, 9 – 10, 11 – 12)
Chest Measurement: 15 (17, 19, 21, 23, 25, 27, 28)”
Armhole Circumference: 6 (8, 8, 10, 10, 12, 12, 14)”
Length of sweater: 10 (12, 12, 12, 16, 16, 18, 18)”
The modeled garment is for 11 – 12, with about 1” of Positive Ease.
Crochet Pattern
Reindeer Sweater
Hook – 5 mm Crochet Hook
Gauge – 18 sts over 12 Rows = 4 x 4” made using the stitch pattern, before blocking.
Gauge pattern
Chain 21 and follow the pattern for 12 rows.
Pattern Notes
- Please kindly read through the pattern before starting.
- The stitch count is written after each row/round, with the smallest XS written first and the others in the ().
- Stitch count written in black is for all sizes, but at some points, the stitch counts are color-coded for clarity, i.e. XS (S, M, L, XL, 2XL, 3XL, 4XL, 5XL)
Difficulty Level – Intermediate
Terms – US Terminology
Stitches Abbreviations
Chain/chains – ch/chs
Chain space – ch sp
Stitch(es) – st(s)
Slip Stitch – sl st
Single Crochet – sc
Back Loop Only – BLO
Construction Notes
- This project is made in sections.
- The sweater is made in rows, with the front, back, and sleeves made separately. After which, these are joined together.
Get a copy of the pattern on either ETSY or Ravelry usign the images below. The PDF has speciallised chat for each size to make hte front panel super easy for you.
Use ocde “BABYREINDEER for a 40% discount. Valid for both Adult and Kid’s version until November 1st, 2025.
1 FREE DOWNLOAD PER MONTH
WITH JUST $3 PER MONTH!
- Pick your desired pattern each month.
- It can be a new or old pattern.

2 FREE DOWNLOADS PER MONTH
WITH JUST $5 PER MONTH!
- Pick your desired patterns each month.
- It can be a new or old pattern.
- You get 2 patterns per month.

3 FREE DOWNLOADS PER MONTH
WITH JUST $8 PER MONTH!
- Pick your desired patterns each month.
- You get 3 free patterns per month.
- It can be a new or old pattern.

Join my crochet channel for daily updates at your finger tips
Crochet Kids Christmas Sweater Pattern
Section 1: Back panel
Band
With Color A
Row 1: Chain 7, sc in 2nd ch from hook and in each ch across, turn. 6 sc
Row 2: Ch 1, sc in first st, sc in BLO across until the last st, sc in both loops, turn. 6 sc
Rows 3 – 30 (34, 38, 42, 48, 54, 60, 66): Repeat Row 2
Or until you have a length measuring half of your bust measurement.
Your piece should measure about 8 (9, 10, 11, 12, 13, 14, 15)”
Do not fasten off.
Edging
Row 1: Ch 1, sc in each st across the long side of the panel, turn. 30 (34, 38, 42, 48, 54, 60, 66) sc
Body of sweater: back panel
Row 2: Ch 1, sc in each st across the panel, turn. 30 (34, 38, 42, 48, 54, 60, 66): sc
Rows 3 – 40 (40, 50, 50, 60, 60, 67, 67): Repeat row 2. Continue until your piece measures 8 (10, 10, 10, 14, 14, 16, 16)”
Neckline
Do not fasten off
Right side
- Place the first stitch marker on the 10 (12, 14, 15, 18, 20, 22, 25) stitch
- Counting from the other end of the panel, place the second stitch marker on the 10 (12, 14, 15, 18, 20, 22, 25)
- The spaces between the stitch markers will be the neckline.
- Continue with Color A
Left side
- The spaces between the stitch markers will be the neckline.
- Continue with Color A
Row 1: Ch 1, sc in each st across until 1 st before the first stitch marker, sc2tog, turn. 9 (11, 13, 14, 17, 19, 21, 24) sc
Row 2: Ch 1, sc2tog, sc in remaining sts, turn. 8 (10, 12, 13, 16, 18, 20, 23) sc
Row 3: Ch 1, sc in each st until the last 2 sts, sc2tog, turn. 7 (9, 11, 12, 15, 17, 19, 22) sc
Rows 4 – 9: Repeat rows 2 – 3
For a deep neckline, you can add a few more rows.
Fasten off.
Left side
- Join yarn with a sl st to the edge of the main panel (left side)
- Note that the sts between the stitch markers will be left unworked.
- Repeat as with the right side.
Fasten off.
Section 2: Front panel
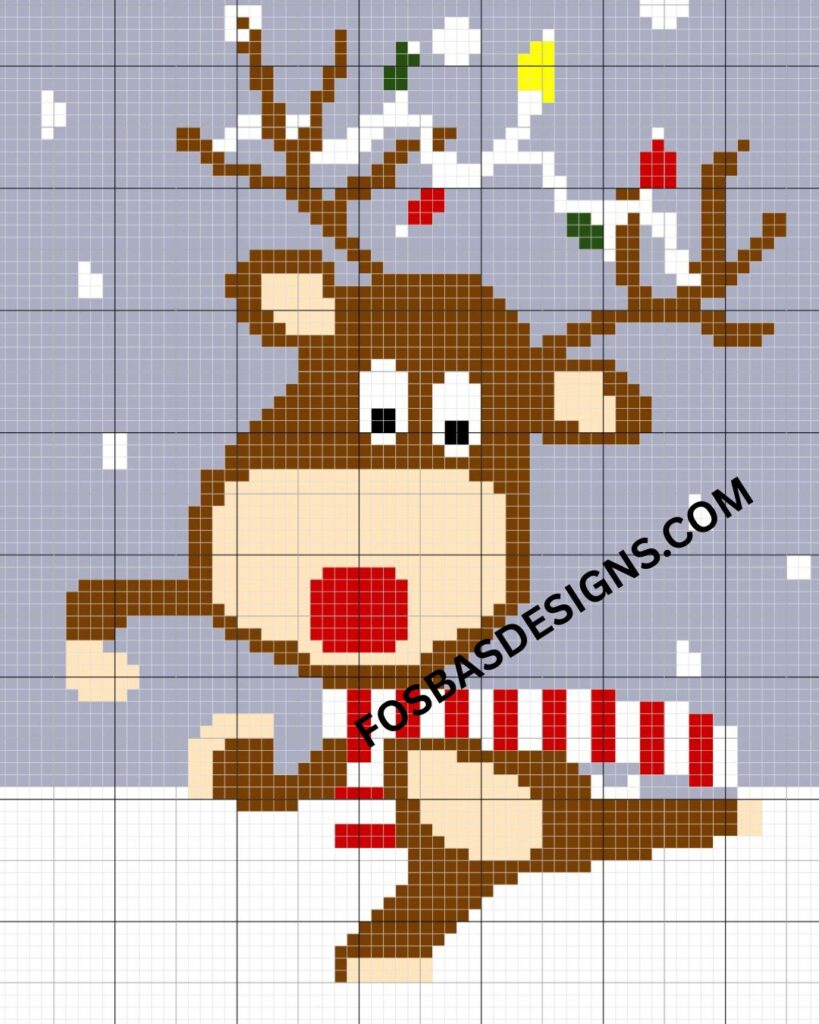
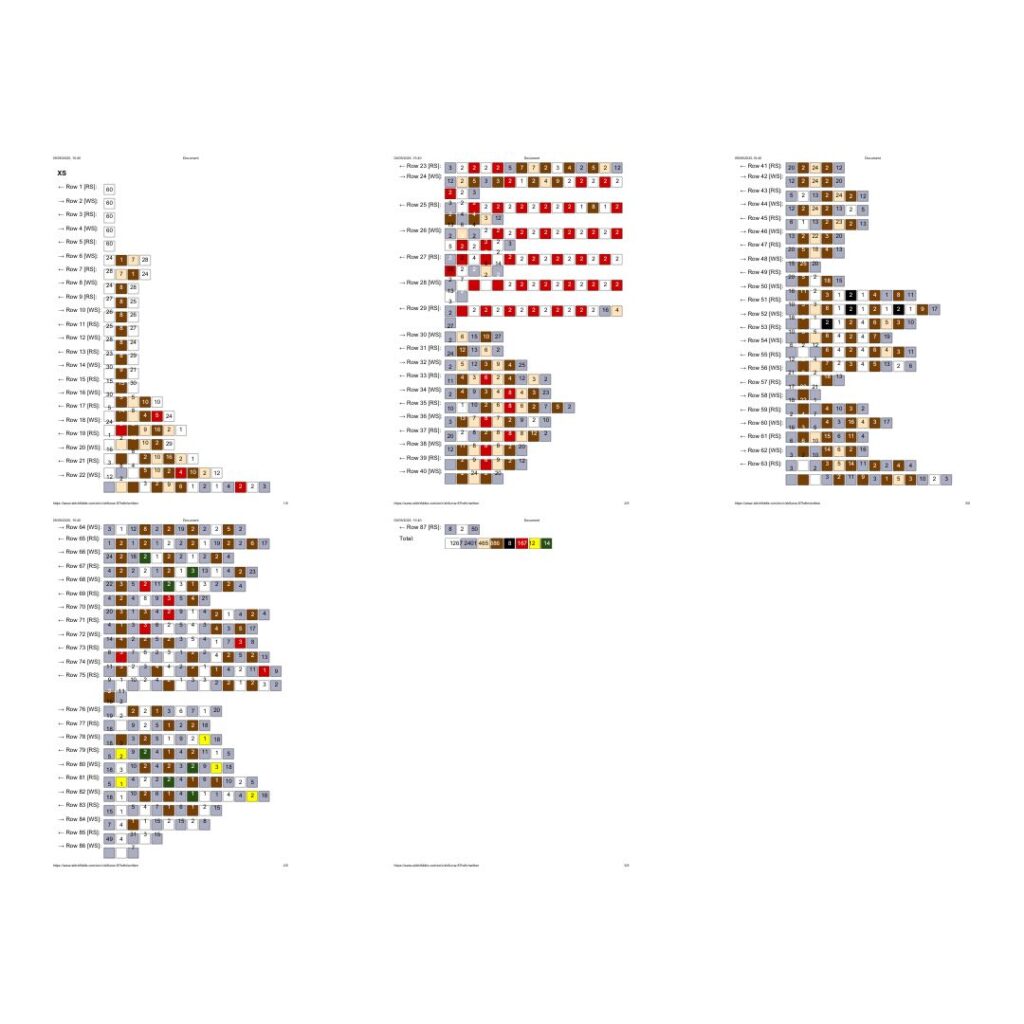
The charts are separate for each size.
- See the attached charts and graph.
- You can also use either or both to help with making the sweater.
With Color A
Row 1: Chain 7, sc in 2nd ch from hook and in each ch across, turn. 6 sc
Row 2: Ch 1, sc in first st, sc in BLO across until the last st, sc in both loops, turn. 6 sc
Rows 3 – 30 (34, 38, 42, 48, 54, 60, 66): Repeat Row 2
Or until you have a length measuring half of your bust measurement.
Your piece should measure about 8 (9, 10, 11, 12, 13, 14, 15)”
Do not fasten off.
Edging
Row 1: Ch 1, sc in each st across the long side of the panel, turn. 30 (34, 38, 42, 48, 54, 60, 66) sc
Body of sweater Front Panel
Follow the chart/graph instructions until you get to the neckline.
Sleeves
Make 2
With color A, Ch 7
Row 1: Sc in second ch from hook and each ch across, turn. 6 sc
Rows 2 – 24 (26, 26, 32, 32, 32, 34, 34): Ch 1, sc in both loop, sc (BLO) in each st until the last st, sc in both loop, turn.
Adjust the number of repeats for a perfect fit around your wrist.
Do not turn after the last row. Crocheting along the top of the ribbing to create the main body of the sleeves.
Row 1: Ch 1, sc in each st across, turn. 24 (26, 26, 32, 32, 32, 34, 34) sc
In both loops from here on
Row 2: Ch 1, sc in each st across, turn. 24 (26, 26, 32, 32, 32, 34, 34) sc
Row 3: Ch 1, 2 sc in first st, sc in each st until the last st, 2 sc in last st, turn. 26 (28, 28, 34, 34, 34, 36, 36, 36) sc
Row 4: Ch 1, sc in each st across, turn. 26 (28, 28, 34, 34, 34, 36, 36, 36) sc
Rows 5 – 10: Repeat Rows 3 & 4
Increase by 2 sts after every Row 3 /repeat. You will be finishing the last row with a total of 32 (34, 34, 38, 40, 40, 42, 42, 42) sc
Rows 11 – 23: Ch 1, sc in each st across, turn. 32 (34, 34, 38, 40, 40, 42, 42, 42) sc
Row 24: Ch 1, 2 sc in first st, sc in each st until the last st, 2 sc in last st, turn. 34 (36, 36, 42, 42, 42, 44, 44, 44) sc
Check the fit of your sleeve
- If still narrow, continue the repeats until you have a comfortable width.
Rows 25 – 34: Ch 1, sc in each st across, turn. 34 (36, 36, 42, 42, 42, 44, 44, 44) sc
Check the fit of your sleeve
- If still short, continue the repeats until you have a comfortable length.
- If you have added more increases above, reduce the number of repeats in order not to have too long sleeves.
Fasten off, leave a long tail for sewing.
Edging
- Crocheting around the whole piece.
- With the right side facing.
Round 1: Ch 1, sc in each st around, (sc, ch 1, sc) at each corner, join
Finishing and Joining
Shoulder seam(s)
Turn both panels made in section 1 to the wrong side.
- Place the front panel over the back panel, with the right side facing the other.
- Join yarn with a slip stitch to ch 1 sp at the corner of the edging.
- Crocheting from the edge towards the neckline, ch 1, sc over both panels.
- Fasten off and repeat on the other side.
Neckline Edging
Join yarn to any stitch around the neckline.
Crocheting around and the corresponding stitches on the back panel.
Round 1: Ch 1, sc in each st around, join with a sl st to the beginning chain.
Fasten off.
Neck band
Option 1
Row 1: Chain 5, sc in 2nd ch from hook and in each chain across, skip corresponding st on the sweater neckline, sl st into the next 2 sts on the neckline, turn. 4 sc
Note:
- You can go down a hook size for the ribbing.
- Skip 3 sts instead of 2 sts for a neater joining on the sweater.
Row 2: In BLO, sc in each st across, turn
Row 3: Ch 2, in BLO, sc in each st across, skip corresponding st on the sweater, sl st into the next 2 sts on the sweater, turn. 4 sc
Rows 4 – end: Repeat Rows 2 and 3 until you have crocheted into all the stitches on around the neckline of your sweater.
Crocheting across the band, just made, join yarn with a sl st to any of the sts on the edge.
Row 1: Ch 1, sc evenly across.
Fasten off.
Option 2: The band is made separately and then joined to the sweater
With Color A
Row 1: Chain 5, sc in 2nd ch from hook and in each ch across, turn. 4 sc
Row 2: Ch 1, sc in first st, sc in BLO across until the last st, sc in both loops, turn. 4 sc
Rows 3 – until you have a length long enough to go around the neckline: Repeat Row 2
Joining the band to the sweater
Place the band next to the front opening.
Using color A, sl st or sc to join the band to the sweater.
Joining the sleeves to the bodies
- Pick up your main panel.
- Fold the main panel into two (as if you are putting it on).
- The folded edge of the sleeves should align with the folded edge of the main panel.
- Open the main panel with the wrong side up. Make sure the sleeve is wrong side up. Attach with a stitch marker the outer edges of the sleeve to the main panel.
- Count an equal number of stitches on the sleeve and main panel.
- Sew the edge of the sleeve to the main panel.
Sleeve Seam(s)
- With the wrong side facing you, sew the sides of the sleeves together, starting from the sleeve cuffs towards the armpit. Then, continue the instructions for the side seam as written below.
Side seam(s)
- With the wrong side facing you, sew the sides of the front and back panels together.
- Fasten off.
- Repeat on the other side.
Reindeer Nose (optional)
With Red
Round 1: in a Magic ring, chain 1, 6 sc, join with a sl st to the beginning chain. 6 sc
Round 2: Ch 1, 2 sc in each st around, join with a sl st to the beginning chain. 12 sc
Rounds 3 – 7: Ch 1, sc in each st around, join with a sl st to the beginning chain. 12 sc
- Leave a long tail of yarn for sewing, cut yarn.
- With the right side of the sweater’s front panel facing you.
- Place the nose on the red part of the Reindeer’s face.
- You can secure with stitch markers and adjust the placements until you are happy.
- Using a darning needle and mattress stitch, sew the nose to the sweater.
- Fasten off.
Weave in all ends.
Block to measurement.
FAQs
Can I use cotton yarn instead of acrylic?
You can, but acrylic yarn tends to hold its shape better and provides more warmth for winter wear.
How long does it take to complete the sweater?
Depending on your crochet speed, expect about 2–3 evenings for smaller sizes and up to a week for larger ones.
Can I make this in adult sizes?
Yes! With a few adjustments in stitch count and measurements, this pattern can be easily adapted for grown-ups too.
Conclusion
This Crochet Kids Christmas Sweater Pattern is more than just a cozy garment — it’s a handmade holiday memory. From the playful reindeer to the bright pops of color, each stitch captures the joy and excitement of Christmas. Whether gifted, worn, or cherished as a keepsake, this festive crochet project is sure to spread cheer for many holidays to come.