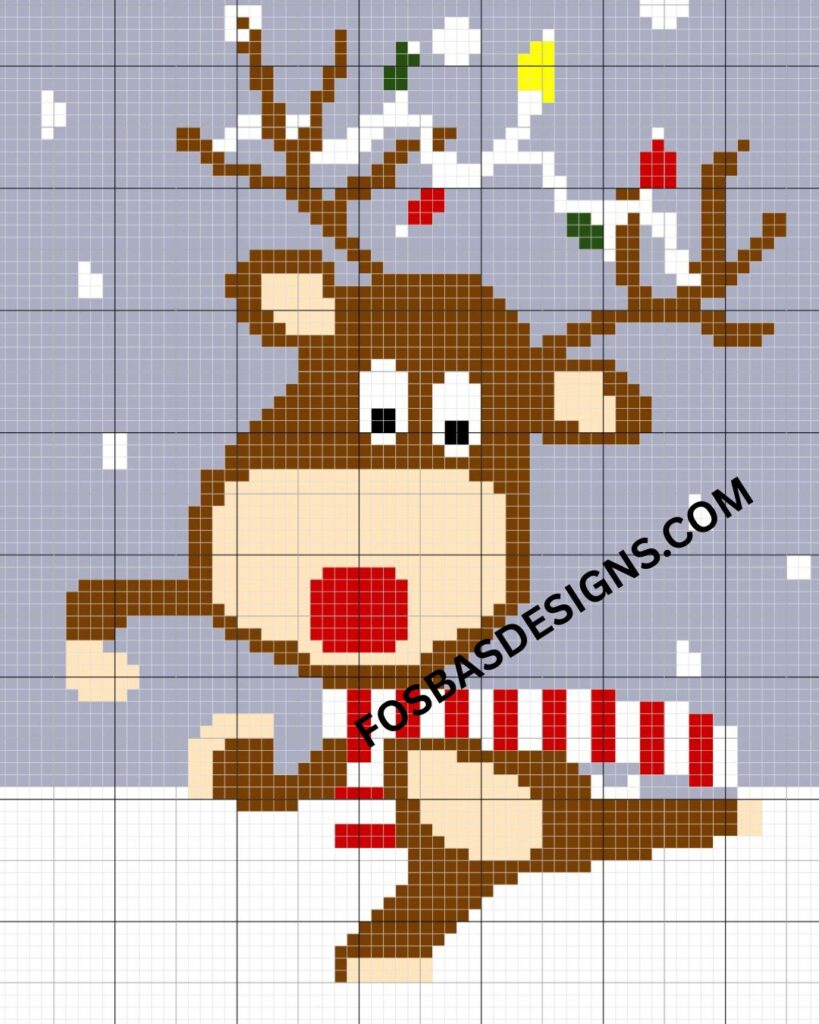
Crochet Christmas Sweater Pattern
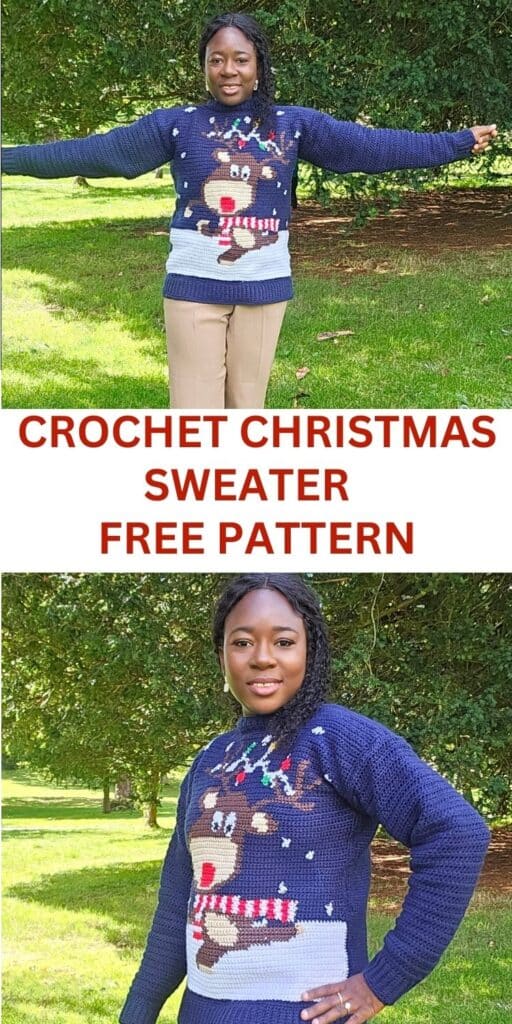
The holiday season is the perfect time to show off festive handmade pieces, and what better way to do so than with a crochet Christmas sweater? This cheerful design is cozy, fun, and full of seasonal charm.

Whether you’re wearing it for family gatherings, holiday parties, or Christmas morning photos, this crochet sweater is bound to bring smiles and plenty of compliments.
Crochet Reindeer crochet sweater pattern details
The pattern is available for free. Scroll down for the instructions. You can grab a copy using either of the following links.
Ravelry or on Etsy. Use code “Reindeer” for a 40% discount at checkout.

Why You’ll Love This Crochet Christmas Sweater Pattern
Crocheting a Christmas sweater is more than just making a garment—it’s about creating a keepsake.
Handmade sweaters carry sentimental value, and this one will quickly become a favorite year after year. It’s festive, practical, and customizable.
You can adjust the length, fit, or even change the colors of the reindeer scarf and details to suit your own style.
Plus, there’s nothing like the pride of saying, “I made this!” when people admire your sweater.
Materials needed for this Crochet Christmas Sweater Pattern
Yarn – Any Worsted weight yarns in colors of your choice.
I used Vanna’s choice – you can have a look at the colors here.
Estimated Total Yardage
Color A – Navy Blue: 1100 (1200, 1300, 1400, 1500, 1600, 1700, 1800, 1900) Yards
Color B – White:
100 (120, 140, 160, 180, 200, 220, 240, 260) Yards
Color C – dark Brown
80 (90, 100, 110, 120, 130, 140, 150, 160) Yards
Color D – Light Brown
80 (90, 100, 110, 120, 130, 140, 150, 160) Yards
Green -10 yards
Yellow – 5 yards
Red – 30 yards
Black – 5 yards
Hook – 5 mm Crochet Hook
Gauge – 18 sts over 12 Rows = 4 x 4” made using the stitch pattern, before blocking.
Gauge pattern
Chain 21 and follow the pattern for 12 rows.
Pattern Notes
- Please kindly read through the pattern before starting.
- The stitch count is written after each row/round, with the smallest XS written first and the others in the ().
- Stitch count written in black is for all sizes, but at some points, the stitch counts are color-coded for clarity, i.e. XS (S, M, L, XL, 2XL, 3XL, 4XL, 5XL)
Difficulty Level – Intermediate
Terms – US Terminology
Stitches Abbreviations
Chain/chains – ch/chs
Chain space – ch sp
Stitch(es) – st(s)
Slip Stitch – sl st
Single Crochet – sc
Back Loop Only – BLO
Sizing and fitting
Finished Measurements
Size(s) and color codes – XS (S, M, L, XL, 2XL, 3XL, 4XL, 5XL)
Bust Measurement: 30 (34, 38, 42, 46, 50, 54, 58, 62)”
Armhole Circumference: 14 (14, 16, 16, 16, 16, 18, 18, 18)”
Length of sweater: 22”
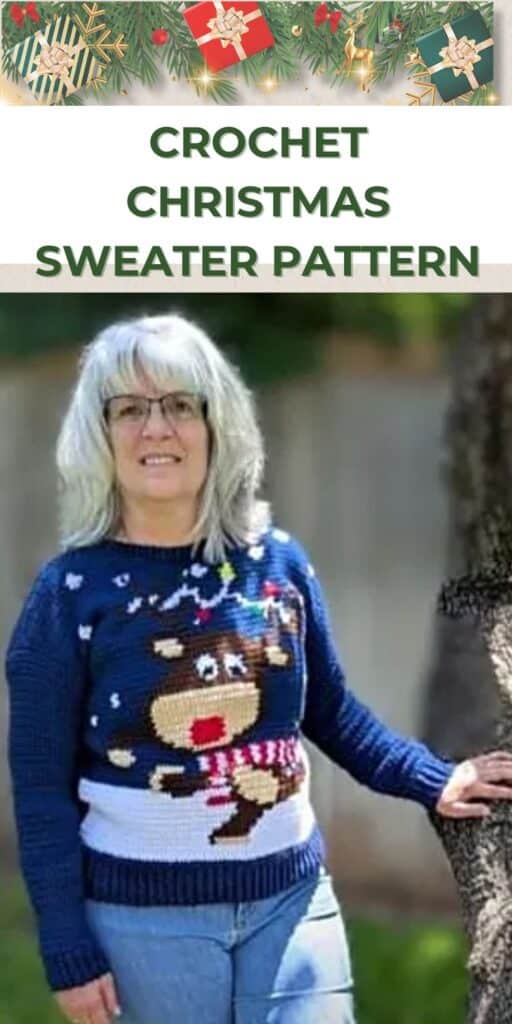
The modeled garment is shown in M, with about 1” of Positive Ease.
Construction Notes
- This project is made in sections.
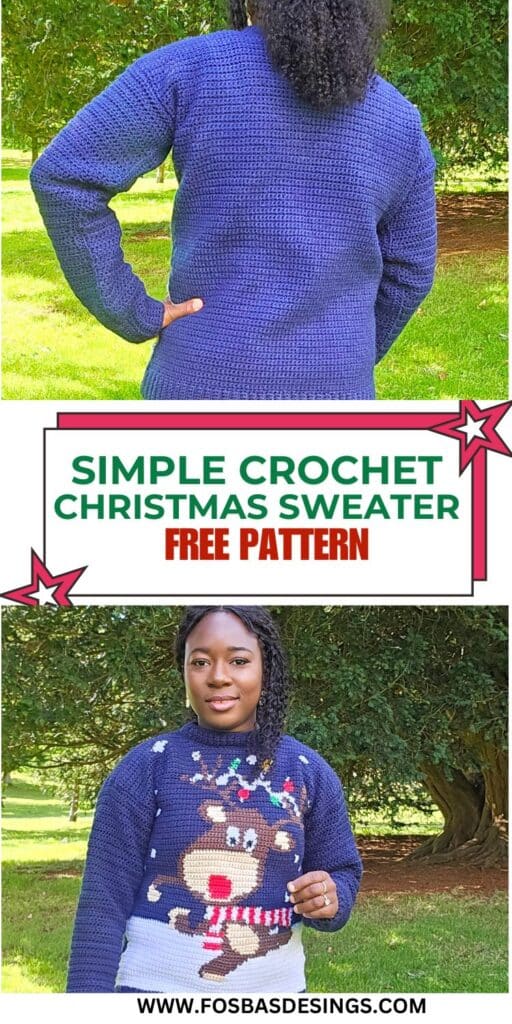
- The sweater is made in rows, with the front, back, and sleeves made separately. After which, these are joined together.


1 FREE DOWNLOAD PER MONTH
WITH JUST $3 PER MONTH!
- Pick your desired pattern each month.
- It can be a new or old pattern.

2 FREE DOWNLOADS PER MONTH
WITH JUST $5 PER MONTH!
- Pick your desired patterns each month.
- It can be a new or old pattern.
- You get 2 patterns per month.

3 FREE DOWNLOADS PER MONTH
WITH JUST $8 PER MONTH!
- Pick your desired patterns each month.
- You get 3 free patterns per month.
- It can be a new or old pattern.

Join my crochet channel for daily updates at your finger tips
How to Crochet A Christmas Sweater Pattern
Section 1
Back panel
Band
With Color A
Row 1: Chain 11, sc in 2nd ch from hook and in each ch across, turn. 10 sc
Row 2: Ch 1, sc in first st, sc in BLO across until the last st, sc in both loops, turn. 10 sc
Rows 3 – 60 (68, 76, 84, 92, 100, 108, 116, 124): Repeat Row 2
Or until you have a length measuring half of your bust measurement.
Your piece should measure about 16 (17, 19, 21, 23, 25, 27, 29, 31)”
Do not fasten off.
Edging
Row 1: Ch 1, sc in each st across the long side of the panel, turn. 60 (68, 76, 84, 92, 100, 108, 116, 124) sc
Body of sweater: back panel
Row 2: Ch 1, sc in each st across the panel, turn. 60 (68, 76, 84, 92, 100, 108, 116, 124) sc
Rows 3 – 87: Repeat row 2.
Neckline
Do not fasten off
Right side
- Place the first stitch marker on the 20 (28, 32, 35, 38, 42, 44, 48, 50) stitch
- Counting from the other end of the panel, place the second stitch marker on the 20 (28, 32, 35, 38, 42, 44, 48, 50)
- The spaces between the stitch markers will be the neckline.
- Continue with Color A
Left side
Join yarn with a sl st to the edge of the main panel (left side)
Repeat as with the right side.
Fasten off.
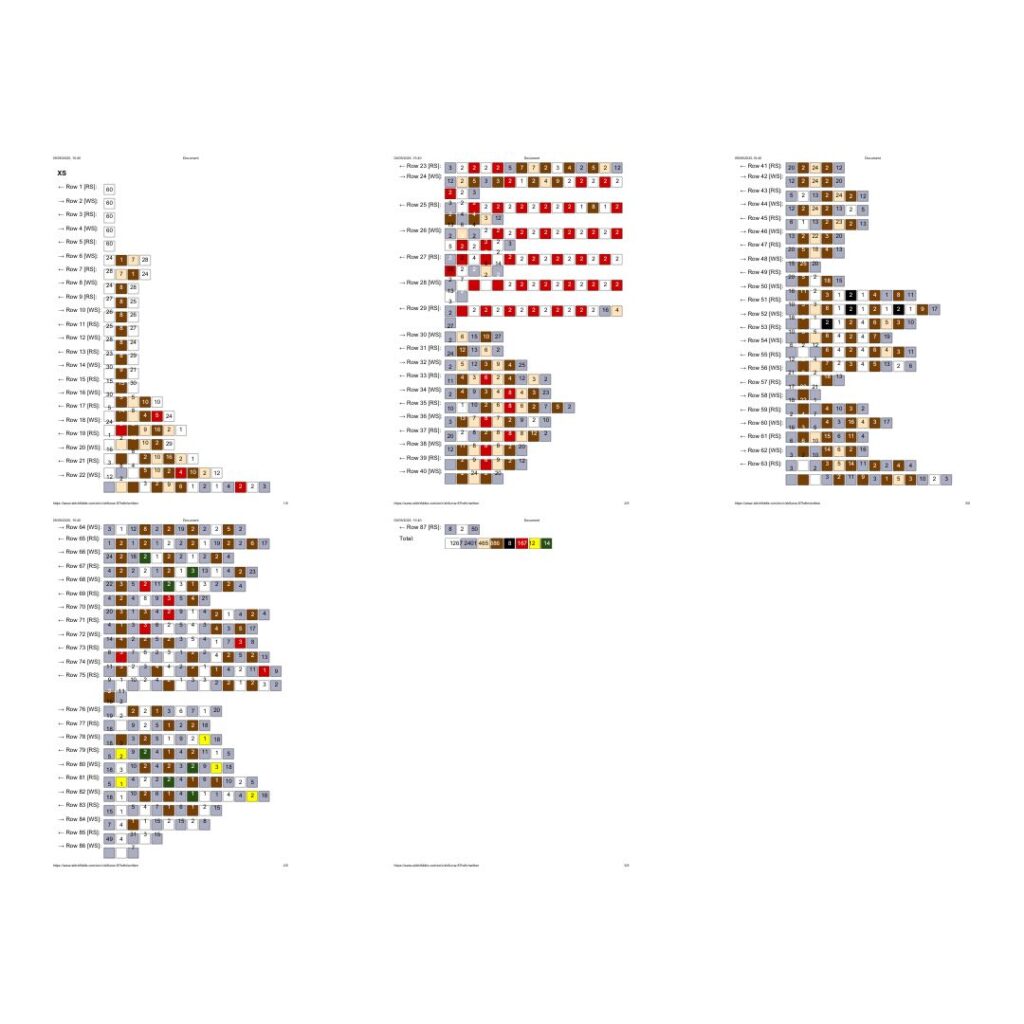
The charts are separate for each size. I will forward a copy to your email to make it easier. You can also use the second chart with the number of sts to make in each color.
Section 2
Front panel
Band
With Color A
Row 1: Chain 11, sc in 2nd ch from hook and in each ch across, turn. 10 sc
Row 2: Ch 1, sc in first st, sc in BLO across until the last st, sc in both loops, turn. 10 sc
Rows 3 – 60 (68, 76, 84, 92, 100, 108, 116, 124): Repeat Row 2
Make sure to have a similar number of rows as with the back panel
Your piece should measure about 16 (17, 19, 21, 23, 25, 27, 29, 31)”
Do not fasten off.
Edging
Row 1: Ch 1, sc in each st across the long side of the panel, turn. 60 (68, 76, 84, 92, 100, 108, 116, 124) sc
Fasten off color A and join color B
Body of sweater – refer to the chart and graph for the size you are making.
For each of the sizes – XS (S, M, L, XL, 2XL, 3XL, 4XL, 5XL), you get a specialized chart and graph. You can decide to follow each or both.
Get a printable copy here on Ravelry or on Etsy
Front panel
Rows 2 – 5: With color B, ch 1, sc in each st across the panel, turn. 60 (68, 76, 84, 92, 100, 108, 116, 124) sc
Reindeer section
Use the graph and chart for the size you are making.
Continue with the chart or block instruction for your size.
Neckline
Do not fasten off
Right side
- Place the first stitch marker on the 20 (28, 32, 35, 38, 42, 44, 48, 50) stitch
- Counting from the other end of the panel, place the second stitch marker on the 20 (28, 32, 35, 38, 42, 44, 48, 50)
- The spaces between the stitch markers will be the neckline.
- Continue with Color A
Continue with A
Row 1: Ch 1, sc in each st across until 1 st before the first stitch marker, sc2tog, turn. 19 (27, 31, 34, 37, 41, 43, 47, 49) sc
Row 2: With A, ch 1, sc2tog, sc in next 7 (10, 12, 14, 15, 17, 18, 20, 22) sts, W(2), A 9 (13, 15, 16, 18, 20, 21, 23, 23), turn.
Row 3: Ch 1, A 8 (12, 14, 15, 17, 19, 20, 22, 22), W(4), A 5 (8, 10, 12, 13, 15, 16, 18, 20), sc2tog, turn.
Row 4: Ch 1, sc2tog, A 4 (7, 9, 11, 12, 14, 15, 17, 19), W(4), A 8 (12, 14, 15, 17, 19, 20, 22, 22), turn.
Row 5: Ch 1, A 7 (11, 13, 14, 16, 18, 19, 21 21), W(2), A 4 (7, 9, 11, 12, 14, 15, 17, 19), sc2tog, turn.
Fasten off color W, continue with A
Row 6: Ch 1, sc2tog, sc in remaining sts, turn.
Row 7: Ch 1, sc in each st until the last 2 sts, sc2tog, turn.
Rows 8 – 9: Repeat Row 6 – 7
Fasten off.
Left side
- With right side facing, join yarn with a sl st to the edge of the main panel (left side)
- Note that the sts between the stitch markers will be left unworked.
- Repeat as with the right side.
Edging
- Crocheting around the whole piece.
- With the right side facing.
- I used both Color A and B for the front panel edging. Switch to color B at the lower end where I had mostly used color B.
Round 1: Ch 1, sc in each st around, (sc, ch 1, sc) at each corner, join
Fasten off.
Sleeves
Make 2
With color A, Ch 10
Row 1: Sc in second ch from hook and each ch across, turn. 9 sc
Rows 2 – 24 (26, 26, 32, 32, 32, 34,34, 34): Ch 1, sc in both loops, sc (BLO) in each st until the last st, sc in both loops, turn.
Adjust the number of repeats for a perfect fit around your wrist.
Do not turn after the last row. Crocheting along the top of the ribbing to create the main body of the sleeves.
Row 1: Ch 1, sc in each st across, turn. 24 (26, 26, 32, 32, 32, 34,34, 34) sc
Row 2: Ch 1, sc in each st across, turn. 24 (26, 26, 32, 32, 32, 34,34, 34) sc
Row 3: Ch 1, 2 sc in first st, sc in each st until the last st, 2 sc in last st, turn. 26 (28, 28, 34, 34, 34, 36, 36, 36) sc
Row 4: Ch 1, sc in each st across, turn. 26 (28, 28, 34, 34, 34, 36, 36, 36) sc
Rows 5 – 10: Repeat Rows 3 & 4
Increase by 2 sts after every Row 3 repeat. You will be finishing the last row with a total of 32 (34, 34, 38, 40, 40, 42, 42, 42) sc
Rows 11 – 23: Ch 1, sc in each st across, turn. 32 (34, 34, 38, 40, 40, 42, 42, 42) sc
Row 24: Ch 1, 2 sc in first st, sc in each st until the last st, 2 sc in last st, turn. 34 (36, 36, 42, 42, 42, 44, 44, 44) sc
Check the fit of your sleeve
- If still narrow, continue the repeats until you have a comfortable width.
Rows 25 – 48: Ch 1, sc in each st across, turn. 34 (36, 36, 42, 42, 42, 44, 44, 44) sc
Check the fit of your sleeve
- If still short, continue the repeats until you have a comfortable length.
- If you have added more increases above, reduce the number of repeats in order not to have too long sleeves.
Fasten off, leave a long tail for sewing.
Edging
- Crocheting around the whole piece.
- With the right side facing.
Round 1: Ch 1, sc in each st around, (sc, ch 1, sc) at each corner, join
Finishing and Joining
Shoulder seam(s)
Turn both panels made in section 1 to the wrong side.
- Place the front panel over the back panel, with the right side facing the other.
- Join yarn with a slip stitch to ch 1 sp at the corner of the edging.
- Crocheting from the edge towards the neckline, ch 1, sc over both panels.
- Fasten off and repeat on the other side.
Neckline Edging
Join yarn to any stitch around the neckline.
Crocheting around and the corresponding stitches on the back panel.
Round 1: Ch 1, sc in each st around, join with a sl st to the beginning chain.
Fasten off.
Neck band
Option 1
Row 1: Chain 5, sc in 2nd ch from hook and in each chain across, skip corresponding st on the sweater neckline, sl st into the next 2 sts on the neckline, turn. 4 sc
Note:
- You can go down a hook size for the ribbing.
- Skip 3 sts instead of 2 sts for a neater joining on the sweater.
Row 2: In BLO, sc in each st across, turn
Row 3: Ch 1, in BLO, sc in each st across, skip corresponding st on the sweater, sl st into the next 2 sts on the sweater, turn. 4 sc
Rows 4 – end: Repeat Rows 2 and 3 until you have crocheted into all the stitches on around the neckline of your sweater.
Crocheting across the band just made, join yarn with a sl st to any of the sts on the edge.
Round 1: Ch 1, sc evenly around the edges join with a sl st to the first ch.
Fasten off.
Option 2: The band is made separately and then joined to the sweater
With Color A
Row 1: Chain 5, sc in 2nd ch from hook and in each ch across, turn. 4 sc
Row 2: Ch 1, sc in first st, sc in BLO across until the last st, sc in both loops, turn. 4 sc
Rows 3 – until you have a length long enough to go around the neckline: Repeat Row 2
Joining the band to the sweater
Place the band next to the front opening.
Using color A, sl st or sc to join the band to the sweater.
Joining the sleeves to the bodies
- Pick up your main panel.
- Fold the main panel into two (as if you are putting it on).
- The folded edge of the sleeves should align with the folded edge of the main panel.
- Open the main panel with the wrong side up. Make sure the sleeve is wrong side up. Attach with stitch marker the outer edges of sleeve to the main panel.
- Count equal number of stitches on the sleeve and main panel.
- Sew the edge of the sleeve to the main panel.
Sleeve Seam(s)
- With the wrong side facing you, sew the sides of the sleeves together, starting from the sleeve cuffs towards the armpit. Then, continue the instructions for the side seam as written below.
Side seam(s)
- With the wrong side facing you, sew the sides of the front and back panels together.
- Fasten off.
- Repeat on the other side.
Weave in all ends.
Block to measurement.
Pro Tips for Success
Take your time with the color changes to keep your stitches neat and your design crisp.
Carrying yarn neatly at the back of your work helps prevent bulk and ensures a smooth finish.
Make sure to check your gauge before starting to achieve the right fit.
Blocking your finished sweater will also give it a polished look and help the colorwork stand out.
How to Style Your Crochet Christmas Sweater
Pair your handmade Christmas sweater with jeans, leggings, or even dressy trousers for a holiday-ready outfit.
You can wear it layered over a collared shirt for a classic look or with cozy joggers for lounging at home.
This versatile design works for casual parties, family gatherings, or even as your go-to “ugly sweater” with a stylish handmade twist.
FAQ’s about Crochet Christmas Sweaters
Can beginners make this pattern? Yes, adventurous beginners who are comfortable with basic stitches can take on this project. The colorwork might be new, but it’s explained clearly.
What sizes are included? The pattern comes in multiple sizes so you can make it for yourself or as a gift for loved ones.
Can I customize the design? Absolutely! You can change the sweater background color or switch up the scarf and reindeer details for a personal touch.
What yarn works best? A soft, medium-weight acrylic yarn is ideal because it’s comfortable and washable.
Conclusion
This crochet Christmas sweater pattern is the ultimate holiday project for those who love handmade fashion and festive fun. It’s warm, whimsical, and a true conversation starter. Whether you’re making it for yourself, a family member, or as a holiday gift, this sweater is sure to spread joy and showcase your crochet skills.
Pick up your yarn, grab your hooks, and get ready to create a Christmas sweater that will be treasured for years to come.