How to Add a Hood to a Crochet Blanket: Step-by-Step Guide
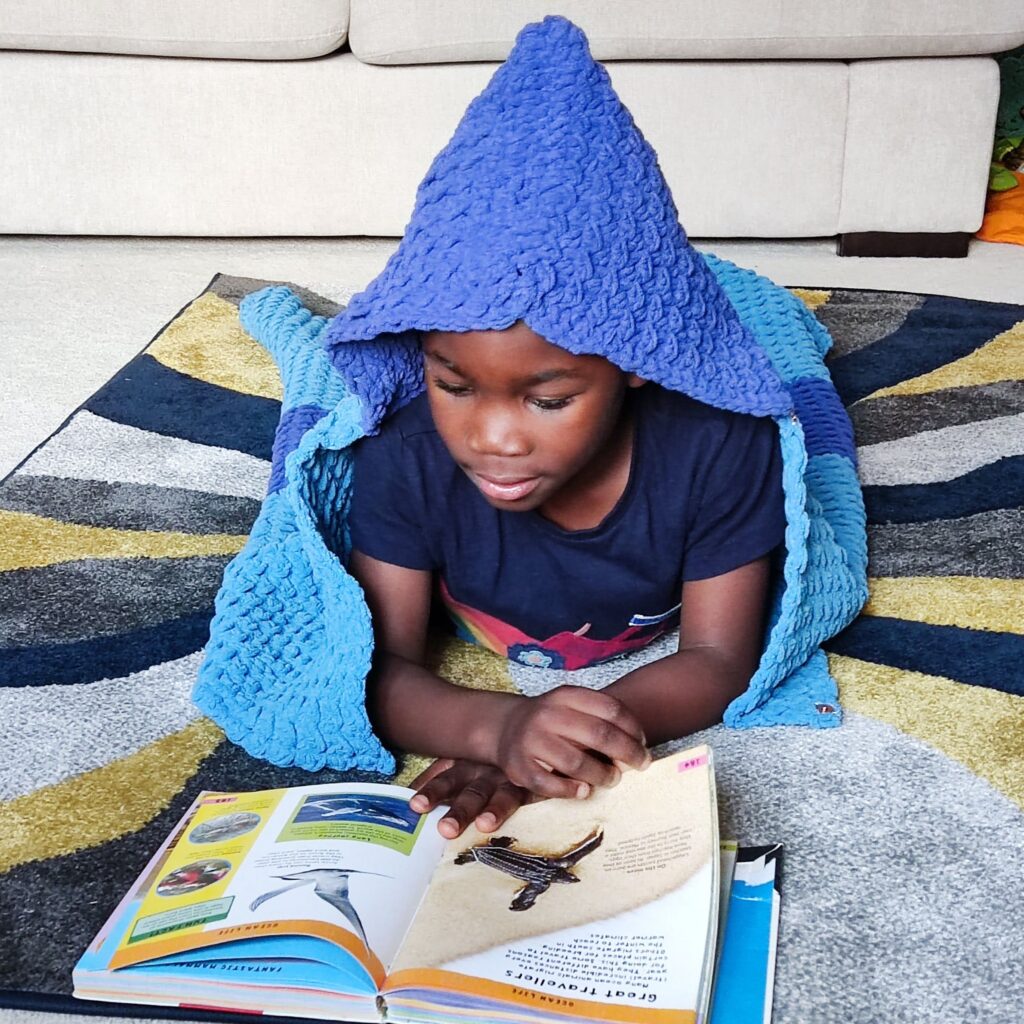
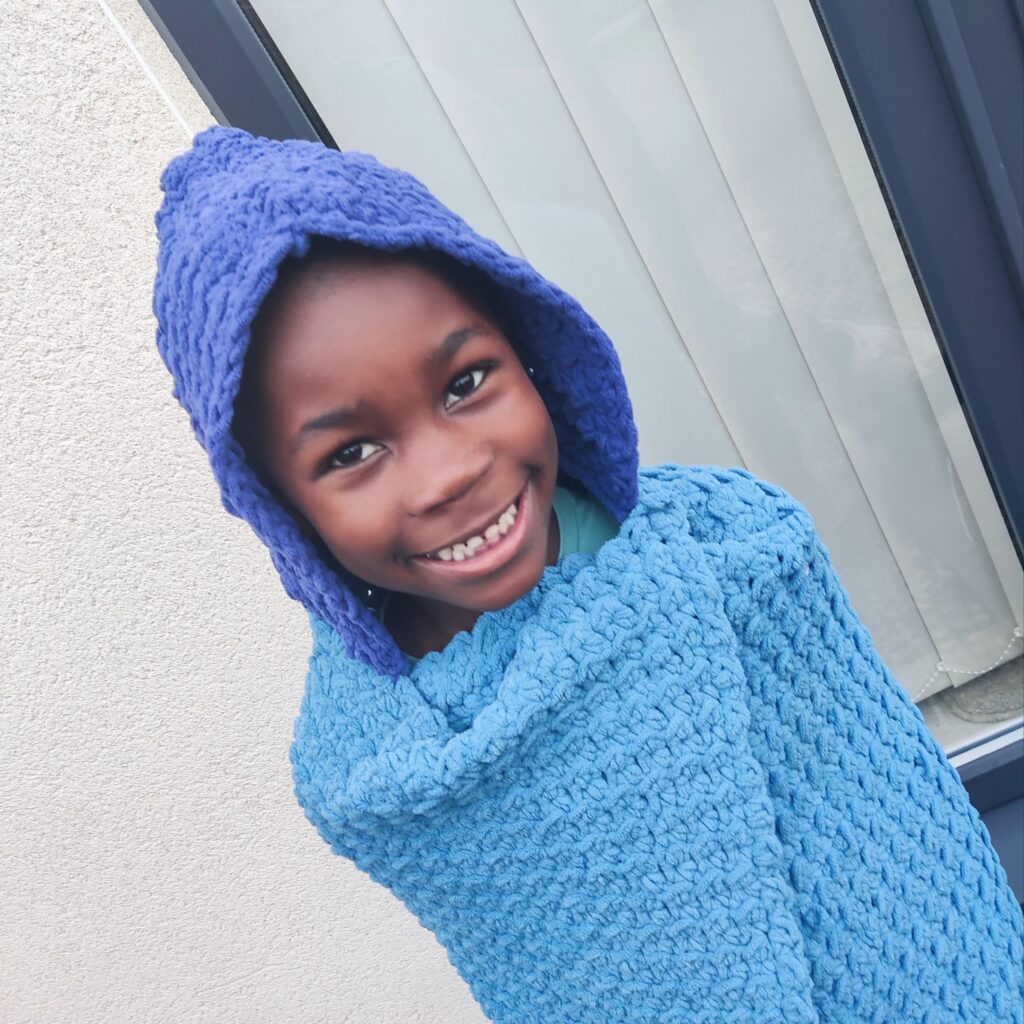
Have you ever seen those beautiful, hooded blankets and wondered if you could replicate such with your crochet? This post is going to show you the pro tips on how to add a hood to a crochet blanket. While making this hooded blanket for my son, I decided to make a post detailing my go-to tips for you!
Adding a hood to a blanket – This can be made from scratch, or you could attach a hood to any of your already crochet blankets.
Lacy crochet blankets and beginner crochet blankets are some of the other crochet blankets on the blog. You can work an extension of the hood and attach it to these blankets.
Currently, crochet hooded blankets are on the trend for both adults and kids. I recently made a hooded crochet blanket for my son, and he loves it. Each day he uses his hooded blanket, I feel like making myself one!
Pin this post for later
How to add a hood to a crochet blanket
Choosing the Right Materials
Yarn Types
When adding a hood to your crochet blanket, picking the correct yarn is essential. Different types of yarn provide different textures and qualities. Here are a few popular yarn types and their attributes:
- Acrylic: Acrylic yarn is affordable and easy to care for, making it a popular choice for crochet projects. It’s lightweight, hypoallergenic, and available in various colors. The acrylic yarn creates a soft, warm fabric perfect for those cozy moments. However, it may pill over time and doesn’t breathe as well as natural fibers.
- Cotton: Cotton yarn offers a soft and smooth texture, making it suitable for those with sensitive skin. It’s absorbent, breathable, and perfect for year-round wear. However, cotton lacks elasticity, which may cause the hood to lose shape over time.
- Blends: These can be a combination of two or more fibers. Cotton and Acrylic, Cotton and polyester. The combination gives a broader option.
Choose a yarn type that best suits your preferences and the intended purpose of your crochet blanket with a hood.
Crochet Hook Size
The size of the crochet hook is crucial when working on a hood for your blanket. Your hook size should match the recommended size for the type of yarn you’re using. A suitable match between yarn and hook size results in a well-structured and even fabric.
Moreover, consider your personal crochet tension. If you tend to crochet tightly, choose a slightly larger hook size to maintain the correct gauge. If you crochet loosely, opt for a smaller hook size.
Basic Crochet Techniques
Basic crochet stitches and their combinations are what make each hooded crochet blanket a masterpiece.
Stitch Types and Techniques
There are many different stitch types that can be used for a crochet hooded blanket, such as single crochet (sc), double crochet (dc), and half-double crochet (hdc). The best part is combining these crochet stitches for a beautiful texture!
Using Stitch Markers
When adding a hood to your crochet blanket, it’s crucial to use stitch markers to secure the hood to the blanket before sewing and also to keep track of important locations in your pattern. Stitch markers can help you:
- Identify the beginning of a round or row, which is especially helpful when working in the round
- Mark where to attach the hood to the blanket
- Keep track of pattern repeats as you work
- Secure the hood to the blanket
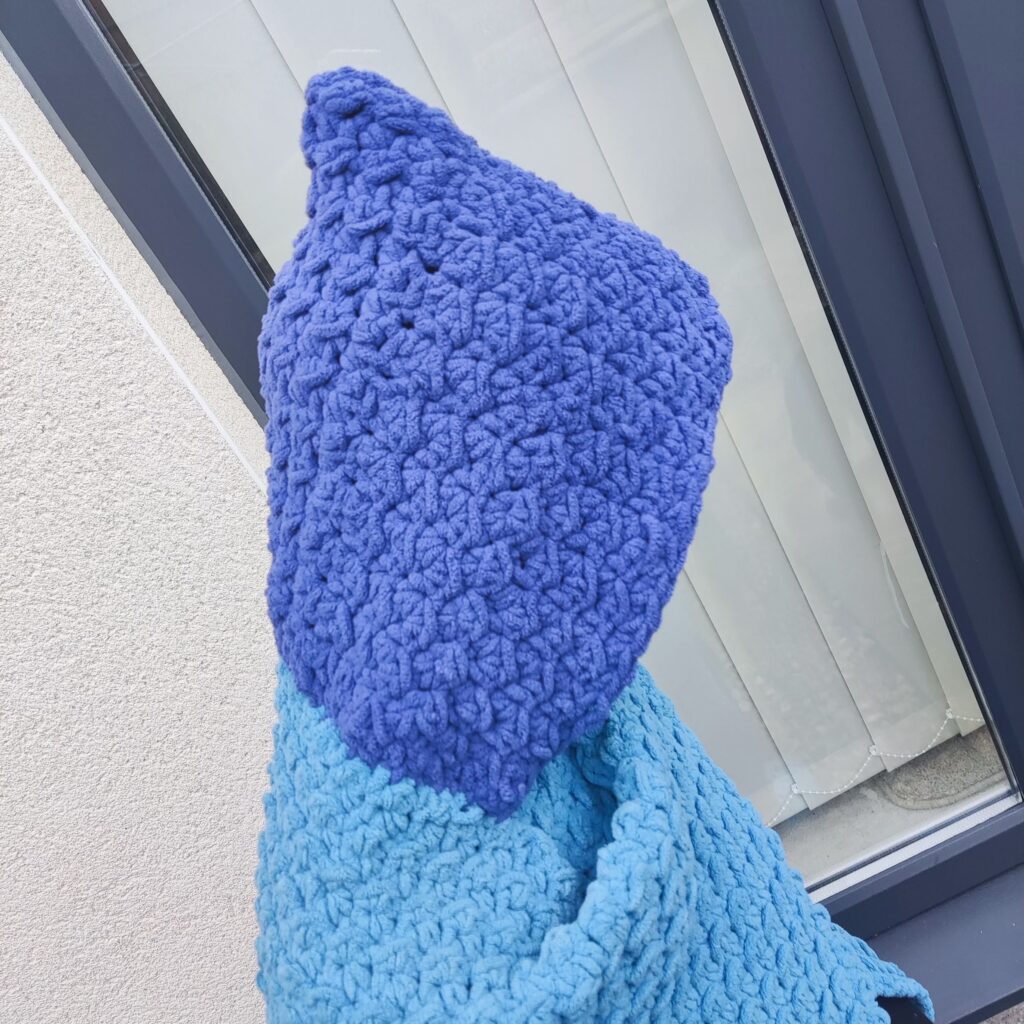
Creating the Hood
Sizing and Shape
To create a crochet hood for your blanket, start by determining the required size and shape. Measure the width of your head, then add a few inches for ease and comfort. Next, decide on the height of the hood. Keep in mind that the hood should cover your head comfortably without being too tight or too loose.
Once you have the measurements, create a rectangle using your preferred crochet stitches. Make sure the rectangle’s width is the same as the measurement you took earlier, and its height reaches the top of your head. For a more detailed shape, consider tapering the sides of the hood towards the top to provide a more fitted look.
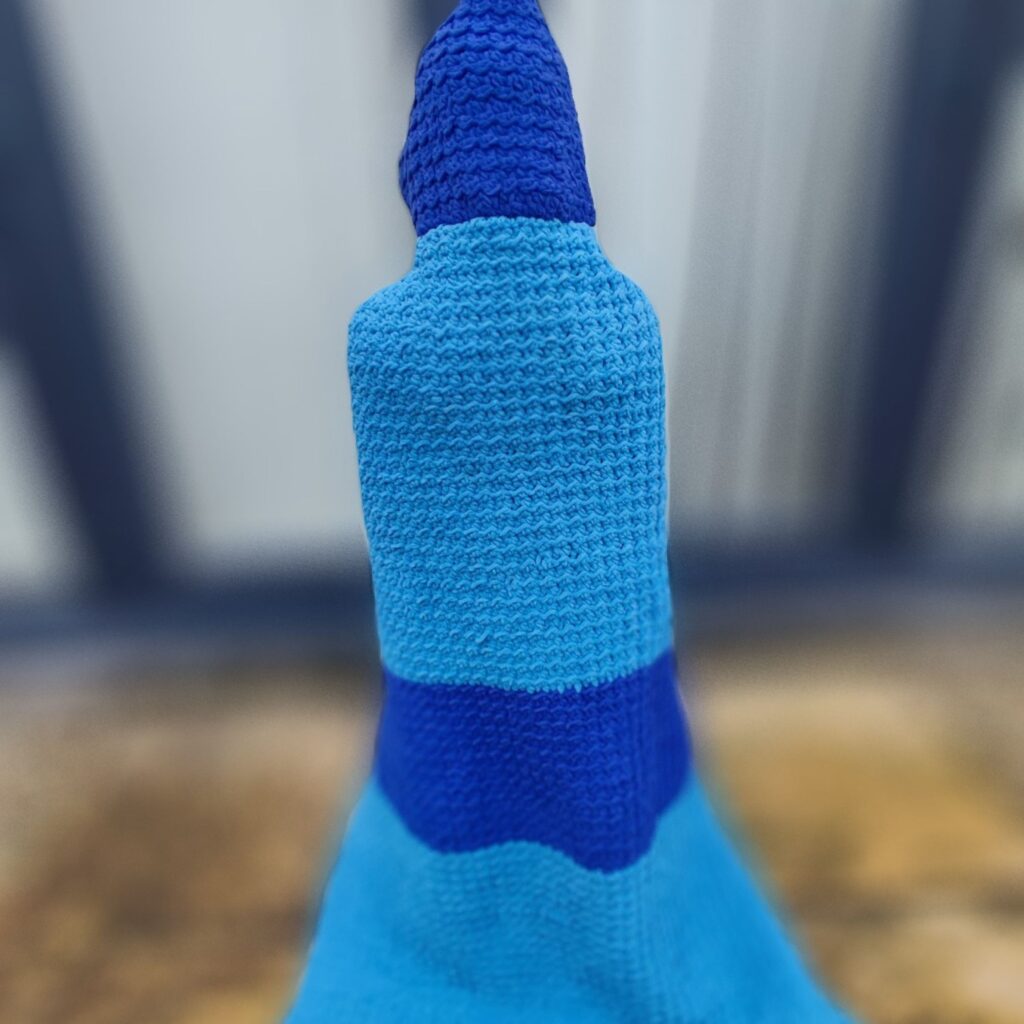
Seaming and Attaching to Blanket
When your hood’s crochet rectangle is complete, it’s time to seam the top edges to form the hood’s shape. Fold the rectangle in half with the right sides facing each other, and sew along the top edge using a yarn needle and a matching yarn. Make sure the stitches are secure and even.
After seaming the top, it’s time to attach the hood to your blanket. Locate the desired corner of the blanket where you want to attach the hood. Ensure that the rows of the hood and blanket match up properly while placing the hood.
Start by attaching yarn to the edge of the hood and work a single crochet (sc) through both the hood and blanket edges. Continue working sc stitches along the hood’s edge, securing it to the blanket. When you reach the end, you can either tie off the yarn or continue with an edging, if preferred.
Adding Unique Features
Edging and Borders
To make your crochet blanket with a hood stand out, consider adding some unique edging or borders. Various stitch combinations and patterns can help create a visually appealing and texturally satisfying blanket. You could use picot stitches for delicate detailing, shell borders for a more decorative finish, or even try incorporating corner-to-corner edging techniques. Experiment with different yarn colors to create contrasts or complementary tones.
Animal-Themed Hoods
Another way to make your hooded crochet blanket more unique is by creating an animal-themed hood. By adding ears, eyes, or other facial features to the hood design, you can create an array of different animals such as Lions, bears, or rabbits. If you prefer, you can go for a more whimsical approach, like creating a snail or a unicorn hood. Animal-themed hoods not only add some fun to your blanket but also make them great gifts for children and animal lovers alike.
Incorporating Cords or Rope
For a functional and stylish touch, consider incorporating cords or rope into your hooded crochet blanket. You can use them to create drawstrings that will help secure the hood around the head or use them as a decorative element for the blanket’s edges. Choose materials like cotton, jute, or even braided yarn for a more organic look.
For example, you could create a chain of the desired length and attach it to each side of the hood, allowing the user to adjust the hood’s tightness comfortably. Additionally, you could use them as tassels for the blanket’s corners, adding extra weight and improving its drape. By integrating ropes or cords into your crochet blanket, you can enhance its usability and add a touch of personalization that will make your creation stand out.
Exploring Hooded Blanket Patterns
When you want to create a hooded blanket, there are several patterns and designs to choose from. In this section, we will explore three different types of hooded blankets: Hooded Baby Blankets, Cozy Hooded Blankets, and Hooded Towels.
Hooded Baby Blankets
Hooded baby blankets are perfect for keeping your little ones warm and snug. This blanket features a lovely textured pattern and a hood that can be placed on the side edge or a corner. These blankets can be made in various yarn types and colors to suit your preferences.
Cozy Hooded Blankets
A cozy hooded blanket is an excellent choice for adults and children alike. These blankets are usually larger and may include additional features like hand warmers, pockets, or unique stitch patterns.
Caring for Your Hooded Blanket
Washing Tips
Caring for your hooded crochet blanket is essential to ensure it remains in good condition and lasts for years to come. When washing your blanket, make sure to use cold water on a gentle cycle. This will help prevent your blanket from shrinking or getting damaged. To further protect your blanket, it is a good idea to place it in a laundry bag or pillowcase when using a washing machine.
Blocking and Drying Tips
Some crochet blankets look much better when blocked. I have a well-detailed article that explains everything you need to know when blocking your blankets
When drying your hooded crochet blanket, avoid using high heat settings in a tumble dryer. The heat can cause your blanket to shrink and affect its shape. Instead, lay your blanket flat to air dry, away from direct sunlight to prevent color fading. This may take a bit longer but will help maintain the quality and structure of your hooded blanket.
Now, your crochet blanket with an attached hood is ready for use. Stay warm and cozy with your newly created hooded blanket!
Frequently asked questions about adding a hood to your crochet blanket
How to crochet a rounded hood
Crochet hoods can be made in rounds, which creates a beautiful hood without the awkward curve created when you make your hoods using a rectangle.
How do I keep my blanket edges straight?
Keeping your edges straight is all about stitch count. Make sure that you have the same number of stitches in each row. Using stitch markers at the beginning and end of each row can help you keep track.
Also, decide if the turning chain counts as a stitch or not. If it counts as your first stitch, that means you skip the first stitch. If it does not count as a stitch, you crochet it into the first stitch.
How do I size the hood for different ages?
Sizing the hood can be challenging if the pattern doesn’t provide specific measurements. As a general guideline, a baby’s hood might be around 8 to 9 inches deep, a child’s might be around 9 to 10 inches, a teen’s might be around 10 to 11 inches, and an adult’s might be around 11 to 12 inches.
I hope you are now confident and are able to make your own hooded blanket after reading through this article on how to add a hood to a crochet blanket.