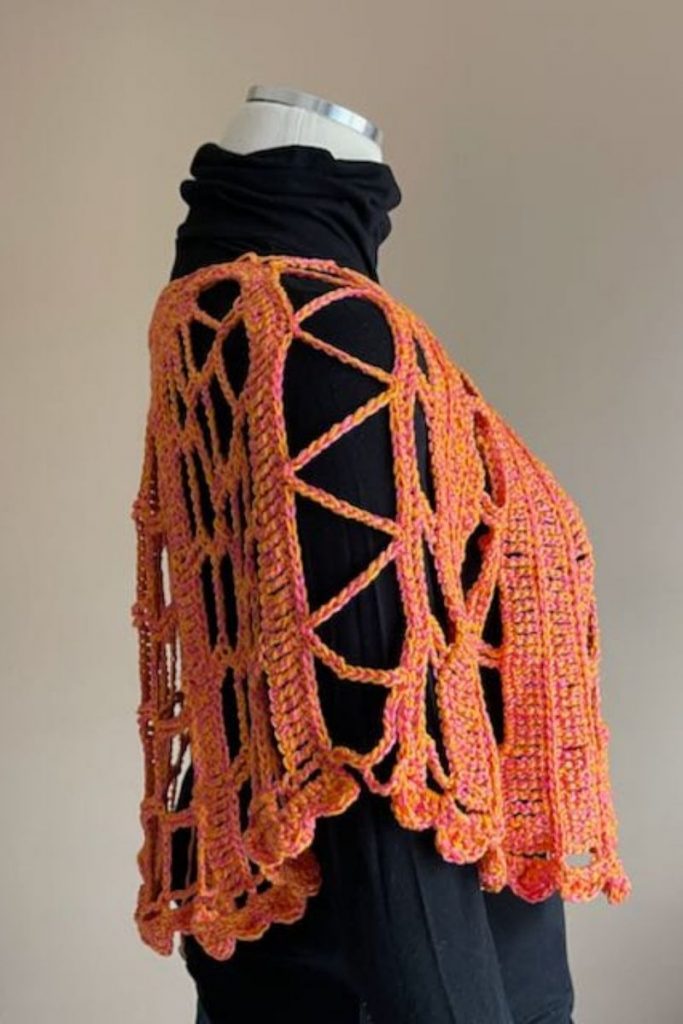
Mo’Rockin’ Sunrise Ponchette: Free Crochet Shawl Pattern
Mo’rocking sunrise Ponchette, a beautiful lacy crochet shawl pattern for warm days.
I am so delighted to have my friend Courtney of creationsbycourtneyllc here on the blog. Even more exciting is her beautiful crochet lacy shawl; the Mo’Rockin’ Sunshine Ponchette! As you might have known, She designs beautiful, unique, and easy-to-follow crochet patterns. It’s not surprising seeing her lacy, crochet shawl!
The weather is gradually warming up, and this free crochet shawl pattern would be the perfect addition to your wardrobe. The details in this shawl are amazing and the yarn adds a classy look to the shawl.
Inspiration for this easy lacy shawl
I’m excited to share the Mo’Rockin’ Sunrise Ponchette with you all, as a guest designer on Fosbas Designs.
This elegant piece started as a very different idea that was supposed to be a shawl. In its own way, it can be worn as a shawl, as each side offers a different look, and when it’s not closed, it drapes like a shawl.
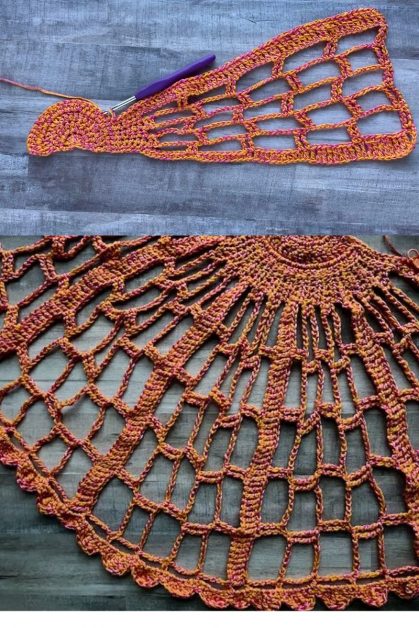
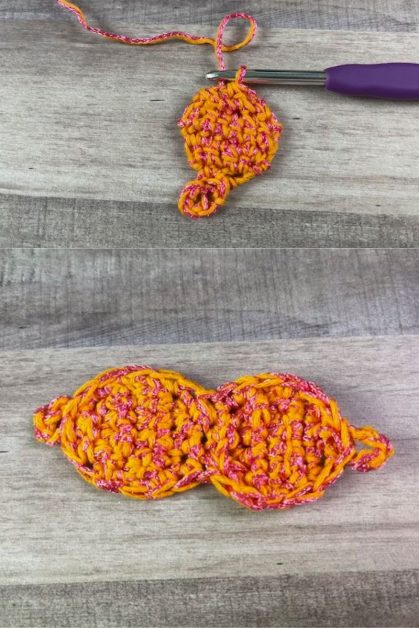
I started the design in the center like many shawls, but wanted to create a half circle shape with back and forth rows that were worked around the center. As you may know, crochet doesn’t always play nice with some shapes, and instead, a different shape was created that reminded me of half of a seashell. It turns out that this shape fits wonderfully across the shoulders, especially with the use of different height stitches.
Have you ever made a triple treble stitch? Well, you get to practice while making the Mo’Rockin’ Sunrise Ponchette! That will be the tallest stitch and there are extended stitches too to create an even increase and decrease in the shape of each row.
When it came time to name this design, I thought about something related to the beach, but one of my crochet besties lives in the Arizona desert, and when she mentioned that, we looked at each other in excitement about looking at deserts. Also, I love a good play on words too, so Mo’Rockin’ instead of Moroccan was a no-brainer. And finding a picture of the Moroccan sunrise sealed the name.

I hope you enjoy creating the Mo’Rockin’ Sunrise Ponchette, as you can wear it as a short lacy or solid poncho, a wrap, or a short shawl. I’m excited to see it worn over dresses, tanks, tops, and any other way you come up!
Skill Level needed to make this shawl
This ponchette is an intermediate-level pattern, but a beginner can make it with some patience.
The pattern is written in US terms.
Measurements
Across the bottom: approx. 34 in. [86 cm]
Center top to bottom: 17 in. [43 cm]
Gauge
Half Circle: 5 rows = 2.25 in. [6 cm]
Materials required for this easy crochet shawl
- Paintbox Yarns Metallic DK, weight #3 yarn (55% cotton, 45% polyamide, 131 yds/ 120 m; 1.7 oz/ 50 g skein): 5 skeins or 587 yds/ 224 g
- US Size H (5.00 mm) hook or hook to meet gauge
- Stitch marker, 2
- 15mm button, 3
- Scissors
- Yarn Needle
- Measuring Tape
Stitch Key
BL: back loop
Ch(s): chain(s)
CSDC: chainless starting double crochet
Dc: double crochet
Dtr: double treble crochet
Edc: extended double crochet
Esc: extended single crochet
Etr: extended treble crochet
FL: front loop
FO: fasten off
Fsc: foundation single crochet
Hdc: half double crochet
M: stitch marker
Rep: repeat
RS: right side
Sc2tog: single crochet 2 together
Sc3tog: single crochet 3 together
Sc: single crochet
Sk: skip
Sl st: slip stitch
St(s): stitch(es)
Sk: skip
Tr: treble crochet
Trtr: triple treble crochet
WS: wrong side
YO: yarn over
Yo-slst: yarn over slip stitch
Since you are here, you might want to check out some other crochet shawl patterns:
- Pretty in Purple Crochet shawl pattern – styled as a shawl
- X-capade crochet shawl pattern – It is another free and easy crochet shawl pattern by Courtney.
Special Stitches & Techniques needed for this shawl pattern
Edc: YO, insert hook in indicated stitch, YO and pull up a loop (3 loops on hook), YO, pull through 1 loop (3 loops on hook), [YO, pull through 2 loops] 2 times
Esc: insert hook in indicated stitch, YO, pull up a loop (2 loops on hook), YO, pull through 1 loop, YO, pull through 2 loops
Etr: YO 2 times, insert hook in indicated stitch, YO and pull up a loop (4 loops on hook), YO, pull through 1 loop (4 loops on hook), [YO, pull through 2 loops] 3 times
Fch: *insert hook in indicated ch, YO and pull up a loop, YO, pull through 2 loops; rep from * number specified
Sc attach: insert hook in indicated st, YO, pull up a loop, insert hook in next st alongside, YO, pull through st and 2 loops in hook
Sl st attach: insert hook in indicated st AND st alongside, YO and pull through all sts and loop on hook
Trtr: YO 4 times, insert hook in indicated st, YO, pull up a loop (6 loops on hook), [YO, pull through 2 loops] 5 times
Yo-slst: YO (2 loops on hook), insert hook in indicated st, YO, pull through st and all loops
Notes for this shawl pattern
- The pattern is written in US terms.
- Read the entire pattern before beginning.
- The shawl is created in 9 parts: First Center, First Body, Edging, Second Center, Second Body, Edging, Connecting Pieces, Attaching Buttons, and Closing Chain.
- The Body of each piece is created in back and forth rows attached to the Center half circle.
- The sl st in the First and Second Center replaces the ch 1 for the following sc. Do not work in any of sl st made in the First or Second Center.
- Each row that begins or ends with a sc will be attached to one st of the center unless otherwise indicated.
- Each row that ends with a sl st will be attached in the same st as the previously made row.
- It helps to attach the Second Chain to the lower button, and then use a hook to weave through stitches along the edge, and then secure it at one of the top buttons.
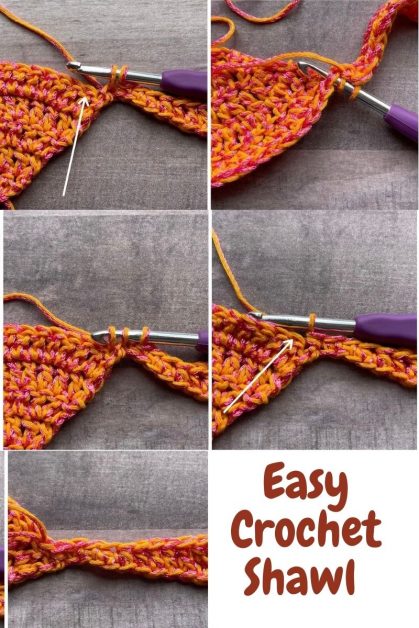
Remember, you can get the Ad-free PDF pattern of this easy crochet shawl pattern with step-by-step pictures here
Instructions for this easy lacy shawl pattern
First Center
Magic Circle
Row 1: Working in the magic circle, ch 2 (doesn’t count as st), 6 dc in the center, tighten, turn – 6 dc
Row 2: CSDC in first st, dc in same st, 2 dc in each st, turn – 12 dc
Row 3: CSDC in first st, dc in same st, dc in next st, *2 dc in next st, dc in next st; rep from * to end, turn – 18 dc
Row 4: CSDC in first st, dc in same st, dc in next 2 sts, *2 dc in next st, dc in next 2 sts; rep from * to end, turn – 24 dc
Row 5: CSDC in first st, dc in same st, dc in next 3 sts, *2 dc in next st, dc in next 3 sts ; rep from * 3 more times, 2 dc in next st, dc in next 2 sts, 2 dc in last st – 31 dc
First Body
Row 1: Ch 58, turn
Row 2: Tr in 5th ch from hook (sk 4 ch counts as first tr), tr in next 43 sts, edc in next 3 sts, dc in next 3 sts, hdc in next 3 sts, sc in next 2 sts, sc attach in last st – 55 sts
Row 3: Sl st in next st of First Center, turn, sc in first st, sc in next st, hdc in next 2 sts, dc in next st, ch 8, sk 8 sts, [tr in next 2 sts, ch 8, sk 8 sts] 2 times, [dtr in next 2 sts, ch 8, sk 8 sts] 2 times, trtr in last 2 sts, turn – 55 sts
Row 4: Ch 6 (counts as trtr here and throughout), trtr in next st, ch 6, sk 6 sts, [dtr in next 2 sts, ch 8, sk 8 sts] 3 times, tr in next 2 sts, ch 8, sk 8 sts, dc in next 3 sts, hdc in next 2 sts, sc in next st, sc attach in last st – 17 sts, 38 chs
Row 5: Sl st in next st of First Center, turn, sc in first st, sc in next st, hdc in next 2 sts, dc in next st, ch 8, sk 8 sts, tr in next 2 sts, ch 8, sk 8 sts, [dtr in next 2 sts, ch 8, sk 8 sts] 3 times, trtr in last 2 sts, turn – 15 sts, 40 ch
Rows 6-7: Rep Rows 4-5
Row 8: Ch 4 (counts as tr here and throughout), tr in next 42 sts, edc in next 3 sts, dc in next 3 sts, hdc in next 3 sts, sc in next 2 sts, sc attach in last st – 55 sts
Rows 9-26: Rep [Row 5, then [Rows 4-5] 2 times, then Row 8] 3 times
Rows 27-30: Rep Row 5, then Rows 4-5, then Row 4, turn
Row 31: Rep Row 3
Row 32: Rep Row 8, FO
Edging
Row 1: Attach yarn to first tr of Row 32 and working around the st at the end of each row, evenly sc (6 sc per trtr and 3 sc per tr), turn – 168 sc
Row 2: Ch 4, (tr, dc) in first st (counts as half shell), sk next st, sc in next st, *[sc in next st, sk next st, (dc, tr, dtr) in next st, (dtr, tr, dc) in next st, sk next st, sc in next st] 5 times**, sk next st, (dc, 2 tr, dc) in next st, sk next st; rep from * 4 more times and stopping at ** on last rep, sc in next st, sk next st, (dc, 2 tr) in last st – 29 shells, 2 half shells
Row 3: Working along the last and first rows of the Body, evenly sc and in each st across, sl st to join to first half shell, FO – 135 sc
Second Center
Follow same instructions as First Center; do not FO
Second Body
Row 1: 55 fsc, sl st in ch of last fsc, turn
Row 2: Ch 6, trtr in next st, ch 8, sk 8 sts, [dtr in next 2 sts, ch 8, sk 8 sts] 3 times, tr in next 2 sts, ch 8, sk 8 sts, dc in next st, hdc in next 2 sts, sc in next st, sc attach – 15 sts, 40 ch
Row 3: Sl st in next st of Second Center, turn, sc in first st, sc in next 2 sts, hdc in next 3 sts, dc in next 3 sts, edc in next 3 sts, tr in next 8 sts, etr in next 3 sts, dtr in next 20 sts, trtr in next 12 sts, turn – 55 sts
Row 4 (RS): Working in FL only, ch 1, yo-slst in each st, sl st attach in same st as the previous row – 55 yo-slst
Row 5: Sl st in next st of Second Center, turn, working in the FL of each yo-slst of Row 4, sc in next 3 sts, hdc in next 3 sts, dc in next 3 sts, edc in next 3 sts, tr in next 8 sts, etr in next 3 sts, dtr in next 20 sts, trtr in next 11 sts, turn – 55 sts
Rows 6-7: Rep Rows 4-5, turn
Row 8: Rep Row 2
Row 9: Sl st in next st of Second Center, turn, sc in first st, sc in next st, esc in next 4 sts, hdc in next 24 sts, dc in next 25 sts, turn – 55 sts
Row 10: Ch 6, trtr in next st, ch 6, sk 6 sts, [dtr in next 2 sts, ch 8, sk 8 sts] 3 times, tr in next 2 sts, ch 8, sk 8 sts, dc in next 3 sts, hdc in next 2 sts, sc in next st, sc attach – 17 sts, 38 ch
Rows 11-22: Rep [Rows 3-7, then Row 10] 2 times
Row 23: Working in BL only, yo-slst in each st, sl st in next st of Second Center, turn – 55 yo-slst
Row 24: Rep Row 10
Rows 25-36: Rep [Rows 3-7, then Row 10] 2 times
Row 37: Rep Row 9
Row 38: Rep Row 2, except sl st attach in same st as Row 37 for the last st
Row 39: Sl st in last st of Second Center, turn, sc in first st, sc in each st. Do not FO
Edging
Row 1: Ch 1, sc evenly around each row end (6 sc around each trtr, 2 sc around each dc), turn – 168 sc
Row 2: Ch 1, *sc in first st, sk next st, (dc, tr, dtr) in next st, (dtr, tr, dc) in next st, sk next st, sc in next st; rep from * to end – 28 shells
Row 3: Working along the first and last rows of the Second Body, sc evenly across, sl st to ch-1 of Row 2. Do not FO
Connecting Pieces
Lay pieces on top of each other. Place M in the center of both pieces and 16 sts on each side of the Center.
Row 1: Working between the two pieces, ch 10, sl st to the corner of Left Piece, sl st in next st, ch 12, sk 4 sts on Right Piece, sl st in next 2 sts, ch 11, sk 9 sts on Left Piece, sl st in next 2 sts, ch 10, sk 9 sts on Right Piece, sl st in next 2 sts, ch 10, sk 9 sts on Left Piece, sl st in next 2 sts, ch 9, sk 9 sts on Right Piece, ch 8, sk 9 sts on Left Piece, sl st in next 2 sts, ch 8, sk 9 sts on Right Piece, sl st in next 2 sts, ch 7, sk 7 sts on Left Piece, ch 6, sk 5 sts on Right Piece, sl st in next 2 sts, ch 6, sk 2 sts on Left Piece, sl st in next st, turn
Row 2: Flip the piece over, sl st in back bump of each ch (between the pieces and at least one sl st of the Body to attach all the way to end); rotate as needed FO

Second Chain
Row 1: Make a slip knot, 4 fch, sl st to first st (loop made), 106 fch, sl st to 4th st from hook (loop made), FO
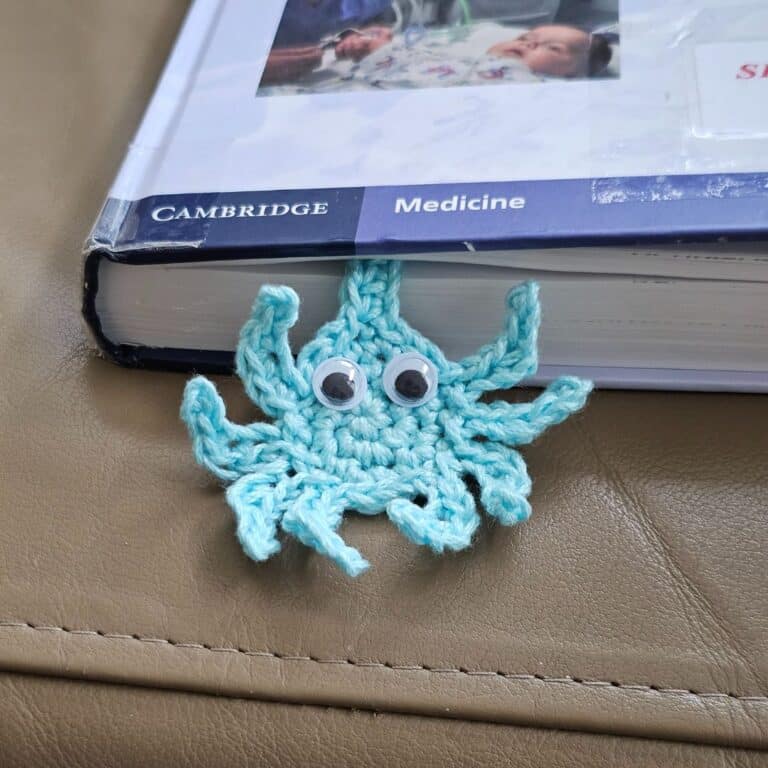
Optional Brooch
Row 1: Ch 4, sl st to first ch (loop made)
Row 2: Ch 1, sc in loop, turn – 1 sc
Row 3: Ch 1, 3 sc in st, turn – 3 sc
Row 4: Ch 1, 2 sc in first st, sc in next st, 2 sc in last st, turn – 5 sc
Row 5: Ch 1, 2 sc in first st, sc in next 3 sts, 2 sc in last st, turn – 7 sc
Row 6: Ch 1, sc in each st, turn – 7 sc
Row 7: Ch 1, sc in first st, sc2tog, sc in next st, sc2tog, sc in last st, turn – 5 sc
Row 8: Ch 1, sc2tog, sc in next st, sc2tog, turn – 3 sc
Row 9: Sc3tog, sl st in row end space, turn – 1 sc
Row 10: Ch 1, sc in st (skip the sl st), turn – 1 sc
Rows 11-17: Rep Rows 3-9, turn
Row 18: Ch 4, working through both spaces, sl st to make a loop
Row 19: Evenly sc around the side, sc2tog in the center between each side, continue to evenly sc around, sc2tog in the center, continue to evenly sc along side, sl st to first sc, FO
Finishing
- Using a length of yarn, attach one button on each side where M is placed along the top, and attach the third button at one bottom corner.
- Weave in all ends.
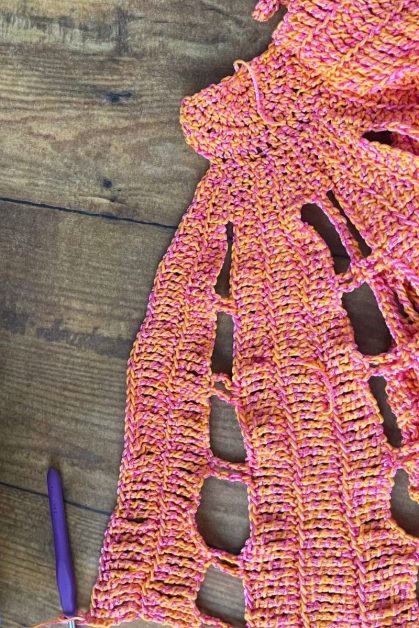
That’s all there is to it! I hope you have enjoyed making the Mo’Rockin’ Sunrise Ponchette! It offers a mix of open and solid stitches for a unique look and subtle texture while keeping one’s interest. It’s surprisingly easy to make but looks complicated. Enjoy letting others know that you made this gorgeous piece.
About the Designer
Hi! I’m Courtney, the designer behind Creations by Courtney. I enjoy creating women’s crochet garments, and accessories for all ages and every body. By day, I’m a licensed psychologist, and in my “free time,” I’m a wife and mom to an 8-year-old son and 4-year-old twin girls.
I love finding ways to avoid seaming in my crochet projects and creating a professional finish. I hope you come along this journey with me to build your crochet skill and style confidence.
Grab the PDF from LoveCrafts: https://www.lovecrafts.com/en-us/p/morockin-sunrise-ponchette-crochet-pattern-by-creations-by-courtney
I hope to see your beautiful versions of my easy crochet shawl pattern, do tag me on
Instagram: @creationsbycourtneyllcm when you make yours. Come see what others are using for their shawls in my community – Facebook: https://www.facebook.com/creationsbycourtneyllc.
Do check out her other designs using the links below:
Website: https://creationsbycourtney.com
Pinterest: https://www.pinterest.com/CreationsByCourtney
You can purchase her crochet patterns in the following places:
Ravelry: http://www.ravelry.com/designers/creations-by-courtney
Etsy https://www.etsy.com/shop/CreationsbyCourtneyW
LoveCrafts: https://www.lovecrafts.com/en-us/user/maker/97898432-96f5-49c0-b998-1e283e729686
One Comment
Comments are closed.