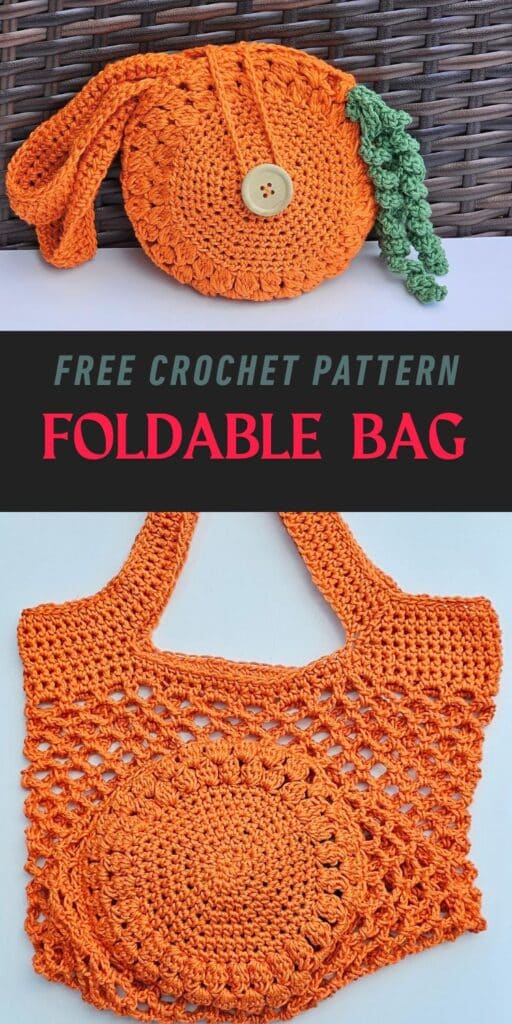
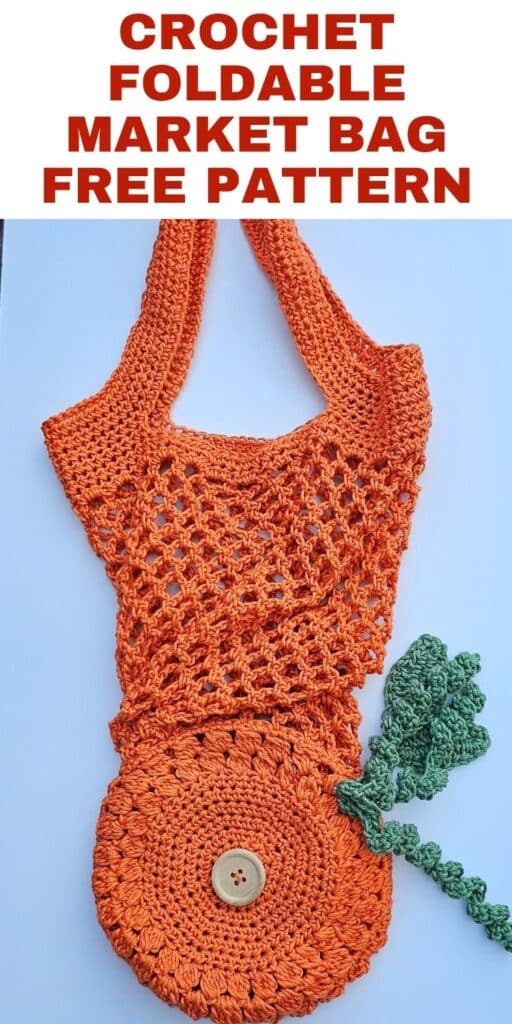
Foldable Market Bag Free Crochet Pattern
If you love combining practicality with creativity, this foldable market bag crochet pattern will quickly become a favorite project.
Not only is it stylish and reusable, but it also folds neatly into a compact pouch, making it perfect for carrying in your handbag or keeping in the car for grocery runs.
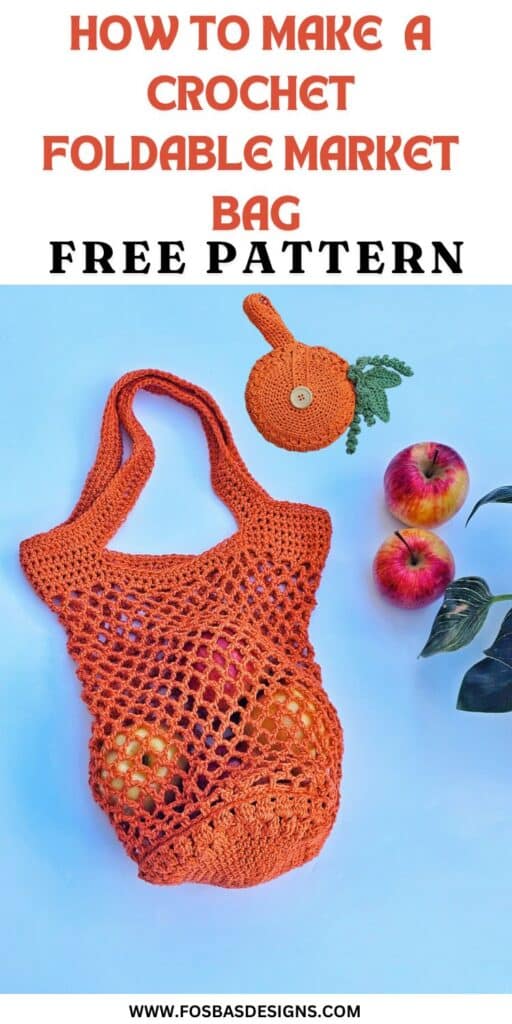
Whether you’re looking for an eco-friendly alternative to plastic bags or simply want a fun project that’s useful, this design is the ideal choice.
Why Make a Foldable Market Bag?
Market bags are trending for good reason—they’re lightweight, eco-conscious, and endlessly reusable.
The foldable feature of this bag makes it even more functional, as you can carry it anywhere without taking up space.
Imagine having a handmade crochet bag that unfolds into a roomy tote and folds back into a small pouch when you’re done. It’s convenient, sustainable, and stylish all at once.
I have always wanted a cute collapsible bag because I am a fan of cute projects that can be repurposed. This free crochet pattern for a foldable market bag comes in handy.
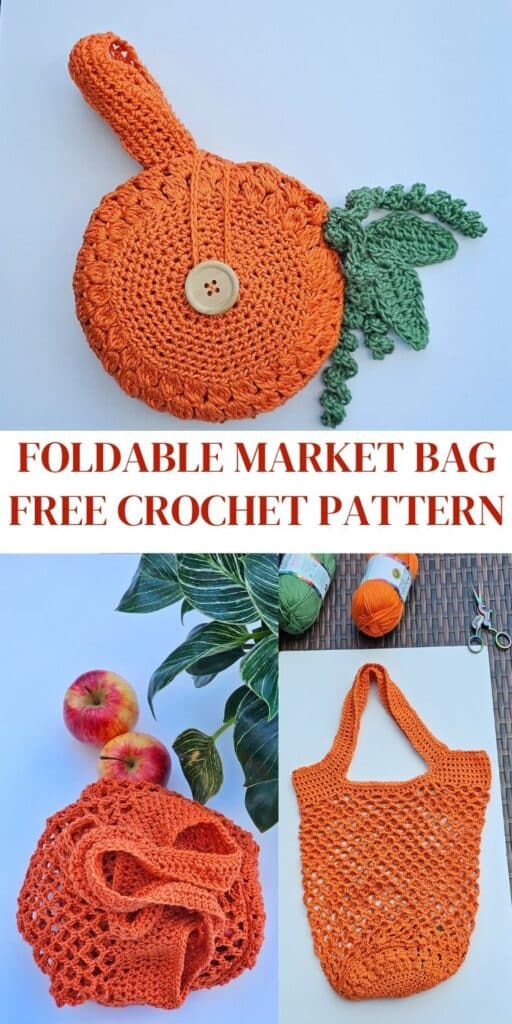
Pumpkin foldable market bag free crochet pattern details
Materials
Yarn – Lionbrand 24/7 Cotton, (#4, 100% Cotton, 186 yards per 3.5 oz/100g Ball)
Yardage
200 yards in color A
40 yards in color B
Hook and other materials
4 mm crochet hook for the base of the bag
6 mm Crochet hook for the body of the bag
Stitch marker – 1 pcs
Gauge
16 sts over 10 Rows = 4” across, made using hdc, before blocking.
Pattern Notes
- Please kindly read through the pattern before starting.
- Any #4 weight yarn can be substituted
Skill Level – Easy
Terms – US Terminology
Construction notes
- This project is done in 2 sections.
- Section 1: The bag base is made in a round. You need two pieces that are then joined together, leaving a few stitches to keep the bag.
- Section 2: The body of the bag is then made on one side of the bag bade and in a round until you have your desired bag height.
Crochet foldable market bag sizing
Finished measurements
One size: But easy to adjust; instructions on how to do this are provided in the pattern.
Bag Base measures 8″ by 8″
Bag height measures 15″ by 10″
Handle – 7″
Stitches Abbreviations
Chain/chains – ch/chs
Chain space – ch sp
Stitch(es) – st(s)
Slip Stitch – sl st
Single Crochet – sc
Half double crochet – hdc
Double crochet – dc
3 double crochet cluster – 3 dc cl
Special stitch
3 double crochet cluster – 3 dc cl


Join my crochet channel for daily updates at your finger tips
1 FREE DOWNLOAD PER MONTH
WITH JUST $3 PER MONTH!
- Pick your desired pattern each month.
- It can be a new or old pattern.

2 FREE DOWNLOADS PER MONTH
WITH JUST $5 PER MONTH!
- Pick your desired patterns each month.
- It can be a new or old pattern.
- You get 2 patterns per month.

3 FREE DOWNLOADS PER MONTH
WITH JUST $8 PER MONTH!
- Pick your desired patterns each month.
- You get 3 free patterns per month.
- It can be a new or old pattern.

How to make a foldable market bag free crochet pattern
Section 1: Base
Make 2
With Color A
Round 1: In a magic ring, ch 2, (does not count as a stitch), 8 hdc in magic ring. 8 hdc
- No need to join after each round; place a stitch marker on the last stitch and move it after every round.
- Move the marker after each round.
Round 2: 2 hdc in each around. 16 hdc
Round 3: *hdc in next, 2 hdc in next, repeat from * around. 24 hdc
Round 4: *hdc in next 2 sts, 2 hdc in next, repeat from * around. 32 hdc
Round 5: *hdc in the next 3 sts, 2 hdc in the next, and repeat from * around. 40 hdc
Round 6: *hdc in next 4 sts, 2 hdc in
next st, repeat from * around. 48 hdc
Round 7: *hdc in the next 5 sts, 2 hdc in the next, and repeat from * around. 56 hdc
Sl st in next st to close the height difference.
Turn, crocheting from the wrong side for Rounds 8 and 9.
Round 8: Ch 3, 3 dc-cl in same st as ch 3, *ch 2, skip next st, 3 dc-cl in next st, rep from * around, skip last st, ch 2, join with a sl st to the top of beginning ch 3. 28 dc-cl and ch sps
Round 9: Ch 3, 3 dc-cl in same st as ch 3, *ch 2, skip next st, 3 dc-cl in next ch sp, rep from * around, skip last st, ch 2, join with a sl st to the top of beginning ch 3. 28 dc-cl and ch sps
Turn, crocheting from the right side
Round 10: Ch 1, *hdc in next st, 2 hdc in ch 2 sp, rep from * around, join with a sl st to the beginning chain. 84 hdc
Set aside.
Joining
- Place both panels on each other.
- Place the wrong side of the first panel over the right side of the second panel.
- Crocheting over both panels.
Round 1: Ch 1, sc in both sts around the panels, leave the last 18 sts unjoined.
- Drop the back panel and continue crocheting around the front panel.
- Sc in next 9 sts, chain 34, sc in last 9 sts, join with a sl st to the beginning chain.
Do not fasten off.
Section 2 – BAG
- Turn, crocheting around the base (front panel) – this is the part without the button hole
- Switch to 6 mm crochet hook.
Round 1: *Ch 4, skip next 2 sts, sc in next st, rep from * around, join with a sl st to the beginning chain. 28 sc/ch 4 sps
Round 2: Ch 1, sl st in the ch 4 sp, *ch 4, sc in next ch sp, rep from * around, do not join. Place a stitch marker in the last ch 4 sp and move after each round. 28 sc/ch 4 sps
Round 3: *Ch 4, sc in each ch 4 sp around, move stitch marker. 28 sc/ch 4 sps
Rounds 4 – 22: Rep round 3 or until your desired height.
Round 23: Ch 1, 3 hdc in each ch 4 sp around, join with a sl st the beginning ch
Remove stitch marker. 84 hdc
Round 24: Ch 1, hdc in each st around, join with a sl st the beginning ch. 84 hdc
Handle
Round 1: *Ch 60, skip next 18 sts, hdc in next 24 sts, rep from * one more time, join with a sl st the beginning ch. 48 hdc
Round 2: *Ch 1, hdc in each ch, hdc in next 24 sts, rep from * one more time, join with a sl st the beginning ch. 168 hdc
Rounds 3 – 4: Ch 1, hdc in each st around, join with a sl st the beginning ch. 168 hdc
Round 5: ch 1, sl st in each st around, join with a sl st the beginning ch.
Fasten off.
Leaf
Make 2
Using a 6 mm crochet hook
Contrasting color, Chain 9
Round 1: Sc into 2nd ch from hook, hdc in next ch, dc in next ch, 2 dc in next ch, dc in next ch, hdc in next 2 chs, 5 sc in last ch, continue on the opposite side of the chains, hdc in next 2 chs, dc in next ch, 2 dc in next ch, dc in next st, hdc in next ch, 4 sc in last ch. 24 sts
Chain 12, fasten off.
Curls
Make 3, continue with 6 mm crochet hook and contrasting color
*Ch 31, 2 sc in 2nd chain from hook and in each ch across, repeat from * two more times.
Leave a long tail of yarn and cut yarn.
Using the ends from the 2 leaves and the 3 curls, sew the leaves to the curls.
Fasten off.
Fold the bag, turn the bag to cover the folded parts of the bag.
Secure the bundle to the pumpkin bag.
Sew a button on the other side of the bag, so you can use the button hole.
About the Designer
Say Hi on Instagram and Subscribe To my email List for pattern discounts and freebies. For questions, send such to [email protected]. Read more about me here.