Crochet Christmas Blanket Pattern
Bring the joy and warmth of the holidays into your home with this Crochet Christmas Blanket Pattern. This festive design captures the spirit of the season with its striking red and white panels arranged in a wreath-like layout and finished with playful green accents.
It’s the perfect handmade piece to add charm to your living room, drape across your favorite chair, or gift to someone special.
The Crochet Christmas Blanket is a Free Pattern, scroll down for hte detials or get the print friendly version with photos usign the linkes below.
Ravelry Use code “HOLLY” for a 30% discount
ETSY Use code “HOLLY” for a 30% discount
See the other projects in this years Winter project ideas.
This pattern combines beauty and comfort, making it a wonderful project for intermediate crocheters and adventurous beginners. The stitches work up quickly, and the finished blanket instantly brightens any space with cozy Christmas cheer.
Crochet Christmas Blanket Inspiration
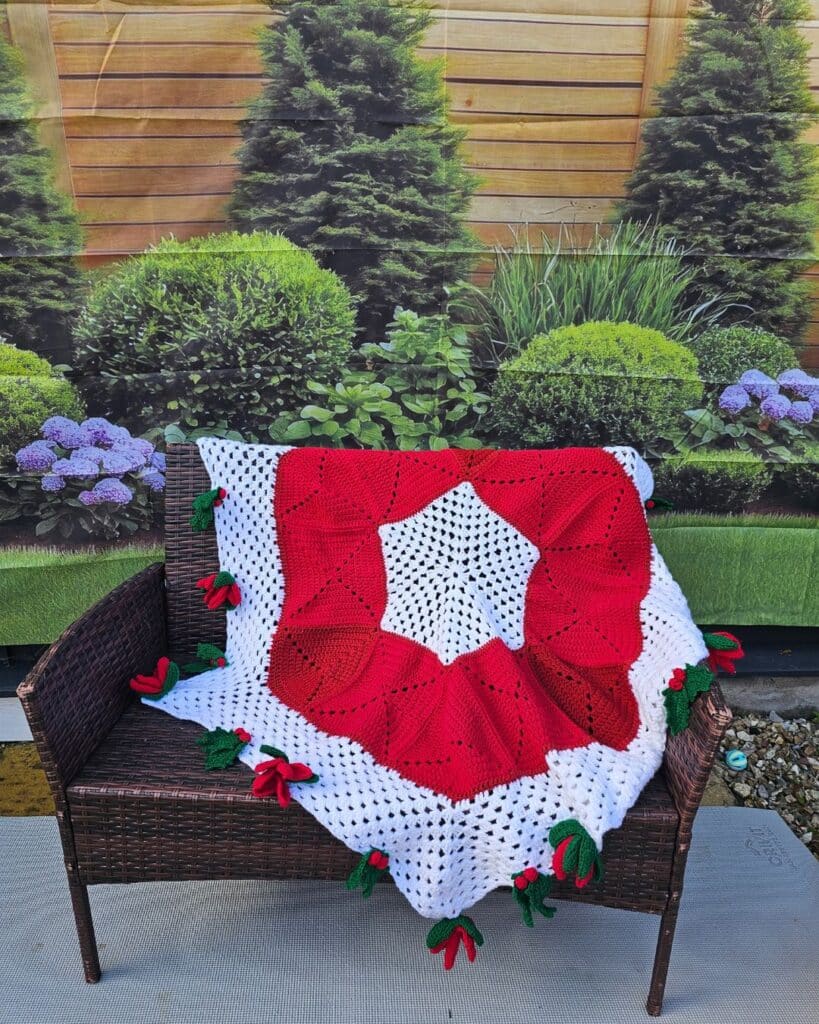
The design for this blanket was inspired by the classic Christmas wreath, a symbol of welcome and celebration. The rich red panels form the shape of a wreath, while the white background adds lightness and contrast.
Small green embellishments resembling holly leaves and berries complete the look, giving the blanket a playful holiday touch. It’s a piece that feels both festive and timeless, designed to be enjoyed year after year.
Christmas hexagon crochet blanket pattern details
Yarn and Materials
To achieve a cozy and structured finish, this blanket uses soft worsted-weight yarn in traditional Christmas shades—vibrant red, crisp white, and deep green. These colors create a bold contrast that stands out beautifully in any home.
The pattern pairs perfectly with acrylic or cotton-blend yarns, depending on your preference for texture or drape. You’ll also need a 5 mm crochet hook, scissors, a tapestry needle, and your favorite stitch markers to help keep the sections aligned.
Yarn: Any Worsted Weight yarn in colors of your choice.
Lion brand Vanna’s Choice, #4 Medium, Worsted weight (100% Acrylic, 170 yards/ 156m per 3.5 oz/100g skein)
Estimated Yardage
A = White = 980 yards
B = Red – 980 yards
C = Green = 170 yards
Design and Construction
This Crochet Christmas Blanket Pattern is made from several red panels that form a wreath shape once joined together. The lacy white background enhances the design while keeping the blanket lightweight and cozy.
The border is finished with green and red accents that look like holly leaves and berries, adding texture and detail. The overall result is a show-stopping blanket that feels joyful yet elegant.
If you’d like to adjust the size, you can easily add or remove panels or expand the border for a larger throw. The modular nature of the design also makes it fun to customize.
Pro Tips for Crocheting the Best Christmas Blanket
- Keep an even tension throughout to ensure smooth joins between panels.
- Block your blanket gently once finished to enhance the shape and stitch definition.
- Use stitch markers to align each section for a neater wreath form.
- Try adding a touch of metallic yarn or gold edging for a more luxurious, festive twist.
Different Ways to Use the Blanket
This Christmas blanket isn’t just for cozying up on cold evenings.
It makes a beautiful decorative throw for your sofa, a thoughtful handmade gift, or even a creative alternative to a traditional tree skirt.
Spread it across your bed for a holiday-ready look or fold it over a chair to bring instant festive warmth to any room.
Hook and other Materials
6 mm Crochet Hook
Darning needle
Stitch Markers – 6 pcs
Gauge – 14 sts over 8 rows = 10 cm/4” square made in dc
Please note that the gauge is not important for this project.


Pattern Notes
- Please kindly read through the pattern before starting.
- Any other #4 weight yarn can be substituted.
Difficulty Level – Intermediate
Terms – US Terminology
Stitches Abbreviations
Chain/chains – ch/chs
Single Crochet – sc
Half double crochet – hdc
Double crochet – dc
Slip stitch – sl st
Magic ring – MR
Treble crochet – tr
Finished Measurement
Blanket: 55” by 55”
Holly leaf – 4” by 2”
Poinsettia – 5” by 5”
Construction note
- This blanket is worked in sections: the main blanket and then the flowers (Holly Leaf and Poinsettia). The main blanket is made in parts (1 Hexagon, 6 Squares, 6 Triangles, and the extension). The first three parts are made separately and joined together, after which the extension is made until the desired width is achieved.
- The Poinsettia and Holly leaves are made separately and then joined to the blanket.
1 FREE DOWNLOAD PER MONTH
WITH JUST $3 PER MONTH!
- Pick your desired pattern each month.
- It can be a new or old pattern.

2 FREE DOWNLOADS PER MONTH
WITH JUST $5 PER MONTH!
- Pick your desired patterns each month.
- It can be a new or old pattern.
- You get 2 patterns per month.

3 FREE DOWNLOADS PER MONTH
WITH JUST $8 PER MONTH!
- Pick your desired patterns each month.
- You get 3 free patterns per month.
- It can be a new or old pattern.

Join my crochet channel for daily updates at your finger tips
Crochet Christmas Blanket Pattern
Section 1: Blanket
Part A – Hexagon
With White
Round 1: In a magic ring, ch 3 (counts as first dc here and throughout), 2 dc in ring, ch 1, (3 dc in ring, ch 1) 5 times, sl st to join. 6 dc cluster
Round 2: Ch 4 (counts as first dc + ch 1), (3 dc, ch 3, 3 dc, ch 1) all in next 5 ch-1 sps, (3 dc, ch 3, 2 dc) in last ch sp, sl st to 3rd ch from ch 4 at the beginning. 12 dc clusters
Round 3: Ch 3, 2 dc in ch1 sp, ch 1, *(3 dc, ch 3, 3 dc) in all ch-3 sps, ch 1, (3 dc in all ch1 sps) ch 1, sl st to join. 18 dc Clusters
Rounds 4 – 8: Repeat round 3
Set aside
Part B: Squares
Make 6 – With Red
Round 1: In a MC, ch 3(counts as dc, here and throughout), 2dc, (ch 3, 3dc), rep () 2 more times, ch 3, join with a sl st to the top of ch 3. 12 dc, 4 corners
Close the ring tightly.
Round 2: Ch 3, *dc in each dc until corner, (2dc, ch 3, 2 dc) at the corner, rep from * until the end, join with a sl st to the top of ch 3. 28 dc, 4 corners.
Round 3: Ch 3, *dc in each dc until corner, (2 dc, ch 3, 2 dc) at the corner, rep from * 3 more times, dc in each of the remaining sts until the end, join with a sl st to the top of ch 3. 44 dc, 4 corners
Rounds 4 – 7: Rep round 3.
108 dc, 4 corners
Fasten off.
Set aside.
Part C: Triangles
Make 6 – With Red
Round 1: In a MC, ch 3 (counts as dc, here and throughout), 2 dc, (ch 3, 3 dc), rep () more time, ch 3, join with a sl st to the top of ch 3. 9 dc, 3 corners
Close the ring tightly.
Round 2: Ch 3, *dc in each dc until corner, (2 dc, ch 3, 2 dc) at the corner, rep from * until the end, join with a sl st to the top of ch 3. 21 dc, 3 corners.
Round 3: Ch 3, *dc in each dc until corner, (2dc, ch 3, 2 dc) at the corner, rep from * 2 more times, dc in each of the remaining sts until the end join with a sl st to the top of ch 3. 33 dc, 3 corners
Rounds 4 – 7: Rep Round 3
81 dc, 3 corners
Fasten off.
Set aside
Part D: Joining the squares and triangles together
- Arrange the squares with triangles placed in between each square as shown below.
- Place each triangle between the spaces left unjoined between the leaves.
- Make sure to have the triangle’s apex pointed towards the centre and the wider part outward.
- Using sl st or mattress stitch, with either a hook or needle, join each side of the triangle to the adjoining square.
- Repeat until you have joined all the squares to the triangles.
Fasten off
Inner edge
- Crocheting around the inner part of the joined circle in rounds.
- Join yarn (red) with a sl st to any of the stitches in the inner part of the joined panel.
Round 1: Ch 1, hdc in each st around, join with a sl st to the beginning chain.
Fasten off.
Step 1: Place the hexagon from part 1 inside the just joined panels.
Step 2: For ease of joining, align each corner of the hexagon with the tip of the triangles, secure this point with a stitch marker.
Step 3: With darning needle, join with mattress stitch the hexagon to the circular panel.
Part E: Outer edge
- Crocheting around the outer part in rounds.
- Join yarn (red) with a sl st to any of the stitches in the inner part of the joined panel.
Round 1: Ch 3 (counts as a stitch here and throughout), *dc in each st, 2 dc in each ch 3 sp at the corners and 1 dc in each st where you joined the squares to the triangles, rep from * around, join with a sl st to the beginning chain. 360 dc
Join white
Round 2: Ch 3, dc in next 2 sts, ch 1, skip next st, dc in next 3 sts, rep from * around, join with a sl st to the top of the beginning ch 3. 360 dc
Fasten off.
- Locate the triangles and count the number of ch sps on each.
- Place a stitch marker on the ch 1 space that is in the middle of each triangle.
- You can adjust the placement of the stitch marker, but make sure it’s evenly placed on each triangle for the finished hexagon look.
- You should have 6 ch 1sps with a stitch marker. This wouldbe the cornmers for your blanket.
Fasten off.
Join yarn with a sl st to any of the ch 1 sps with the stitch markers.
Round 2: Ch 3, (2 dc, ch 3, 3 dc) in ch 1 sp, *ch 1, 3 dc in each ch sps until the next stitch marker, (3 dc, ch 3, 3 dc) in ch 1 sp with the stitch marker, rep from * around, join with a sl st to the 3rd ch from the beginning ch 3.
Round 3: Ch 4, (counts as first dc + ch 1), *(3 dc, ch 3, 3 dc) in ch 3 sp, ch 1, 3 dc in each ch sps until the next corner, rep from * around, 2 dc in last ch 1 sp, join with a sl st to the 3rd ch from the beginning ch 3.
Round 4: Repeat round 3
Round 5: Ch 4, (counts as first dc + ch 1), 3 dc in each ch sps until the next corner, *(3 dc, ch 3, 3 dc) in ch 3 sp, ch 1, 3 dc in each ch sps until the next corner, rep from * around, 2 dc in last ch 1 sp, join with a sl st to the 3rd ch from the beginning ch 3.
Rounds 4 – 11: Repeat round 3
Continue the repeats until you have your deisdred width.
Fasten off and weave in all ends.
Section 2: Poinsettia Flower
Make 24 pcs in red
Make 12 pcs in green
With Red
Round 1: In a magic ring, ch 3, 14 dc, join with a sl st to the beginning chain. 15 dc
- Petal round – you will have 3 petals
- When crocheting into the chains, use the first loop as the remaining loop will be used in round 3
Round 2: *Ch 15, sc in 2nd ch from hook, dc in next 3 chs, tr in next 10 chs, skip next 2 sts on round 1, sc in next 3 sts, rep from * to the end, Insert the hook into the base of the first ch of the petal to join with a sl st.
Round 3: Ch 1, *dc in next 3 chs, tr in next 5 sts, dc in next 3 sts, sc in next 3 sts, you should be at the tip of the petal now, ch 3, crocheting down the other side – sc in next 3 sts, dc in next 3 sts, tr in next 5 sts, dc in next 3 sts, skip next st, sc2tog, rep from * to the end. Join with a sl st to the beginning ch
Fasten off, and weave in ends.
To assemble your flower
Step 1: Pick up one of the smallest petals – start with the red, and pass your hook through the middle part of both red petals and also through the middle part of the green petal. Secure tightly, leave a long tail of yarn, and cut yarn.
Step 2: Repeat for each of the flowers, rearranging the petals to have the tips spread out evenly.
Joining the poinsettia to the blanket
Step 1: Place a set at each of the corners
Step 2: Place another flower at the middle of the flowers from step 1.
Section 3: Holly Leaf with Berries
With Green, Chain 9
Round 1: Sc into 2nd ch from hook, hdc in next ch, dc in next ch, 2 dc in next ch, dc in next ch, hdc in next 2 chs, 5 sc in last ch, continue on the opposite side of the chains, hdc in next 2 chs, dc in next ch, 2 dc in next ch, dc in next st, hdc in next ch, 4 sc in last ch. Join with a sl st to the beginning ch. 24 sts
Round 2: Ch 1, sc in first st and next st, ch 3, sl st in 3rd ch from the hook,(sc in same st, sc in next 2 sts, hdc in next st, ch 3, sl st in 3rd ch, rep () one more time, sc in next 2 sts, ch 4, sl st in 4th ch, rep () three more timesSc in the same stitch and in the remaining stitches until you reach the tip (base) of the leaf.
Fasten off.
Weave in all ends.
Berries
Make 2 per set (48 in total)
With Contrasting color 2
Round 1: In a magic ring, chain 1, 6 sc in the MR, join with a sl st to the beginning chain.
Round 2: ch 1, sc in each st around, join with a sl st to the beginning chain.
Leave a long tail of yarn, and cut yarn.
Sew each berry to the leaves and secure tightly.
You can sew 2 or 3 berries to the joined leaves.
Fasten off and weave in all ends.
Block to measurement.
For pattern support, send me a message
with the pattern name and details –
Share your finished blanket with the community –
https://www.facebook.com/groups/496008034687310
How to Care for Your Blanket
To keep your crochet blanket soft and vibrant, hand-wash it in cold water or use a gentle machine-wash cycle if you’ve used acrylic yarn. Lay it flat to dry to preserve its shape. Proper care will ensure your handmade piece stays beautiful for many holiday seasons.
Read my detailed post on blocking your project here.
Frequently Asked Questions
Q: Can I adjust the size of the blanket?
Yes! You can easily make it smaller or larger by modifying the number of panels or rounds in the border.
Q: Is this beginner-friendly?
The stitches are simple, but assembling the panels requires a little attention to detail. It’s a great project for confident beginners looking to expand their skills.
Q: Can I change the colors?
Absolutely. While red, white, and green are traditional, this blanket looks stunning in modern combinations like gold and cream, silver and blue, or even monochrome tones for a contemporary look.
The Crochet Christmas Blanket Pattern is a celebration of everything we love about the holidays—warmth, color, and creativity.
Each stitch brings a little more festive spirit into your home, and the finished piece becomes a beautiful reminder of the joy of handmade gifts. Whether you make it for yourself or to surprise someone special, this blanket is sure to become part of your holiday traditions for years to come.
About the Designer
Say Hi on Instagram and Subscribe To my email List for pattern discounts and freebies. For questions, send such to [email protected]. Read more about me here.

