
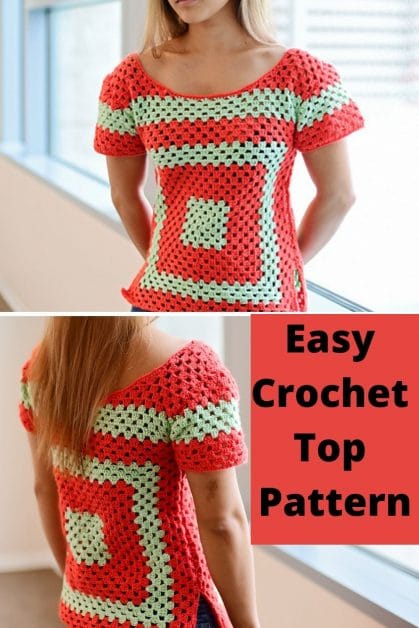
Crochet Granny Square Top Pattern
How about a fitted granny square top pattern? This simple top uses granny stitch which is a fun way to use the traditional granny stitch in a classy way. Make this top a little shorter and you have a beautiful granny square crop top perfect for summer.
Most crocheters love the granny stitch and must have made something in this stitch. So, designing the granny square top many years ago felt like fulfilling a basic right in the crochet community. Tell me, what have you made anything using the granny stitch? What’s your favorite thing to make using this stitch?
Have a look at some of the granny square projects on the blog – Granny stocking, Tudor granny square.
Name inspiration for this easy granny square top pattern
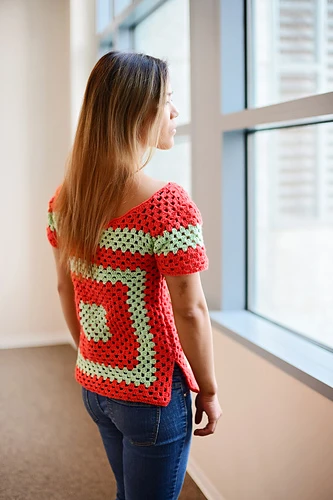
This easy granny square top has been named “fitted granny square top” I prefer calling this top “not your regular granny’s top” as it has a beautiful neckline as opposed to just joining two panels of squares together at the neck. All in a bit to make this design so unique and beautiful.
Another great thing about this top is the use of colors! I have added a beautiful twist of using up your stash and never worrying about the colors coordinating or not. You can totally go color-blocking with this top!

Want to be the first to be informed of the latest release and freebies? Come join my tribe!!!
Sizing available for this beautiful crochet granny square top pattern
The crochet granny square top was first published by the Happily Hooked Magazine in 2019 and was available in 5 sizes. However, in 2020, I re-tested this pattern in the plus sizes to make it size-inclusive. Currently, this granny square top is available in 9 different sizes.


Do check out more crochet patterns available here on my blog.
Waves of Bliss crochet Top pattern
Easy summer crochet top – free pattern

Materials for this easy, fitted granny square top pattern
- YARN – Stylecraft Special DK #3 light weight (100% acrylic; 322 yds/295 m per 3.5 oz/100g Ball)
• 1 (2, 2, 3, 3, 3, 4, 4, 5) Balls in Coral (A)
• 1 (1, 2, 2, 2, 3, 3, 3, 3) Ball(s) Mint (B)
Estimated Yardage
600 yards/549 m (880 yards/804m, 1000 yards/914 m, 1300 yards/1189 m, 1600 yards/1463 m, 1800 yards/1646 m, 2100 yards/1920 m, 2400 yards/2195 m)
Hook and other materials for your granny square crochet top
US Size G/6 (4.0mm) crochet hook
Yarn needle
Stitch markers (2 pieces)
Stitches needed for the granny square top
Ch- Chain
St – Stitch
Sp – space
Hdc – Half Double Crochet
Dc – Double Crochet
Sl st – Slip Stitch
FO – Fasten Off
Rs – RIGHT SIDE
Ws –Wrong Side
SKILL LEVEL – Intermediate
SIZES –
Size(s) and color codes – S (M, L, XL, 2XL, 3XL, 4XL, 5XL)
Bust Measurement: 34 (38, 42, 46, 50, 54, 58, 62)”
Length of Top: 21 (21, 21, 23, 23, 23, 25, 25)”
Armhole Measurement: 16 (16.5, 17, 17.5, 18, 18.5, 19, 19.5)”
The modeled garment is shown in Medium, with 1” of Positive Ease.
Gauge
18 dc and 9 rows = 4”/10 cm
Adjust hook size if necessary, to obtain gauge.

Instructions for this free crochet granny square top pattern
Front/Back Panel
Round 1: With B, ch 5, sl st to first to form a ring, ch 3, 2 dc, [ch 3, 3 dc] 3 times, ch 3, join—4 (3 dc clusters), 4 ch-3 sps.
Round 2: Ch 4 {counts as dc + ch 1 sp here and throughout the pattern}, [(3 dc, ch 3, 3 dc, ch 1) in next ch- 3 sp] 3 times, (3 dc, ch 3, 2 dc) in next ch-3 sp, join to the 3rd ch from the beginning ch 4. —8 (3 dc clusters),
4 ch-3 sps, 4 ch-1 sps.
Round 3: Ch 3 {counts as dc here and throughout the pattern}, 2 dc in first ch-1 sp, ch 1, *(3 dc, ch 3, 3 dc, ch 1) in next ch-3 sp, (3 dc, ch 1) in each ch-1 sp to next corner; repeat from * to last corner, (3 dc, ch 3, 3 dc, ch 1) in last ch-3 sp join— 12 (3 dc clusters), 4 ch-3 sps, 8 ch-1 sps.
Round 4: Ch 4, *(3 dc, ch 1) in each ch-1 sp to next corner, (3 dc, ch 3, 3 dc, ch 1) in next ch-3 sp; repeat from * to last corner, (3 dc, ch 1) each ch- 1 sp to last ch-1 sp, 2 dc in last ch-1 sp, join to the 3rd ch from the beginning ch 4. —16 (3 dc cluster), 4 ch-3 sps, 12 ch 1 sps.
Rounds 5 – 18 (21, 22, 24, 28, 32, 36, 40): Repeat Rows 3 – 4, changing color as indicated for each size below:
Small – 4 rounds B, 6 rounds A, 4 rounds B, 4 rounds A. = 72 (3 dc cluster), 4 ch-3 sps, 68 ch 1 sps.
Medium – 5 rounds B, 6 rounds A, 5 rounds B, 6 rounds A. = 86 (3 dc cluster), 4 ch-3 sps, 82 ch 1 sps.
Large – 5 rounds B, 6 rounds A, 7 rounds B, 6 rounds A. = 96 (3 dc cluster), 4 ch-3 sps, 92 ch 1 sps.
X-large – 6 rounds B, 7 rounds A, 8 rounds B, 7 rounds A = 112 (3 dc cluster), 4 ch-3 sps, 108 ch 1 sps.
2X-large – 7 rounds B, 9 rounds A, 8 rounds B, 5 rounds A = 116 (3 dc cluster), 4 ch-3 sps, 112 ch 1 sps.
3X-large – 8 rounds B, 8 rounds A, 8 rounds B, 8 rounds A = 128 (3 dc cluster), 4 ch-3 sps, 124 ch 1 sps.
4X-large – 9 rounds B, 9 rounds A, 9 rounds B, 9 rounds A = 144 (3 dc cluster), 4 ch-3 sps, 140 ch 1 sps.
5X-large – 10 rounds B, 10 rounds A, 10 rounds B, 10 rounds A = 160 (3 dc cluster), 4 ch-3 sps, 156 ch 1 sps.
Fasten off
Note: At this point, your work should be half of the your burst measurement, if it’s not, then continue to repeats. – Rows 3 – 4 till you get the appropriate measurement.
Now working in Rows and only in one of the 4 corners
Row 1 (WS): Join B in corner ch-3 sp, ch 3, 2 dc in the same corner, ch 1 *3 dc, ch 1 in each ch-1 sp, rep from * till next ch 3 sp, 3 dc in corner sp, turn to leave the remaining sts unworked. — 19 (22, 23, 25, 29, 33, 37, 401 shells, 18 (21, 22, 24, 28, 32, 36, 40) ch 1 sps
Row 2 (RS): Ch 4, *3 dc in next ch-1 sp, ch 1; repeat from * to last shell, dc in st—18 (21, 22, 24, 28, 32, 36, 40) shells, 2 dc.
Place stitch markers in (small – 6th and 12th) (Medium – 8th and 16th), (Large – 9th and 18th), (X-Large – 11th and 15th), (2X-Large – 11th and 18th), (3X-Large – 13th and 26th), (4X-Large – 15th and 30th), (5X-Large – 17th and 34th) ch-1 sps.
Note that the sp between the stitch markers will be the neckline, as such – you can adjust appropriately
Right Armhole/Neckline
Row 1: With A, working towards 1st stitch marker, ch 3, turn, 2 dc in first ch-1 sp, ch 1, *3 dc in next ch-1 sp, ch 1; repeat from* to stitch marker (or last ch-1 sp on repeats of row), dc in ch-1 sp, turn, ch 1— 5 (7, 8, 10, 10, 12, 14, 16) shells, 2 dc.
Leave remaining sts un-worked
Row 2: Skip 1st ch-1 sp, ch 4, 3 dc in next ch-1 sp, *ch 1, 3 dc in next ch-1 sp; repeat from * to end of row.
—5 (7, 8, 10, 10, 12, 14, 16) shells, 2 dc.
Rows 3 – 6: Repeat Rows 1-2. (dec 1 shell each repeat of Row 1)
Row 7: Ch 4, *3 dc in next ch-1 sp, *ch 1, 3 dc in next ch-1 sp; repeat from * to end of row—3 (5, 6, 8, 8, 10, 12, 14) shells,
2 dc.
Row 8: Repeat Row 7.
Fasten off with a long tail for sewing.
Fasten off with a long tail here for the remaining sizes.
Left Armhole/Neckline
Turn, with A, sl st to top of first st working toward 2nd stitch marker, repeat Right Armhole/Neckline instructions.
Repeat from start for Back Panel
Finishing
With RS together, WS facing, sew shoulder seams.
Shape the neckline
Join A with sl st, ch 1, hdc in each row end round neckline, join with sl st to ch-1.
Optional – if the neckline is too wide for you, you can add a few more rounds of hdc around.
Sleeves (make 2)
Note that you can vary the colors accordingly
Row 1: With B, Chain 69 (73, 81, 85, 89, 93, 93, 93), Dc in 4th ch from hook, dc in next, *ch 1, skip next ch, dc in next 3 ch; repeat from * to end of row – 17 (18, 20, 21, 22, 23, 23, 23) shells, 16 (17, 19, 20, 21, 22, 22, 22) ch-1 sps.
Row 2: Ch 4, turn, *3 dc in next ch-1 sp, ch 1; repeat from * to end of row, dc in top of last—16 (17, 19, 20, 21, 22, 22, 22) shells, 17 (18, 20, 21, 22, 23, 23, 23) ch-1 sps.
Row 3: Ch 3, turn, 2 dc in same ch-1 sp, *ch 1, 3 dc in next ch-1 sp; repeat from * to end of row— 17 (18, 20, 21, 22, 23, 23, 23) shells, 16 (17, 19, 20, 21, 22, 22, 22) ch-1 sps.
Rows 4 – 5 (5, 7, 7, 7, 7, 7,7): Repeat Rows 2-3.
Fasten off B, Join A
Row 6 (6, 8, 8, 8, 8, 8, 8): With A, repeat Row 2.
Shaping the arm (this part is done by skipping the first ch-1 sps and working 2dc in the last ch-1 sps.
Row 7 (7, 9, 9, 9, 9, 9, 9): Ch 3 (counts as dc), skip 1st ch-1 sp, *3 dc in next ch-1 sp, ch 1; repeat from * to last ch-1 sp, dc in last ch-1 sp, turn.
Rows 8 (8, 10, 10, 10, 10, 10, 10) – 10 (10, 12, 12, 12, 12, 12, 12): Repeat Row 7 (7, 9, 9, 9, 9, 9, 9)
Fasten off A, Join B after Rows 8 (8, 10, 10, 10, 10, 10, 10)
Rows 11 (11, 13, 13, 13, 13, 13, 13) – 13 (13, 17, 17, 19, 19, 19): Repeat Row 7
Fasten off and weave in ends.
Assembling
- With WS facing fold sleeve in 2
- Place tip of sleeve (the narrowest part, after folding to 2) to shoulder seam/side, secure with stitch marker
- On the front and back panels, count 11 (11, 18, 18, 18, 19, 19, 19) rows down from shoulder seam, place stitch markers. (Note, adjust number of rows to preference)
- With the sleeve placed on the part marked with stitch markers on the panel, sew both sleeve and the panel together starting from the beginning of Row 7 (7, 9, 9, 9, 9, 9, 9) of the sleeve, this is the part where we skipped Ch -1 sps
- The remaining part of the sleeve is joined/sewn together, i.e Row 1 to Row 6 (6, 8, 8, 8, 8, 8, 8) and not to the front/back panels.
Fasten off.
Sew the side of the panels (front and back) together from the arm pit, continue down side
Fasten off and weave in all ends.
Repeat for other side.
I would love to see your color choices and makes from this granny square crochet top pattern. Do tag me with your beautiful make.


One Comment
Comments are closed.