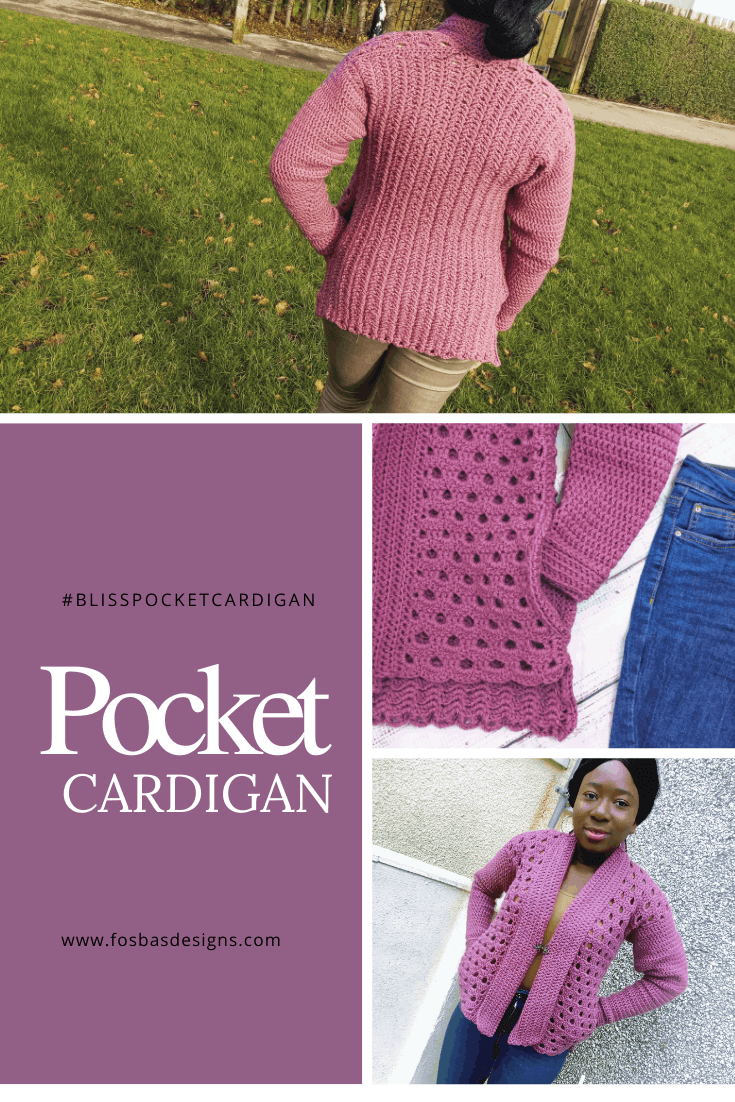
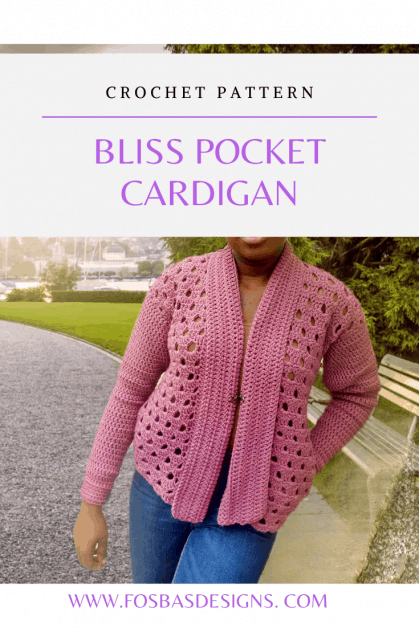
Bliss Crochet Pocket Cardigan Pattern
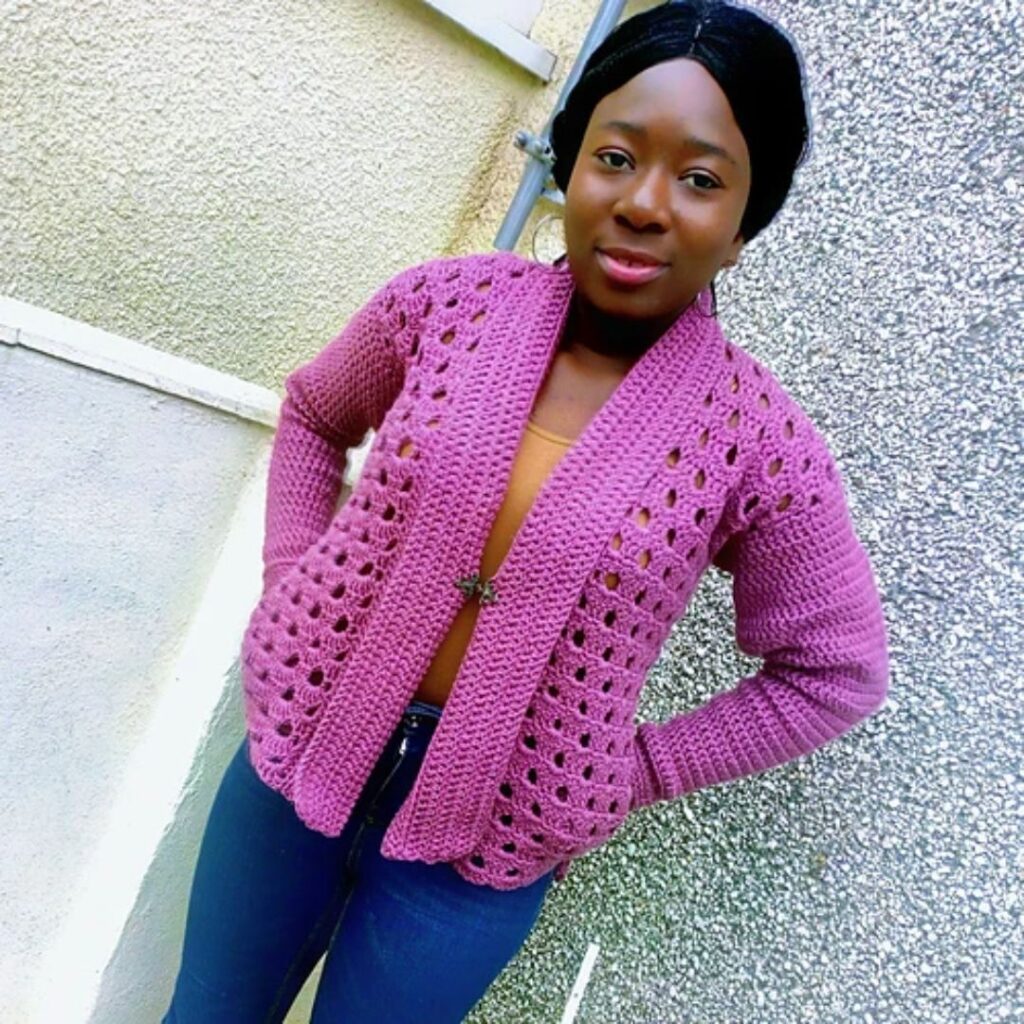
Introducing the Bliss crochet pocket cardigan pattern. Textures and pockets are two things I love to add to my designs. This crochet pocket cardigan pattern has both!
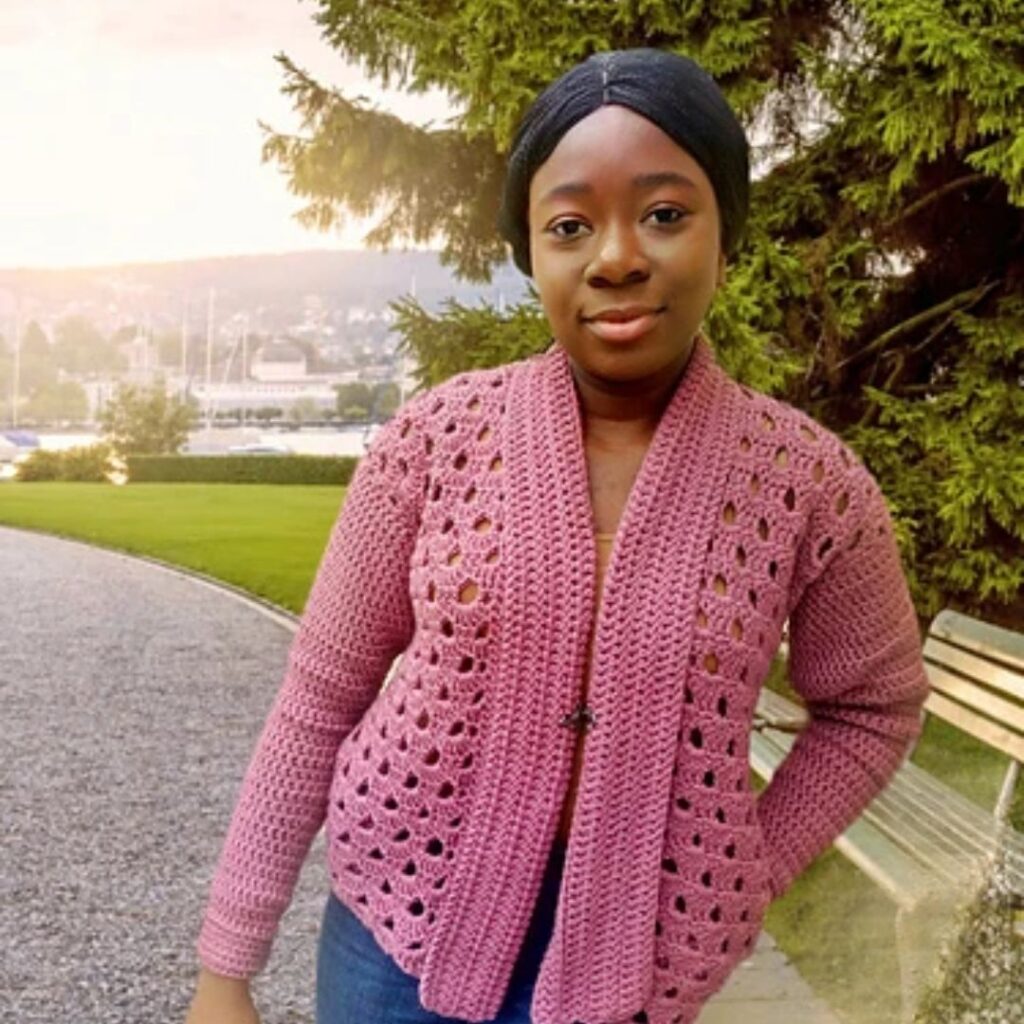
The size-inclusive crochet pocket cardigan has gradually become my favorite as I get to keep my valuables in my pocket when I am out of the house.
Having a sketch come out just as dreamed or sketched in my case remains a delight. The Bliss pocket cardigan is one of my most planned cardigan patterns and I couldn’t be happier with the outcome. I mean, this cardigan has an in-seam pocket Ladies!!!
Most cardigans I’ve seen with pockets have those sewed on but this cardigan is endowed with pockets made inside (within the seam) and you can easily access your pockets from the sides.

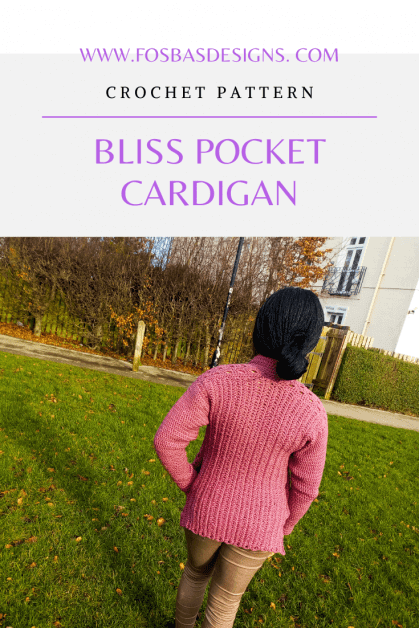
Can we talk about the beautiful textures on the Bliss pocket cardigan? The back panel uses the interlocking stitch!! Wait a minute, this pattern has a video tutorial for this!
With spring just a few weeks away, the front panel uses an open stitch which also adds more beauty to this pattern. I have named this beauty after my very good crochet friend, you should check her out on INSTAGRAM.
More designs with pockets on my blog that you can check out include-
Here are some free crochet cardigan patterns
Real bobble-free cardigan pattern
Materials for the pocket cardigan pattern
- Yarn – Any chunky (#5) weight yarn can be substituted. The prototype was made using Stylecraft Special Chunky, Weight 5 Chunky (100% Acrylic, 157 yards/144 m per 3.5 oz/100g Ball) any other similar #5 weight yarn can be substituted, you can buy it here
- Size J/10 (6 mm) Crochet Hook
- Stitch Markers x 2
- Yarn needle
The pattern include a chart for the back panel and also has both written and photo tutorials alongside a stitched video. Grab the PDF pattern through the link below.
Crochet Pocket Cardigan pattern on ETSY
Biss Pocket Cardigan on RAVELRY
Sizing and grading of Bliss pocket cardigan pattern
XS (S, M, L, XL, 2-XL, 3-XL, 4-XL, 5-XL)
Bust Measurement: 28 – 30(32 – 34, 36 – 38,40 – 42, 44 – 46, 48 – 50, 52 – 54,56 – 58, 60 – 62)”
Length of Cardigan: 21(23, 25, 25, 27, 27, 29, 29, 31)”

Adjustments and fitting of your pocket cardigan
Since this pattern is aimed at being size-inclusive, there is also room for customizing this pattern to fitting you. like making this cardigan longer, the length of the sleeves, and adjusting bust measurements.
I can’t wait to see your beautiful makes from this pattern, do tag me on Instagram with your progress and finished makes using #blisspocketcardigan
How to crochet a cardigan with pockets
Please read pattern notes and construction before beginning
Foundation Chain 82(94, 106, 118, 130, 142, 154, 166, 178) in multiple of 6 + 4
[WS] Row 1: Dc in 6th ch from hook, ch 3, skip next ch, dc in next ch, *ch 1, skip next 3 chs, dc in next ch, ch 3, skip next ch, dc in next ch, rep from * to last 2 chs, skip next ch, dc in last ch. turn to work on the foundation chains made. 13(15,17,19,21, 23, 25, 27, 29) dc/ch 3-dc 12(14, 16,18,20, 22, 24, 26, 28) ch-1 sps
[RS] Row 2: In this row, we are working into the 1 skipped ch between the dc sts. Ch 2, with the stitches from row 1 behind, working in skipped chains from the foundation, skip first missed ch, V stitch in next skipped ch 1 from foundation ch, *ch 1, V stitch in next skipped ch 1 from foundation ch, rep from * to last st, dc in last st, turn. 13(15,17,19,21, 23, 25, 27, 29) V sts 12(14,16,18,20, 22, 24, 26, 28) ch-1 sps
[WS] Row 3: Ch 2, with both layers of Row 1 and 2 over each other,* locate next ch-3 sp, pass your hook behind ch-3 from row 2, work 1 V st in ch-3 sp from row 1, ch 1, skip ch-1 sp, repeat from * to last st, dc, turn. 13(15,17,19,21, 23, 25, 27, 29) V-sts 12(14,16,18,20, 22, 24, 26, 28) ch-1 sps
[RS] Row 4: Ch 2, * working from the front V stitch in ch-3 sp from 2 rows below, ch 1, repeat from * to last st. dc, turn. 13(15,17,19,21, 23, 25, 27, 29) V-sts 12(14,16,18,20, 22, 24, 26, 28) ch-1 sps
Rows 5 – 65(69, 69, 75, 75, 75, 79, 79, 79): Rep Rows 3 and 4, ending on Wrong side (Row 3)
Row 66(70, 70, 76, 76, 76, 80, 80, 80): With both ch 3 sps held together, ch 2, hdc in next st, *2 hdc through both ch-3 sps, 2 hdc in ch-1 sp, rep from * to last st, hdc, turn. 52(60, 68, 76, 84, 92, 100, 108, 116) hdc Do not fasten off
Section 2: Front Panel
Place stitch markers on the 22(27, 32, 37, 42, 47, 52, 52, 57) stitch and second stitch marker on the 30(33, 36, 44, 48, 53, 56, 56, 59) stitch
Row 1: Ch 2, Hdc in each st till first stitch marker, turn. 22(27, 32, 37, 42, 47, 52, 52, 57) Hdc
Row 2: Ch 3, dc in first 2 sts, *ch 2, skip 2 sts, dc in next 3 sts, rep from * to end, turn.
14(17, 20, 23, 26, 29, 32, 32, 35) dc 4(5, 6, 7, 8, 9, 10, 10, 11) ch-sps
Row 3: Ch 1,*skip next st, sc in next st, skip next st, 1 shell in ch-sp, rep from * till the last shell, skip next st, sc in last st, turn. 4(5, 6, 7, 8, 9, 10, 11, 11, 12) shells 5(6, 7, 8, 9, 10, 11, 11, 12) sc
Row 4: Ch 4(counts as dc + ch 1), skip next st, *dc in next 3 sts, ch 2, skip next 3 sts, rep from * to last 3 sts, ch 2, skip 2 sts, dc in last st, turn. 5(6, 7, 8, 9, 10, 11, 12, 13) ch sps 14(17, 20, 23, 26, 29, 31, 34, 37) dc
Row 5: Ch 3(counts as dc), 2 dc in ch-2 sp, *skip next st, sc in next st, skip next st, 1 shell in ch-2 sp, rep from * to last ch-1 sp, 3 dc, turn. 3(4, 5, 6, 7, 8, 9, 10, 11) shells (6) dc 4(5, 6, 7, 8, 9, 10, 11, 12)sc
Row 6: Ch 3, dc in next st, *ch 2, skip next 3 sts, dc in next 3 sts, rep from * to last 5 sts, ch 2, skip next 3 sts, dc in last 2 sts, turn. 13(16, 19, 22, 25, 28, 30, 33, 36) dc 4(5, 6, 7, 8, 9, 10, 11, 12 ch) sps
Row 7: Ch 1, sc in first st, *skip next st, 1 shell in ch-2 sp, skip next st, sc in next, rep from * to last 2 sts, skip next st, sc in last st. 4(5, 6,7,8, 9, 10, 11, 12) shells 5(6, 7, 8, 9, 10, 11, 12, 13)sc
Row 8: Ch 4(counts as dc + ch 1), skip next st, *dc in next 3 sts, ch 2, skip next 3 sts, rep from * to last 2 sts, ch 2, skip next st, dc in last st, turn. 5(6, 7, 8, 9, 10, 11, 12, 13) ch sps 14(17, 20, 23, 26, 29, 31, 34, 37) dc
Row 9 – 41(45, 45, 45, 49, 49, 49, 51, 51): Rep Rows 5 to 8
Fasten off.
Left side
Join yarn with a sl st on the other side, working towards the 2nd stitch marker, and repeat as with the right side.
Do not fasten off
Edging/sides
With your work laid flat, working up the side of the front panel, continue across the side of the back panel, ch 2, Hdc in each st across.
Fasten off.
Right side edging
Join yarn with a sl st to the long side (right side), Repeat for the other side (left)
Collar
working up the side of the front panel and working towards the neck, Join yarn with a sl st to right side inner opening.
Row 1: Ch 2, hdc in each edge, hdc in 4(3, 2, 1, 0, 0, 0, 2, 1) sts left on the back, hdc in each edge of the right side, turn.
Row 2 – 8(8, 8, 10, 10, 10, 10, 12, 12): Ch 2, Hdc across
Fasten off
Section 3 – Sleeves
Fold the front panels over the back panel Measure 7.5(8, 8, 8.5, 8.5, 9, 9, 9.5, 10)” from the shoulder downwards
Place stitch markers on the point (1st on the front panel, the 2nd on the back panel), over both panels
Join yarn with a slip stitch at the stitch with the marker.
Round 1: Ch 2, Hdc in each st till second st marker join with a sl st to ch-2 sp. 46(52, 52, 58, 58, 64, 64, 70, 76) hdc
Rounds 2 – 6: Ch 3, dc in each st around, join with a sl st to ch-3 sp. 46(52, 52, 58, 58, 64, 64, 70, 76) dc
Round 7: Ch 3, dc around till last 2 sts, dc2tog, join with a sl st to
ch-3 sp. 45(51, 51, 57, 57, 63, 63, 69, 75) dc
Rounds 8 – 22(28, 28, 30, 30, 32, 32, 38, 44): Repeat Round 7.30(30, 30, 34, 34, 38, 38, 38, 38) dc
Rounds 23(29, 29, 31, 31, 33, 33, 39, 45) – 34(36, 36, 38, 38, 40,
40, 40, 46): Ch 3, dc around, join with a sl st to ch3 sp. 30(30, 30,
34, 34, 34, 38, 38, 38) dc
Sleeve Cuff
Next 6 Rounds: Ch 3, BPdc around each st, join with a sl st
to ch-3 sp. 30(30, 30, 34, 34, 34, 38, 38, 38) dc
Fasten off
Repeat for the second sleeve Side seam(s)
Turn work to the wrong side.
Join yarn with a sl st to the underarm point, working through both
front and back panels work 1 sc in next 20(20, 22, 24, 26, 26, 26,
30, 30) sts.
Do not fasten off
Pocket(s)
Separate the panels
Round 1: Working through the front panel and in BLO, ch 3, dc into next 20 sts, turn to continue on the Back panel in FLO, 1 dc in next 20 sts on the back panel, join to ch 3 sp.(40) dc
Round 2 – 10:Ch 3, in both loops, dc in each st around, join to ch-3 sp. (40) dc
Sl st through both sides of the pocket to join both sides.
Fasten Off
Side seam(s) continued
Join yarn to the base of the pocket, 1 sc in both panels for the remaining stitches left on the side.
Repeat for the other side.
Fasten off, and weave in ends.
Block to measurement