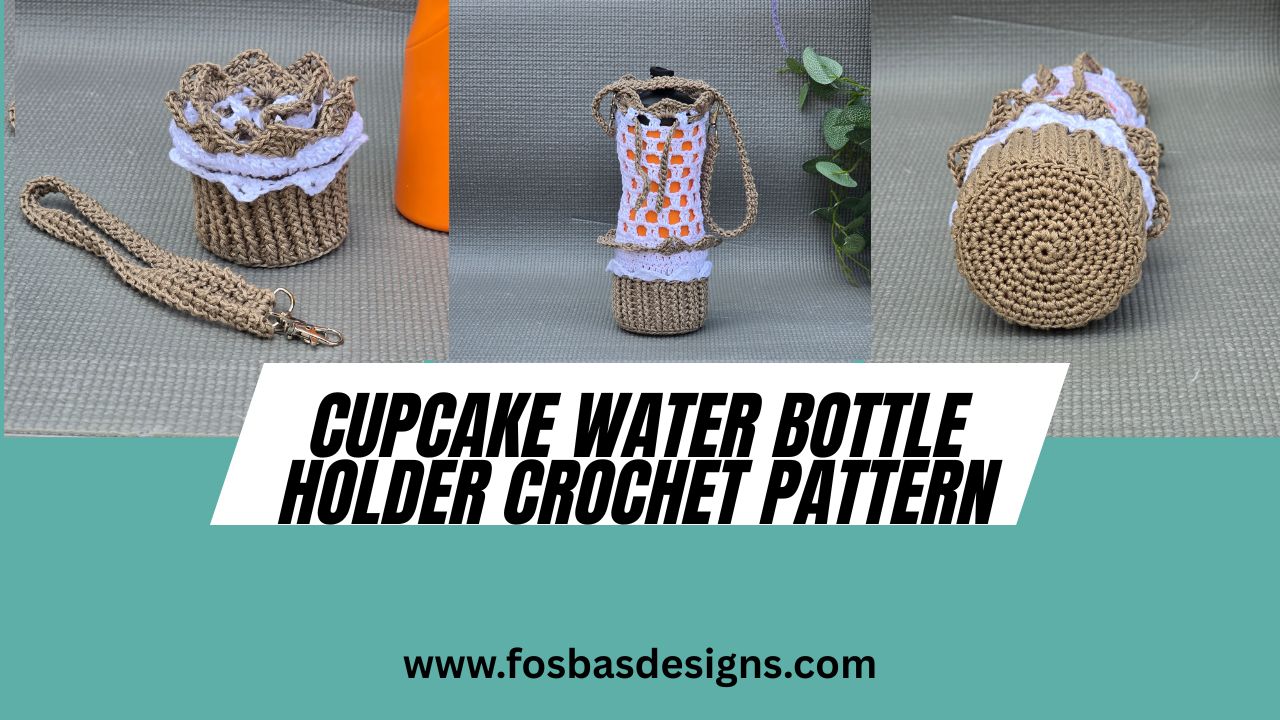
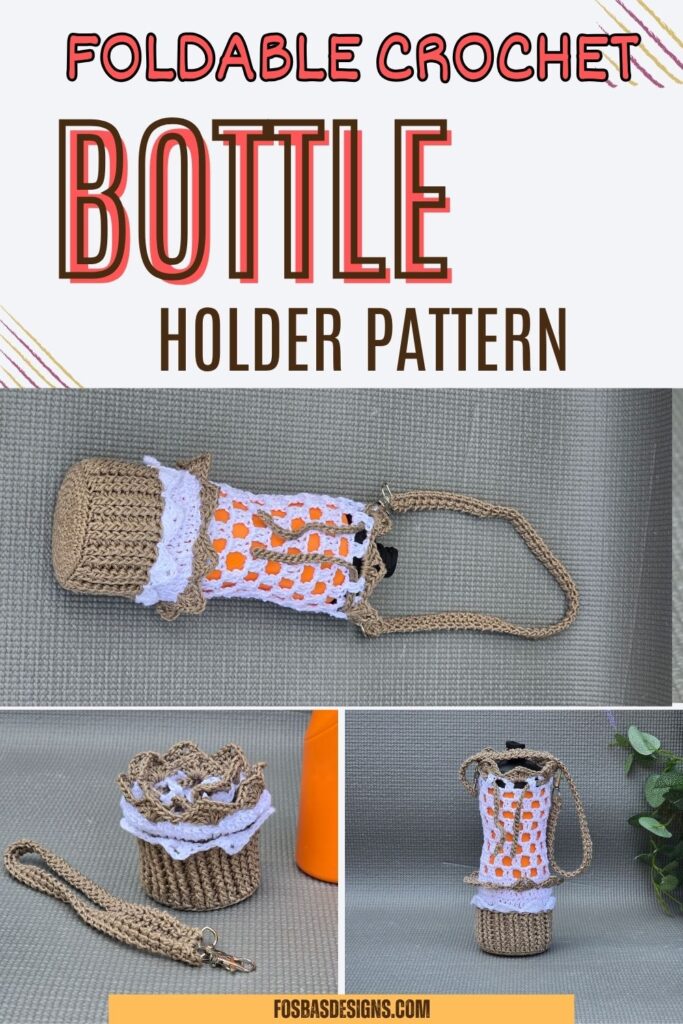
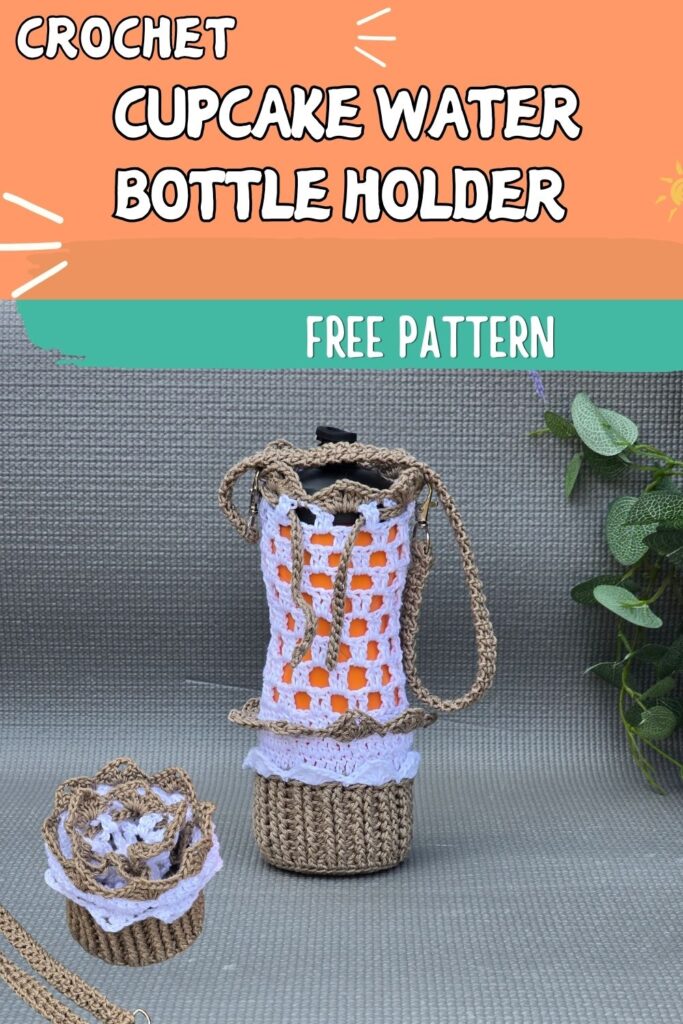
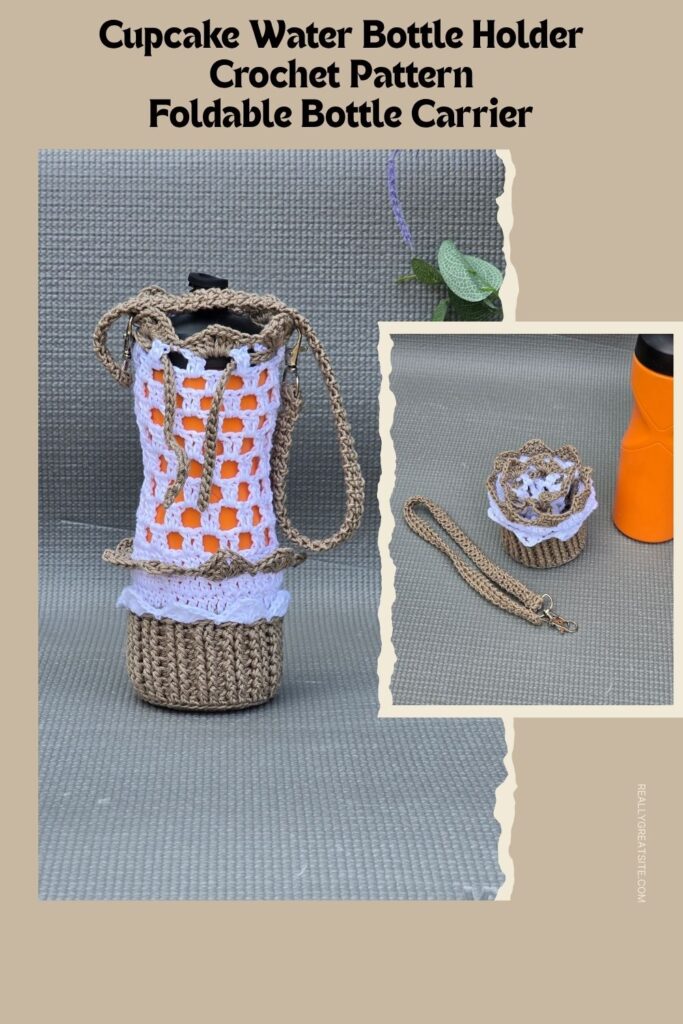
Cupcake Water Bottle Holder Crochet Pattern (Foldable Bottle Carrier)
Looking for a practical crochet project that’s both adorable and functional? This Cupcake Water Bottle Holder Crochet Pattern transforms from a cute cupcake-shaped pouch into a handy water bottle carrier.
When not in use, it folds neatly into a compact cupcake that can be clipped to your bag, backpack, stroller, or purse.
Get the print friendly version on Ravelry Etsy
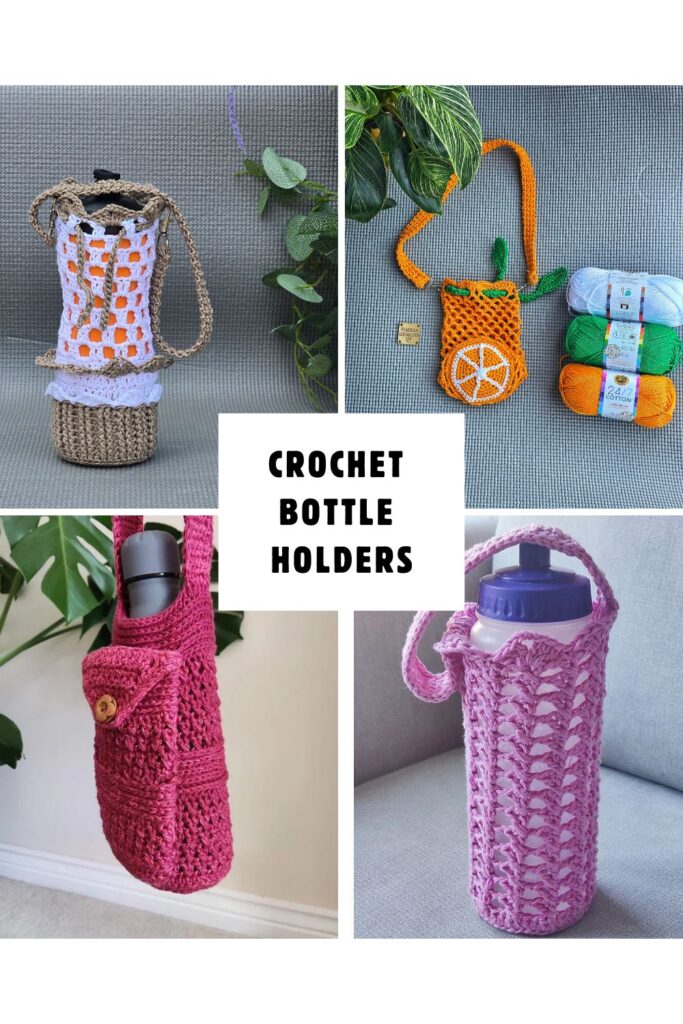
Love Bottle Holders? Grab the Full Bundle
Crochet Bottle Holder Bundle
Love bottle holders? Get all 5 patterns, including this one:
- Pink Mesh Tote – A 1-hour crochet water bottle holder pattern
- Berry Button Flap – Simple bottle holder with phone pouch
- Cupcake Foldable Water Bottle Holder
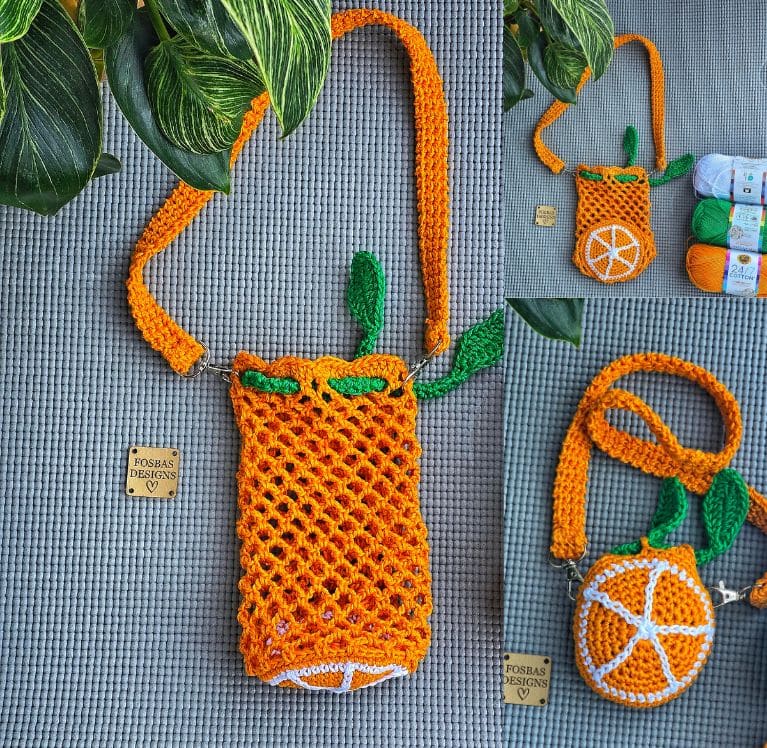
- Orange Slice bottle holder
- Coffee cup holder
Available now on Ravelry and Etsy.
This bundle is perfect if you love practical crochet accessories and want multiple crochet crossbody bag patterns for every season.
Perfect for walks, festivals, travel, sporting events, and everyday adventures, this beginner-friendly pattern uses simple stitches and minimal yarn while creating a unique accessory that’s sure to spark conversations.
Why You’ll Love This Pattern
- Folds into a compact cupcake shape
- Lightweight and easy to carry
- Great stash-busting project
- Beginner-friendly construction
- Uses basic crochet stitches
- Perfect gift idea
- Reusable alternative to disposable bottle carriers
- Easy to customize with different color combinations
More Crochet Accessories You’ll Love
If you enjoy practical crochet projects, be sure to check out:
- Crochet Water Bottle Holder with Phone Pouch
- Orange slice foldable water bottle holder
- Foldable Crochet Market Bag
- Crochet Tote Bag
- Crochet Keychain Holder
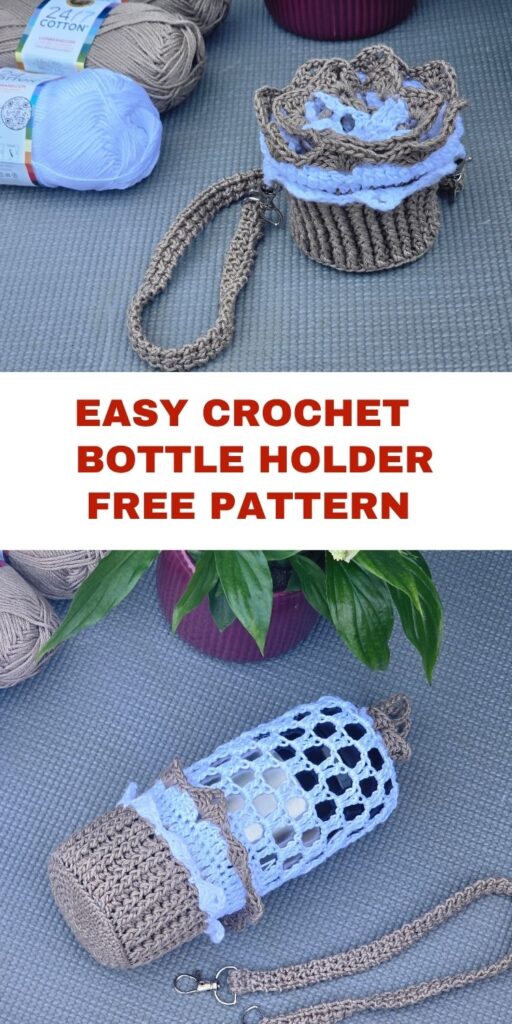
Material for the Cupcake Water Bottle Holder Crochet Pattern
Lionbrand 24/7, #4 lightweight (100% Cotton, 257 yards/235 m per 3.75 oz/100g Skein)
Estimated yardage
80 yards in each color
Hook
4.5 mm Crochet Hook
Other materials
Darning needle
Metal hooks for bag handle (optional)
- 4.5 mm Crochet Hook
- Yarn needle
- Tape measure
- Metal hook for bag handle – 2 pcs (optional)
Gauge – Rounds 1 – 4 = 3”
Use the instructions for section 1
Pattern Notes
- Please kindly read through the pattern before starting.
- Any #4 weight yarn can be substituted
Difficulty Level – Easy
Terms – US Terminology
Stitches
Chain(s) – ch(s)
Back Loop only – BLO
Back Post Half Double Crochet – BPhdc
Double Crochet – dc
Front Post Half Double Crochet – FPhdc
Single Crochet – sc
Half Double Crochet – hdc
Slip Stitch – sl st.
3rd loop
Color codes:
CC – Contrasting color
MC – Main color
Special Stitch
Shell stitch – (3 dc, ch 3, 3 dc) in indicated st
Finished Measurement:
4” (Base) by 7” (Height)
Share Your Project
I’d love to see your finished Cupcake Water Bottle Holder!
Share your photos on social media and tag @FosbasDesigns so I can admire your beautiful creations.
Happy Crocheting!
Susanna
Fosbas Designs
Perfect Summer Crochet Project
If you are searching for a summer crochet pattern that is both functional and eye-catching, this crochet water bottle holder pattern is the perfect project to make next. The playful orange slice detail gives this crochet crossbody bag pattern a fresh summer feel while still being practical enough for everyday use.
From festivals to beach days, this crochet bottle sling is a stylish way to carry your water bottle hands-free all summer long. Get a copy using the images below.

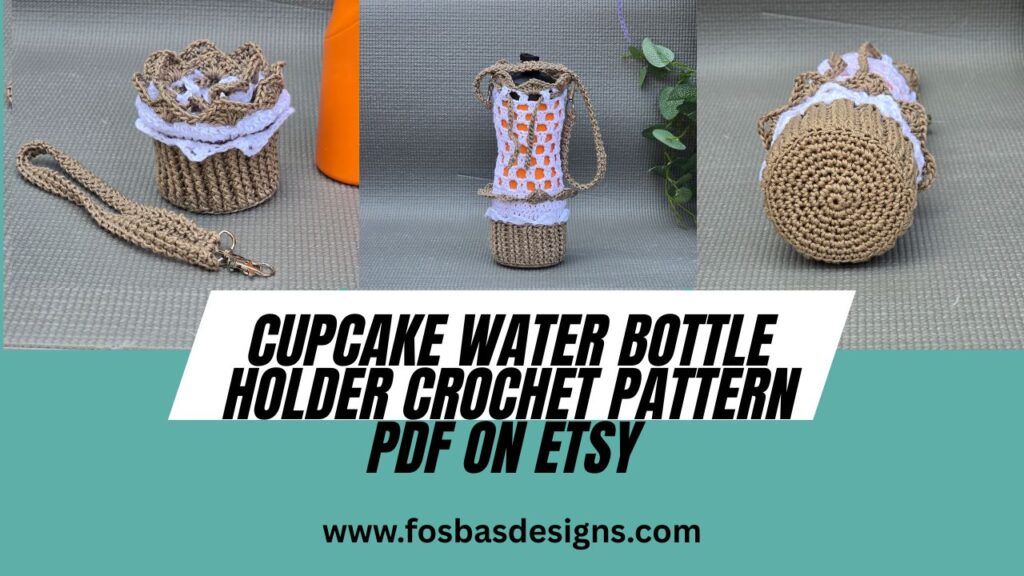
Cupcake Water Bottle Holder Crochet Pattern
Section 1: Cupcake/Muffin case
Muffin Base
Using MC
Round 1: In a Magic ring, ch 1, 6 sc, join—6 sc.
Or ch 3, 6 sc in 3rd ch from hook, join—6 sc.
Round 2: Ch 1, 2 sc in each around, join—12 sc.
Round 3: Ch 1, *sc in next, 2 sc in next; repeat from * around, join—18 sc.
Round 4: Ch 1, *sc in next 2 sts, 2 sc in next; repeat from * around, join—24 sc
Round 5: Ch 1, *sc in next 3 sts, 2 sc in next; repeat from * around, join—30 sc
Round 6: Ch 1, *sc in next 4 sts, 2 sc in next; repeat from * around, join—36 scRound 7: Ch 1, *sc in next 5 sts, 2 sc in next; repeat from * around, join—42 sc
Round 8: Ch 1, *sc in next 6 sts, 2 sc in next; repeat from * around, join—48 sc
Muffin case body
Round 9: Ch 1, in BLO, hdc in each st around, join. 48 hdc
Rounds 10 – 16: Ch 2(counts as first BPhdc), *FPhdc around the next 2 sts, BPhdc around next st, rep from * until the last 2 sts, FPhdc around the last 2 sts, join – 32 FPhdc, 16 BPhdc
Round 17: Ch 2, hdc in 3rd loop of each st around, join. 48 hdc
Fasten off.
With CC
Join yarn with a sl st to any st from round 17.
Rounds 18 – 19: Ch 2, dc in each st around, join. 48 dc
Round 20: Ch 2, dc in BLO of each st around, join. 48 dc
Round 21: Ch 3 (counts as first st, here and throughout), dc in next st, *ch 2, skip next 2 sts, dc in next 2 sts, rep from * until the last 2 sts, ch 2, skip last 2 sts, join with a sl st to the top of ch 3. 12 ch 2 sps, 24 dc
Round 22: Ch 5 (counts as dc + ch 2, here and throughout), *skip next 2 sts, 2 dc in next ch 2 sp, ch 2, rep from * until the last ch sp, ch 2, dc in last ch 2 sp join with a sl st to 3rd ch from beginning ch 5. 12 ch 2 sps, 24 dc
Round 23: Ch 3, dc in same ch 2 sp, *ch 2, skip next 2 sts, 2 dc in next ch 2 sp, rep from * until the last 2 sts, ch 2, skip last 2 sts, join with a sl st to the top of ch 3. 12 ch 2 sps, 24 dc
Rounds 24 – 29: Repeat Rounds 22 – 23
Adjust the repeats as needed.
Fasten off CC, join MC
Join MC with a sl st to any of the ch 2 sps.
Round 30: Ch 3, 2 dc, ch 3, 3 dc in same ch 2 sp, *sc in next ch 2 sp, shell stitch in following ch 2 sp, rep from * until the last ch 2 sp, sc in last ch 2 sp, join with a sl st to the top of ch 3. 6 groups of shells, 6 sc
Fasten off
Section 2: Adding Icing
This part is crocheted into the loops left unworked in the round; switch to BLO.
Icing level 1
Made into the unworked loops around
Added to the last round of the muffin cup.
Join CC with a sl st in any st. Crocheting in rounds.
Level 1: Ch 3, (2 dc, ch 3, 3 dc) in same st, *skip next 2 sts, sc in next st, skip next 2 sts, shell stitch in next st st, rep from * until the last 5 sts, skip next 2 sts, sc in next st, join with a sl st to the top of ch 3. 8 groups of shells, 8 sc
Fasten off.
Icing level 2
Added to the unworked front loops of round 8, (3 rounds above the first layer).
Join MC with a sl st in any st. Crocheting in rounds.
Level 2: Ch 3, (2 dc, ch 3, 3 dc) in same st, *skip next 2 sts, sc in next st, skip next 2 sts, shell stitch in next st st, rep from * until the last 5 sts, skip next 2 sts, sc in next st, join with a sl st to the top of ch 3. 8 groups of shells, 8 sc
Fasten off.
Section 3: Rope to secure the last round of the bag
Row 1: With MC, chain 51, sc in 2nd ch from hook and in each ch across, turn. 50 sc
Row 2: Ch 1, sl st in each st across
Fasten off and secure the ends.
Thread the rope through the ch 2 sps in round 29
Section 4: Bag handle
With MC
Row 1: Ch 3, using the back loop only, sc in 2nd ch from hook, sc in last chain, turn. 2 sc
Row 2: Working into the front loop only of this row and the loop left from the foundation chain, sc in each st across, turn. 2 sc
Row 3: Using only the front loop of the current row and the unworked loop from the row below, sc in each st across, turn. 2 sc
Rows 4 until the end: Repeat Row 3.
Repeat the last row until you have your desired length.
Joining the rope to the cupcake pouch. Option 1:
Sew the end of the strap to the corresponding side of the purse.
Note: Using this option makes the strap permanent. For a strap that can be removed, use option 2
Option two: Using the metal clasps
Step 1: Pass the handle through the lower end of a clasp.
Step 2: Repeat row 4, crocheting over the lower end of the claps.
Fasten off
Securing the clasp to the other end
Step 1: Pass the handle through the lower end of a clasp about 1/2 “
Step 2: Fold the lower end and secure it over the clasps to the other corresponding part of the handle. Use a sewing needle and whip stitch. Cut the yarn and secure the ends
The clasp makes it easier to remove and attach the handle.
You can secure the handle to the bag or to the bottle pouch.
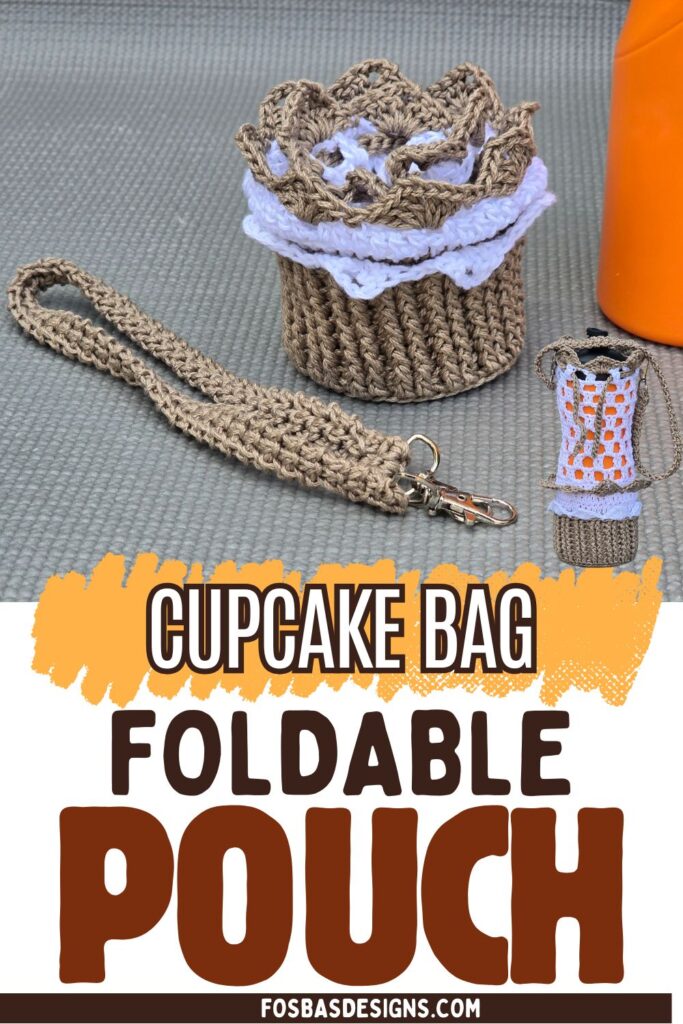
How to fold
Step 1: Remove the straps and set aside.
Step 2: Gently push the body of the pouch down into the muffin case.
Step 3: Fluff (shape) the cupcake properly.
Step 4: Attach the strap to either side of the pouch.
Frequently Asked Questions
What size water bottle does this holder fit?
The holder is designed to fit most standard reusable water bottles with a diameter of approximately 3 inches. The mesh section provides flexibility to accommodate slight size variations.
Can I use a different yarn?
Yes. Any #4 weight cotton yarn can be substituted. Cotton is recommended because it provides durability, structure, and minimal stretching.
Is this pattern beginner-friendly?
Yes. This is an easy-level crochet pattern that uses basic stitches and simple construction techniques.
Can I make the strap longer?
Absolutely. Simply add additional rows to the strap section to create your preferred length.
Does the cupcake really fold up?
Yes. The bottle holder folds neatly into the cupcake-shaped pouch, making it easy to store in a handbag, backpack, or car.
Do I need the metal clips?
No. The clips are optional but make it convenient to attach the folded cupcake to bags, belt loops, or strollers.
Can I sell finished items made from this pattern?
Yes. You may sell finished items made from the pattern. Please do not copy, redistribute, or resell the pattern itself.
What is the best yarn for this project?
Lion Brand 24/7 Cotton works beautifully because of its stitch definition, durability, and ability to hold the cupcake shape.
The Cupcake Water Bottle Holder combines practicality and creativity in one adorable crochet project. Whether you’re heading to the park, a festival, a sporting event, or simply running errands, this foldable bottle holder keeps your water close at hand while folding into a charming cupcake when not in use.
With simple stitches, minimal materials, and endless color possibilities, this is a project you’ll enjoy making again and again. It’s perfect for gifts, craft fairs, and treating yourself to a fun crochet accessory.
Happy crocheting!

