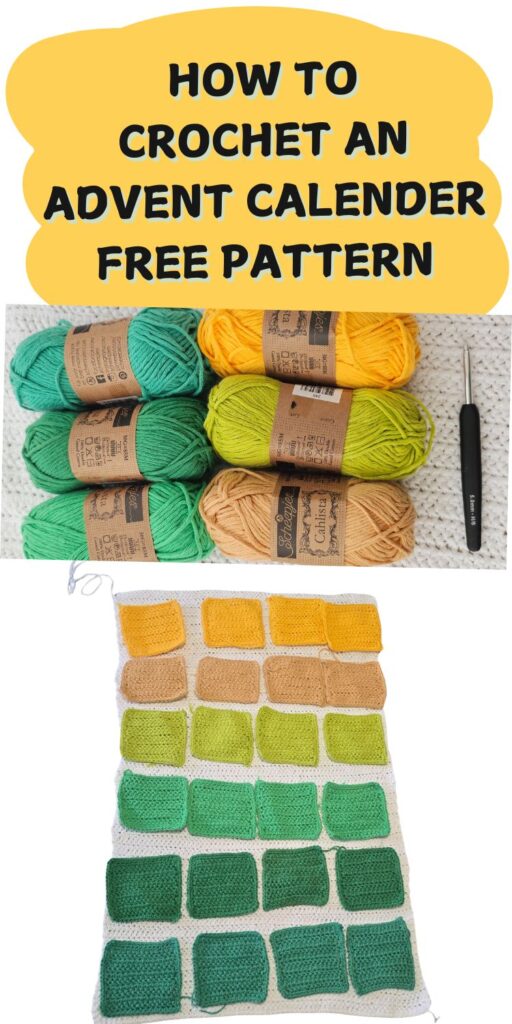
Easy Crochet Advent Calendar Free Pattern
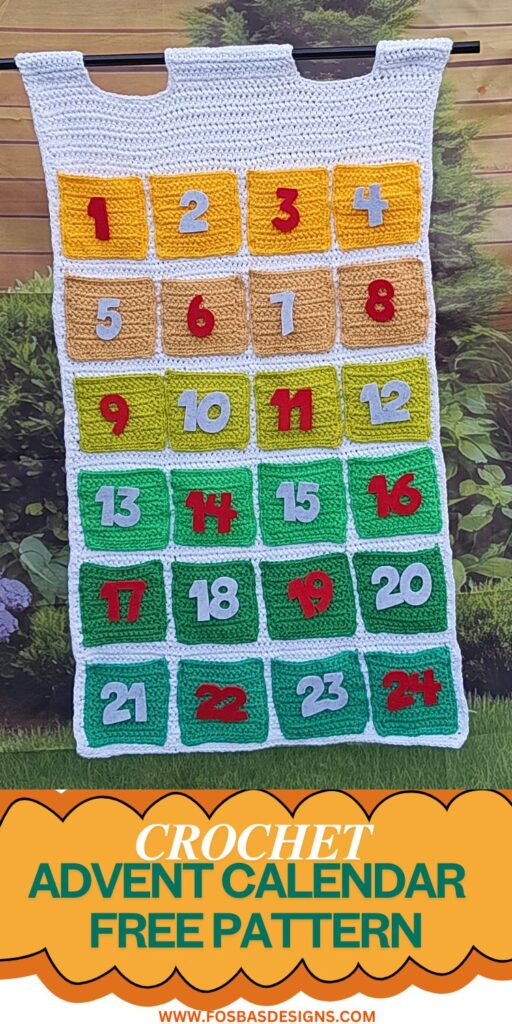
If you’re searching for a fun, practical, and festive project to make this holiday season, this crochet advent calendar is the perfect make! Designed to hold little treats, notes, charms, or tiny surprises for each day leading up to Christmas, this advent calendar combines simple squares, playful colours, and bold appliqué numbers to create a beautiful handmade decoration you can use year after year.

It’s beginner friendly, works up quickly, and is ideal for gifting or adding a personal, handmade touch to your holiday home décor. This pattern uses basic stitches and is fully customizable, making it a wonderful project for crocheters of all experience levels.
Why You’ll Love This Crochet Advent Calendar
One of the best parts of this pattern is how simple and repeatable it is.
Once you’ve made the first square, you’ll find yourself flying through the rest.
The pocket-style design is perfect for holding treats or tiny toys, and you can mix and match colours to fit your festive theme.
The sturdy backing keeps the calendar hanging neatly, while the bright numbers add a cheerful finishing touch. It’s a great way to create a treasured tradition for kids, family members, or even yourself!
Etsy | Ravelry | Pin for later

Materials Needed
For this pattern, you’ll use medium-weight yarn in your chosen selection of festive colours. Each colour block represents different weeks of December, but you can play around with shades that fit your theme.
Yarn: Any Worsted weight yarn on colors of your choice.
Scheepjes Cahlista – Worsted Weight, #4 Aran (100% Cotton, 92 yards per 50g skein)
Colors and Estimated Yardage
Cahlista Snow White = 558 Yards
Cahlista Topaz – 85 Yards
Cahlista Yellow Gold – 85 Yards
Cahlista Green Yellow – 85 Yards
Cahlista Parrot Green – 85 Yards
Cahlista Emeralds – 85 Yards
Cahlista Apple Green – 85 Yards
Crochet Hook = 5 mm
Number felt stitchers
Darning needle
A dowel or rod for hanging.
Gauge – Not crucial to this project.
Pattern Notes
- Please kindly read through the pattern before starting.
- Any other weight of #4 weight yarn can be substituted.
- Make sure to use similar eight yarn if using different brands.
Skill Level – Easy
Terms – US Terminology
Construction
This crochet advent calendar is constructed from individual crochet pockets stitched together around a rectangular backing.
Each pocket is crocheted separately, blocked if needed, and later attached securely. The numbers can be created using felt, crochet appliqués, or cut-out craft foam.
Because each pocket is detachable during the crafting process, this pattern is incredibly portable and great for crocheting on the go.
Customisation and Personalization
One of the best things about this Advent calendar is how flexible it is.
You can choose traditional Christmas colours like red, green, and gold—or create a more modern theme with pastels, neutrals, or metallics.
You can also personalise the gifts inside each pocket, such as written affirmations, fun activities for kids, countdown notes, chocolates, self-care prompts, or small toys.
You may even choose to make themed calendars for birthdays, weddings, or family events!

Tips for a perfect crochet Advent calendar
To get crisp and neat pockets, keep a consistent tension throughout.
Blocking the squares before joining also helps ensure they sit evenly.
If you plan to fill the pockets with heavier items, consider reinforcing the top corners as you join them.
For a cleaner finish, weave in ends as you complete each square instead of saving them all for the end.
And finally, attach your pockets securely using a darning needle for a smooth finish.


Easy Crochet Advent Calendar Free Pattern
Section 1: Main Panel
With the Main color (white), chain 72
Row 1: Hhdc in 3rd ch from hook and in each chain across, turn. 70 Hhdc
Row 2: Ch 2, Hhdc in each st across, turn. 70 Hhdc
Rows 3 – 80: Repeat Row 2
Continue the repeats until your piece measures 32”
To customize the size, you could stop the main panel and make a square from section 2, place the square on the panel to have an estimate of how tall your panel should be in order to accommodate 6 rows of the squares.
Split for hanging holder
Do not fasten off.
Right extension
Row 1: Ch 2, Hhdc in next 12 sts, leave the remaining sts unworked, turn. 12 Hhdc
Row 2 – 6: Ch 2, Hhdc in next 12 sts, turn. 12 Hhdc
Work additional rows until your piece is tall enough to wrap neatly around the rod you’ll be using.
Fasten off
Left extension
- Turn your project so as to have the other edge is facing you, and join yarn with a sl st to the edge.
Row 1: Ch 2, Hhdc in next 12 sts, leave the remaining sts unworked, turn. 12 Hhdc
Rows 2 – 6: Ch 2, Hhdc in next 12 sts, turn. 12 Hhdc
Fasten off.
Middle extension
- Count 11 sts away from each extension.
- Place a stitch marker on the 11th stitch on either side.
- Crocheting into the stitches between the stitch markers.
Row 1: Ch 2, Hhdc in next 24 sts, leave the remaining sts unworked, turn. 24 Hhdc
Row 2 – 6: Ch 2, Hhdc in next 24 sts, turn. 24 Hhdc
Edging
Crocheting around the whole piece, continue with white yarn.
Ch 1, sc in each st evenly around, (sc, ch 2, sc) at each corner, join with a sl st to the beginning chain.
Handle joining Instructions
- Fold each extension over to form the handle shape.
- With a darning needle, sew along the sides to secure firmly.
Squares
Make 24 pieces
- I used 1 ball for 4 squares
- With a total of 6 shades for 24 squares.
Row 1: Ch 20, Hhdc in 2nd ch from hook and in each ch across, turn. 18 Hhdc
Row 2 – 10: Ch 2, Hhdc in each st across, turn. 18 Hhdc
Edging
Crocheting around the whole piece, continue with white yarn.
Ch 1, sc in each st evenly around, (sc, ch 2, sc) at each corner, join with a sl st to the beginning chain.
Assembling Instructions
- Lay the main panel flat on a clean surface.
- Position 4 squares side by side to form the first row.
- Adjust the placement so each square is evenly spaced.
- Secure the squares in place with stitch markers.
- Skip 2 rows above the first set, then arrange the next row of squares. Continue this process until all 24 squares are positioned.
- With a darning needle, sew along three sides of each square, leaving the top edge open to serve as the pocket opening.
Finishing Touch
- Once all the squares are sewn, attach a sticker to each one.
- Position each sticker centrally so the placement looks neat and uniform.
Pass the dowel through the extensions made.
Sew in all ends
Block your calender
Frequently Asked Questions (FAQs)
Can beginners make this pattern?
Absolutely! The squares use simple stitches, and the construction is beginner friendly.
What can I put inside the pockets?
Chocolates, notes, ornaments, mini toys, crayons, stickers, scripture verses, or any small gifts.
Can I make the pockets bigger or smaller?
Yes! You can adjust your square size by changing the hook size or the stitch count.
How do I hang the calendar?
Use a wooden dowel, curtain rod, or even a stick from your garden for a rustic touch.
Can I wash it?
Spot cleaning is recommended to keep the numbers and structure intact.
Conclusion
This crochet advent calendar is more than just a craft project—it’s a beautiful way to build holiday memories, create excitement each day, and add handmade charm to your seasonal decorations.
Whether you’re crocheting it for yourself or gifting it to a loved one, this project is sure to become a special part of every December. Enjoy the process and have fun customizing your own countdown to Christmas!