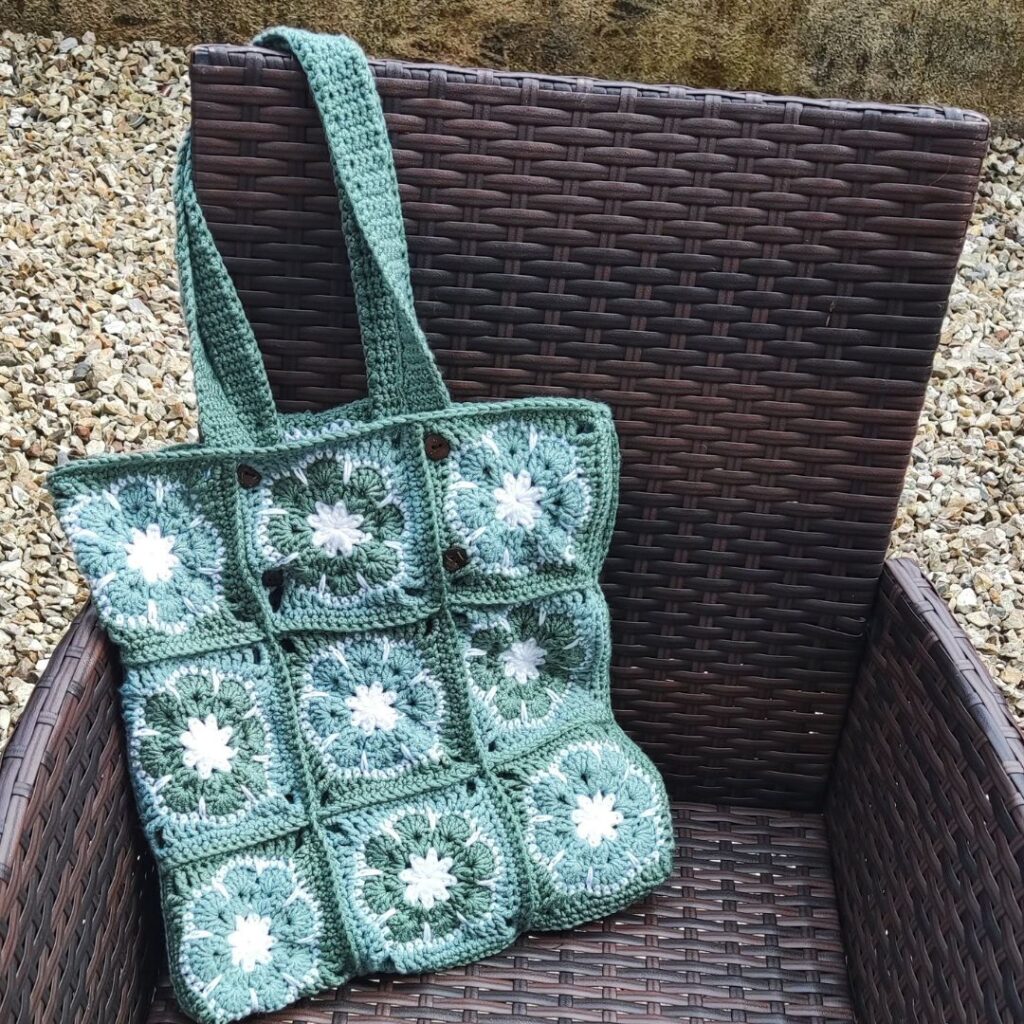
Crochet Tote Bag Free Pattern
African Flower Bag Crochet Pattern is a fun construction project that can be compressed into different sizes and shapes.
Looking for the perfect handmade accessory? This Crochet Tote Bag Free Pattern is a must-try project for crochet lovers! Designed using beautiful African Flower Squares, this tote bag is both stylish and functional. The sturdy construction makes it perfect for everyday use, whether for shopping, carrying yarn projects or as a casual handbag.
This pattern is beginner-friendly and can be customized with your favorite color combinations. Featuring a reinforced handle for durability and a seamless join for a professional finish, this tote bag is the ultimate blend of creativity and practicality. Follow this step-by-step guide to make your own crochet tote bag and add a personal touch to your accessories collection!
I particularly love projects that can be sized in different ways, which I have been able to incorporate into crochet designs.
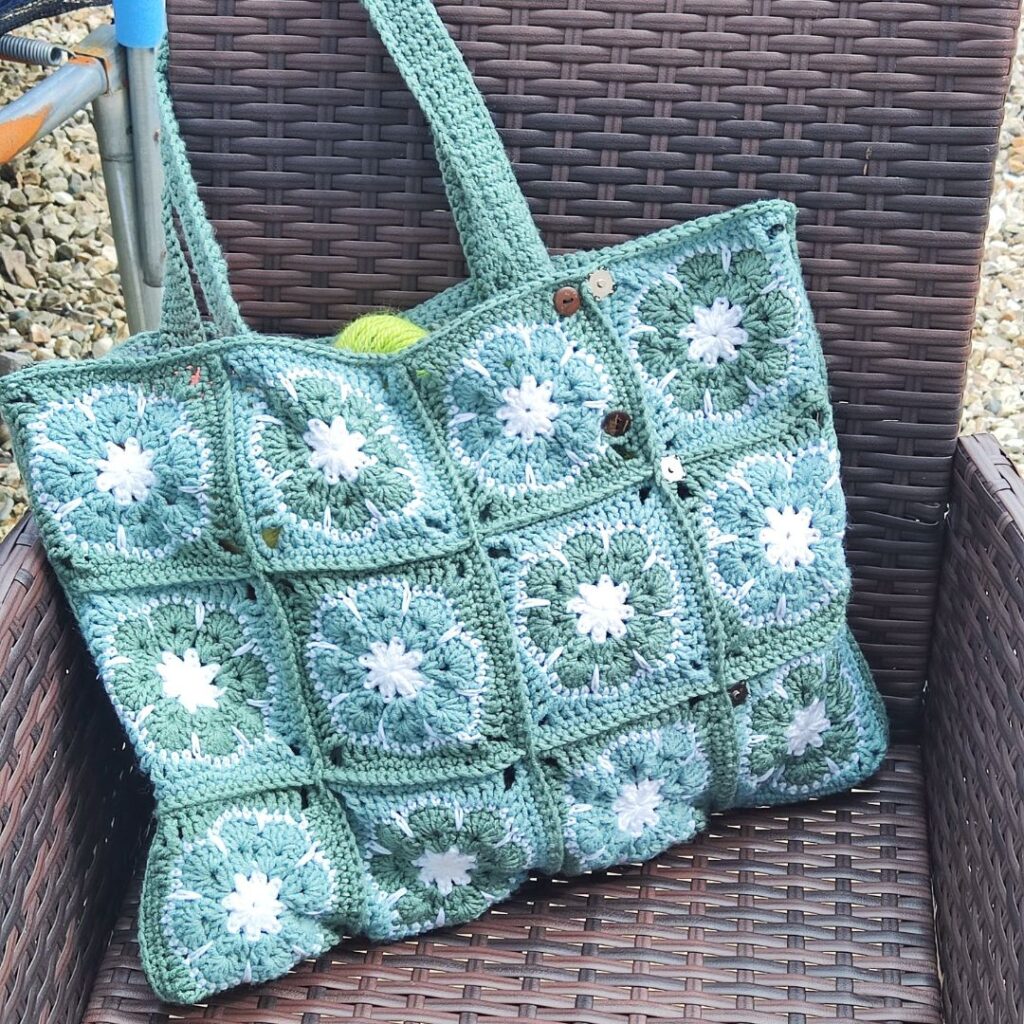
The African flower square crochet bag is made from 32 different squares! These are quick squares that can be made in just a few minutes and a perfect stash busting projects in colors of your choice.

DIY Convertible Bag
I made a quick video to show you how I convert the bag into different shapes and sizes.
Finished Measurements
Each square measures about 6”
Handle = 9”
Large Bag = 24” by 24”
Medium Bag = 24” by 18”
Small Bag = 18” by 18”
If you prefer to make your bag into just one shape, you can reduce the number of squares instead.
Large size Bag
Sew the sides of the panel, leaving the third side un-joined.
This part would be used as the bag opening.

Medium size bag
Sew snaps on the bags as indicated with arrows. See the PDF for the image with arrows.

On the other side, sew the corresponding snaps.
The snaps can be closed either longitudinally or vertically.
The different methods give you a crochet bag that can serve various functions depending on the height of your intended use.
African flower granny square medium size bag:

The snaps can further be adjusted to give you another shape of crochet bag as shown below!

The smallest crochet bag
Sew more snaps on the parts marked with red arrows. Sew the PDF for where to sew the snaps.
Remember to sew the other side of the snap on the same side of the back panel.
Use the lower sets of snaps
Close up all the snaps for the smallest version of the bag:

Materials needed for this tote bag
Yarn – Hobbii Kind Feathers, DK weight, #3(100% Acrylic, 246 yd/225 m per 3.5 oz/100g Ball)
Estimated Total Yardage
Main Color (Dark Green) = 180 Yards
Contrasting Color 1 (Light Green) = 180 Yards
Contrasting Color 2 (White) = 100 Yards
Hook – 6 mm Crochet Hook
Other materials
- Buttons—About 12 pcs (this is needed for the bag straps), each about 8 – 10mm.
- Tapestry needle
- Snap buttons – 12 pcs
Gauge – 15 sts over 8 Rows = 4 x 4” made in dc, before blocking.
Difficulty Level – Intermediate
Terms – US Terminology
Pattern Notes
- Please kindly read through the pattern before starting.
- Beginning chains count as a stitch throughout the pattern.
Stitches Abbreviations
Chain/chains – ch/chs
Chain space – ch sp
Stitch(es) – st(s)
Slip Stitch – sl st
Single Crochet – sc
Double crochet – dc
Third loop – This is the loop just below the front front loop.
A close-up photo of this has been attached below.

Finished Measurements
Each square measures about 6”
Handle = 9”
Construction Notes
- This project is done in squares
- The squares are then joined together.
- The handle is made in rows – You need two, and then sew these to the bag.
Marie from Underground Crafter is hosting the third annual 31-day multi-designer blog hop to celebrate International Crochet Month. This tote is featured today – 5th March, 2025.
Have a look at the other beautiful patterns in this event on Marie’s blog.
We’ve partnered with Crochet Foundry, Fox Chapel Publishing, GlassEyesOnline, KennyClayCo, KnitPal, Knitter’s Relief Balm, MBT Creates, Search Press North America, and Unicorn to bring you great prizes in our giveaway. Don’t forget to enter the giveaway in this post on Underground Crafter by Wednesday, April 2, 2025 at 11:59 pm Eastern.
How To Join the 2025 International Crochet Month Blog Hop
- Visit this post on Underground Crafter daily to get the latest pattern and the daily featured free PDF.
- Join in by crocheting the patterns as you have time.
- Share your progress and post pictures of your finished projects. Tag your projects and posts #undergroundcrafter on all social media.
- If you’d like to chat with other crocheters, join the Underground Crafters Facebook group.
- By the end of the Blog Hop, you’ll have up to 31 awesome projects.
Visit Underground Crafter to learn more about the prizes, enter the giveaway, and to get links to each International Crochet Month Blog Hop pattern as it is released.

Use code: “ToteGranny” for a free download on Ravelry.


1 FREE DOWNLOAD PER MONTH
WITH JUST $3 PER MONTH!
- Pick your desired pattern each month.
- It can be a new or old pattern.

2 FREE DOWNLOADS PER MONTH
WITH JUST $5 PER MONTH!
- Pick your desired patterns each month.
- It can be a new or old pattern.
- You get 2 patterns per month.

3 FREE DOWNLOADS PER MONTH
WITH JUST $8 PER MONTH!
- Pick your desired patterns each month.
- You get 3 free patterns per month.
- It can be a new or old pattern.

How to crochet the African tote bag
Section 1 – Squares
Make 32 Squares
- You can use your color arrangements for the squares.
- I found it neater when I fastened off after every round and joined my yarn to any of the ch sps.
Round 1: With white, make a Magic ring, ch 3 (counts as the first dc, here and throughout), dc, *ch 1, 2 dc, rep from * 6 more times, ch 1, join with a sl st to the beginning ch. 16 dc, 8 ch sps
Close the ring tightly.
Fasten off or drop yarn
Join light green to any ch sps.
Round 2: Ch 3, dc, ch 1, 2 dc in ch 1 sp, *(2 dc, ch 1, 2 dc) in each ch 1 sp around, join with a sl st to the beginning ch. 32 dc, 8 ch sps
Round 3: Sl st until the next ch 1 sp, ch 3, 5 dc in ch 1 sp, *6 dc each ch 1 sp, join with a sl st to the beginning ch. 48 dc
Fasten off or drop yarn.
Join white to any of the sts
Round 4: Ch 1, sc in next 2 sts, *long sc into the second space between the 4 dc from round 2, skip the next st in round 3, sc in next 5 sts, rep from * to the last 2 sts, sc in last 2 sts.
Fasten off white, join the dark green to any of the 3rd sc in the group of 5 sc from the round below.
Round 5: Ch 7 (counts as the first tr + ch 3), tr, in same st, *dc in next 2 sts, hdc in next st, sc in next 5 sts, hdc in next st, dc in next 2 sts, (tr, ch 3, tr) in next st, rep from * 2 more times, dc in next 2 sts, hdc in next st, sc in next 5 sts, hdc in next st, dc in last 2 sts, join with a sl st to the 3rd chain from the beginning ch 7.
Round 6: Ch 1, sc in each st around, aim for 3 sc in each ch 3 sp, join with a sl st to the beginning ch.
Weave in all ends
Fasten off.
Block to measurement.
Joining the squares together
- Mark the edges with stitch markers.
- Use a crochet hook and a single crochet to connect the sides of the squares.
I did my joining using one of the dark colors.
You can use any color for your joining.
Crocheting around the rectangle just made
Round 1: Ch 1, sc in each st around, (sc, ch 1, sc) at each corner, join
Do not fasten off
Joining the squares together
- Lay the squares into 4 rows.
- Mark the edges with stitch markers.
- Crocheting across the sides of 2 squares at a time until you have joined all the squares into a big rectangle.
- Use a crochet hook and a single crochet to connect the sides of the squares. Crocheting across 2 loops on Each square (a total of 4 loops) gives a beautiful braid-like look.
The schematics below show how I joined mine to reduce the sewing/joining needed. Start by joining in a straight line (red or blue) and then switch to the second color (blue or red) once you have completed the first set.
Fasten off and sew in all ends.
Fold the bag into two, sew the sides of the joined squares leaving the 3rd as the opening.
Bag Handle
With the color of your choice.
Make two
Chain 8
Row 1: Sc in 2nd ch from hook and in each ch across, turn. 7 sc
Rows 2 – 30: Ch 1, sc in each st across, turn. 7 sc
Increase or decrease the number of repeats until you have a length long enough for the handle.
Edging
Ch 1, sc around the whole piece, sc, ch 1, sc at each corner, join with a sl st to the beginning chain.
Fasten off
Sew in all ends.
To assemble:
Connect the handle to the bag using the buttons on the handle and any of the spaces on the square.
You can sew the handle to the bag if you do not intend to convert this bag.
Enjoy your project.
More crochet bags on the blog:
About the Designer
Say Hi on Instagram and Subscribe To my email List for pattern discounts and freebies. For questions, send such to [email protected]. Read more about me here.