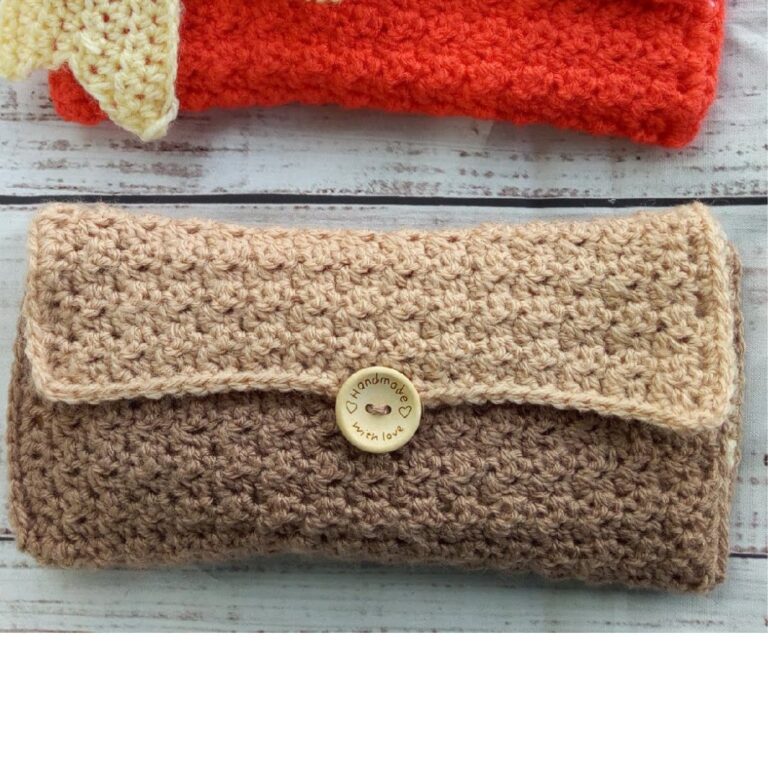
How to crochet envelope bag Pattern
It’s time for a new crochet envelope bag pattern! I love the construction of this one, as it requires minimal sewing, yet it is easy to adjust the final size of your bag! I am gradually increasing my collections of Crochet bag patterns on the blog and can’t wait to see your beautiful versions.
This free pattern is designed for crocheters who want to make a crochet bag that combines functionality with style. This bag can also pass as a wallet/envelope, & book sleeve!
This is a free pattern; scroll down for the tutorial in this blog post.
More crochet projects to check in the blog:
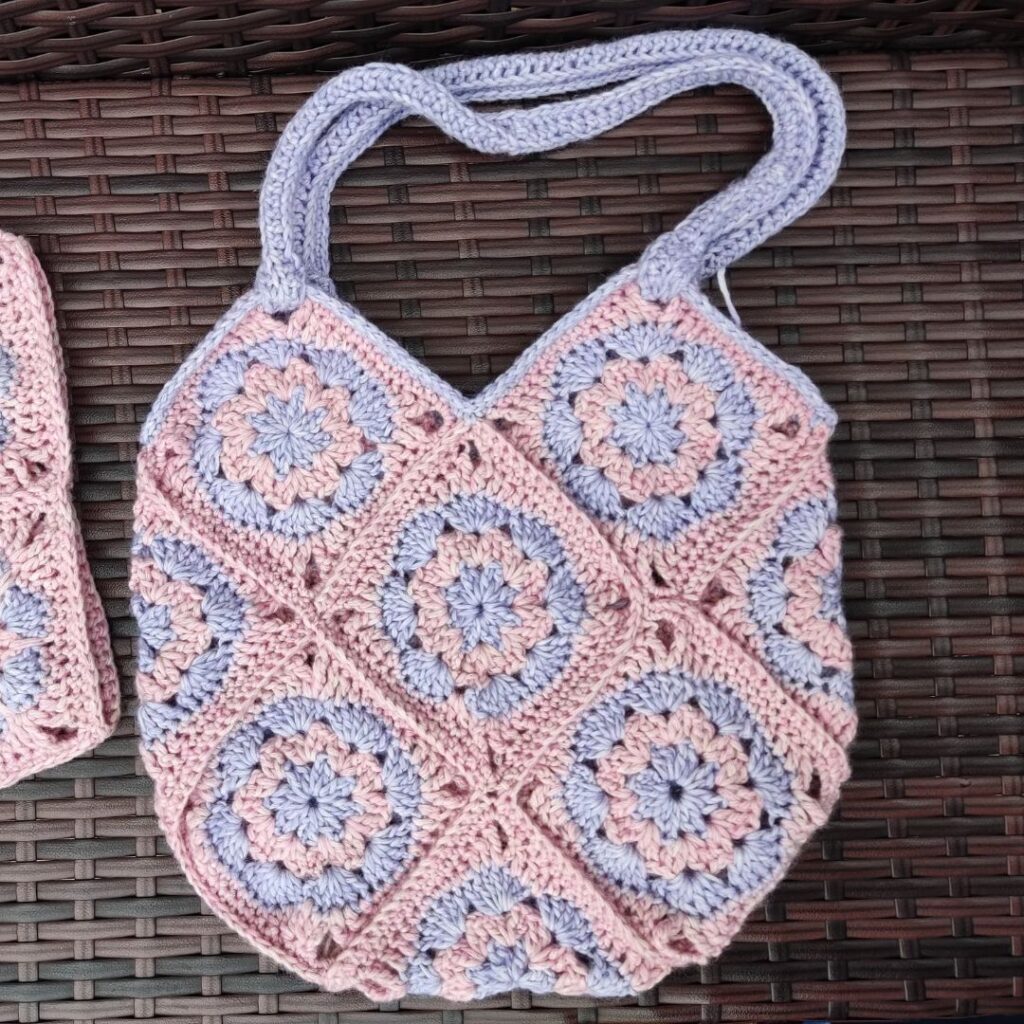
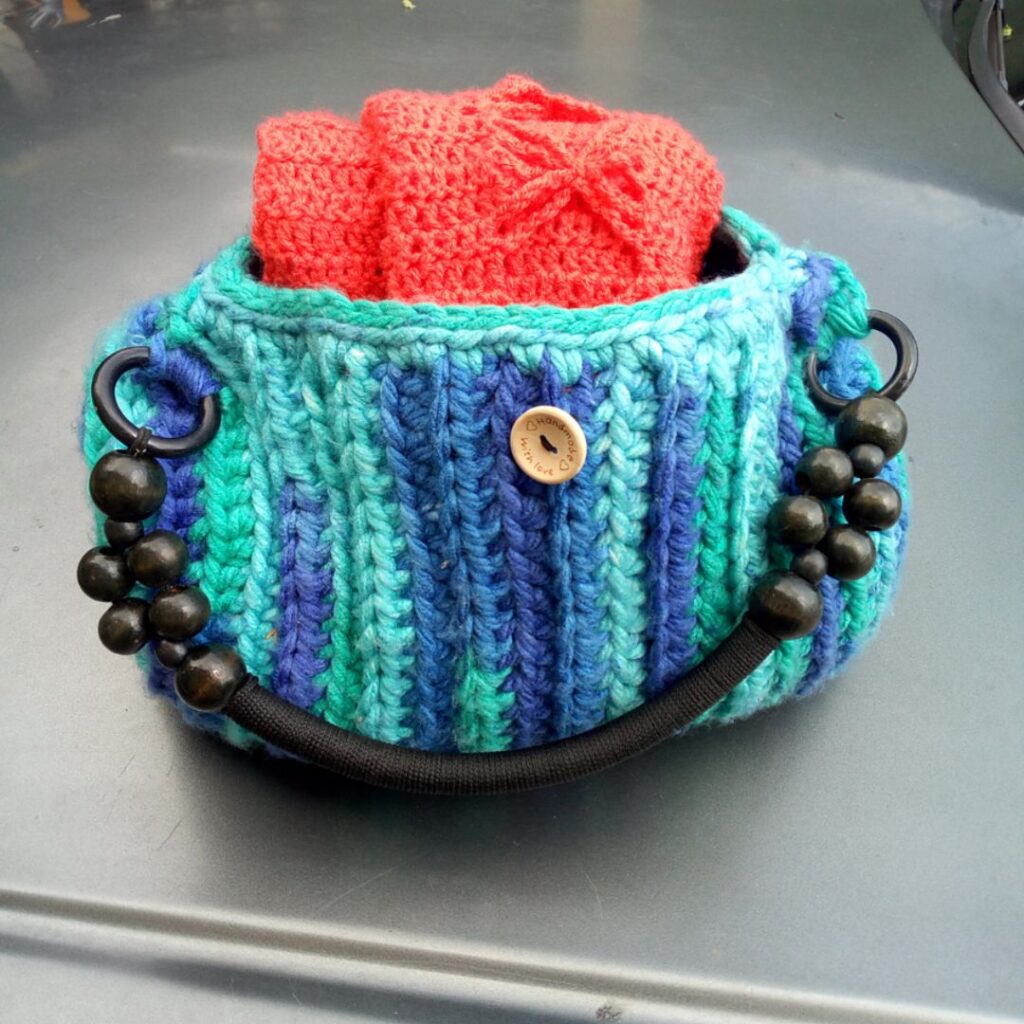
Granny Square Bag
This is a cute crochet tote bag!
- Easy to customize!
- A perfect stash-busting project!
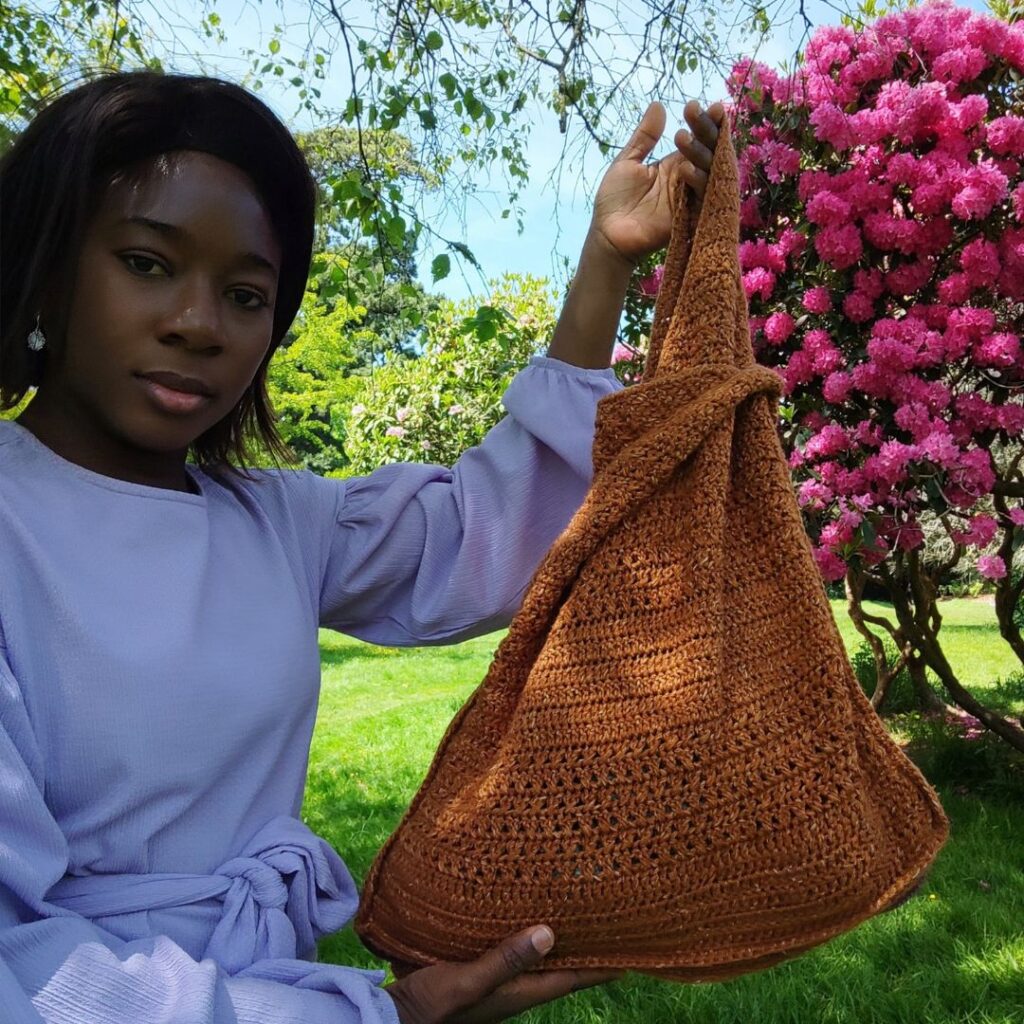
Japanese Knot Bag
It comes in 3 different sizes!
- It’s a super fun and creative project.
- Beginner Friendly project.
WIP Crochet Bag
Take your crochet project with you when going out!
- It’s a practical and quick project!
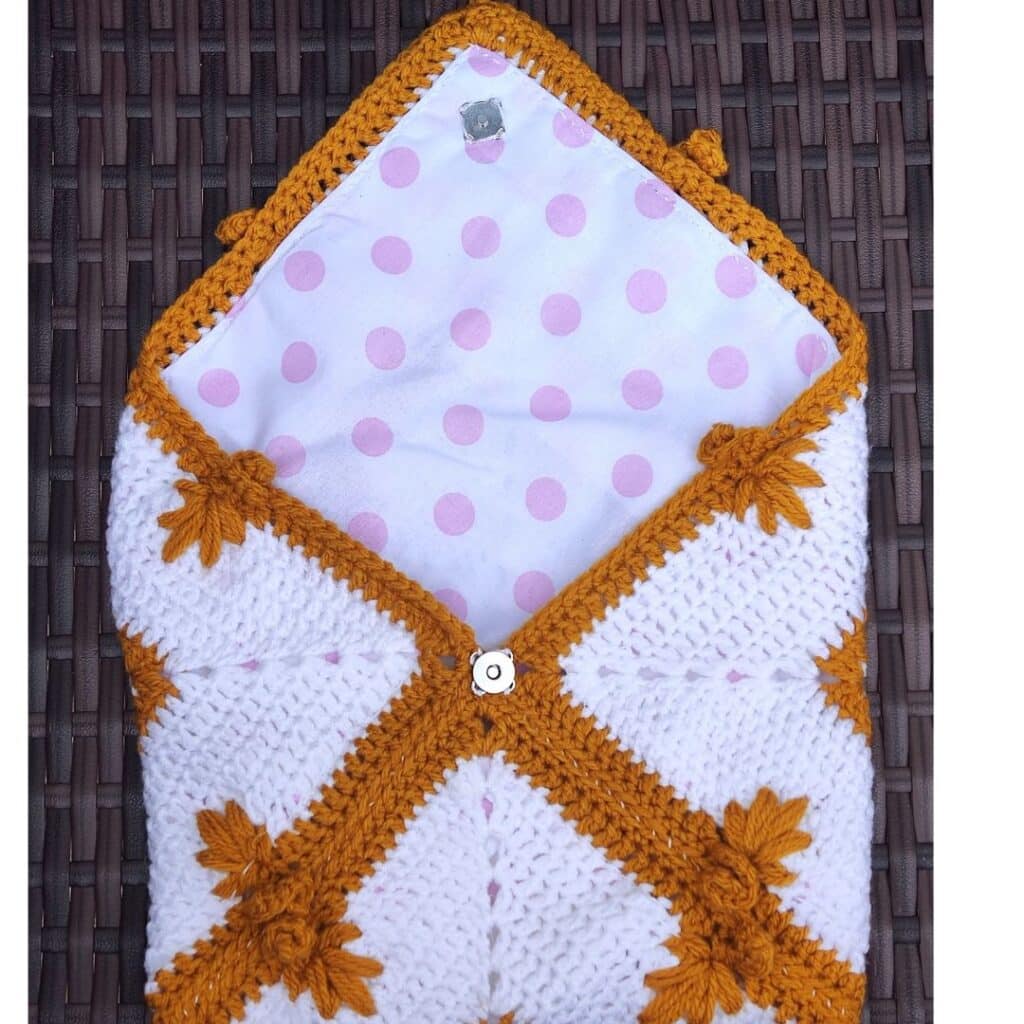
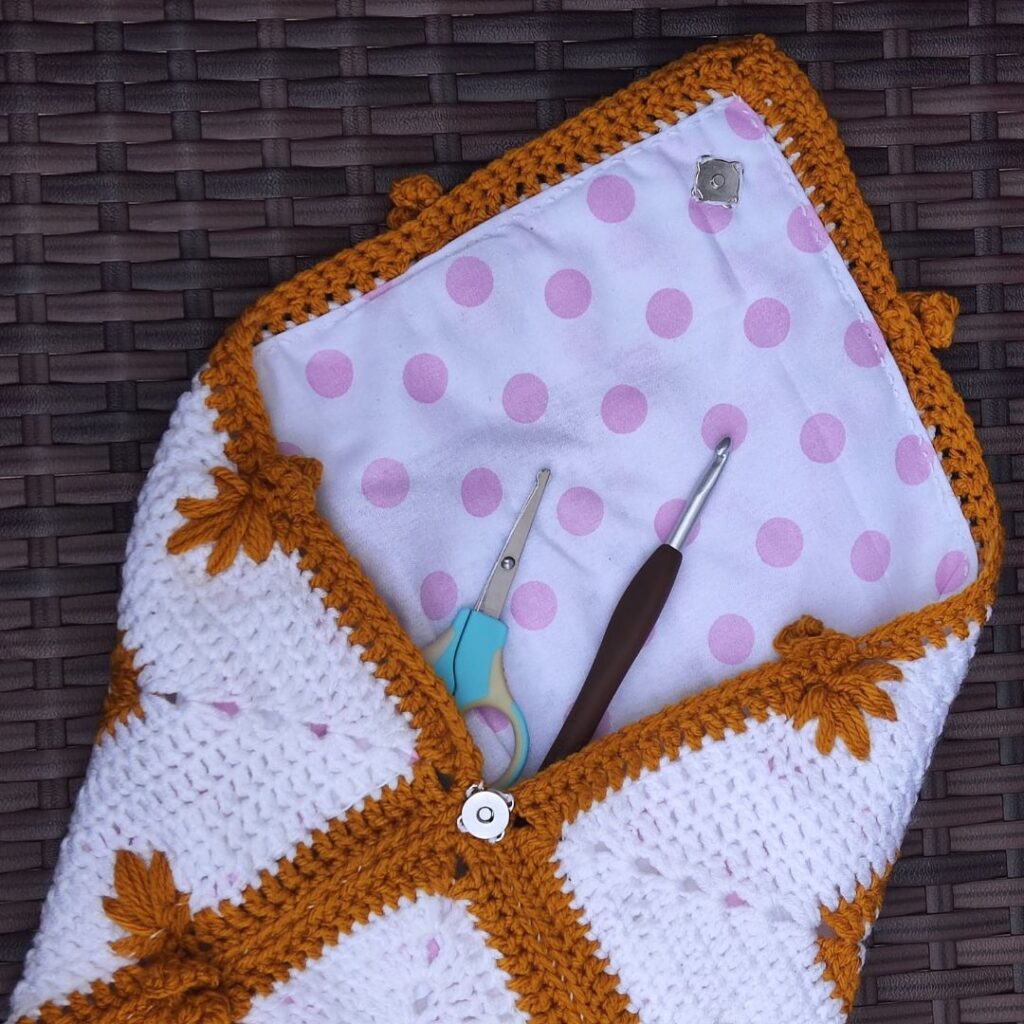
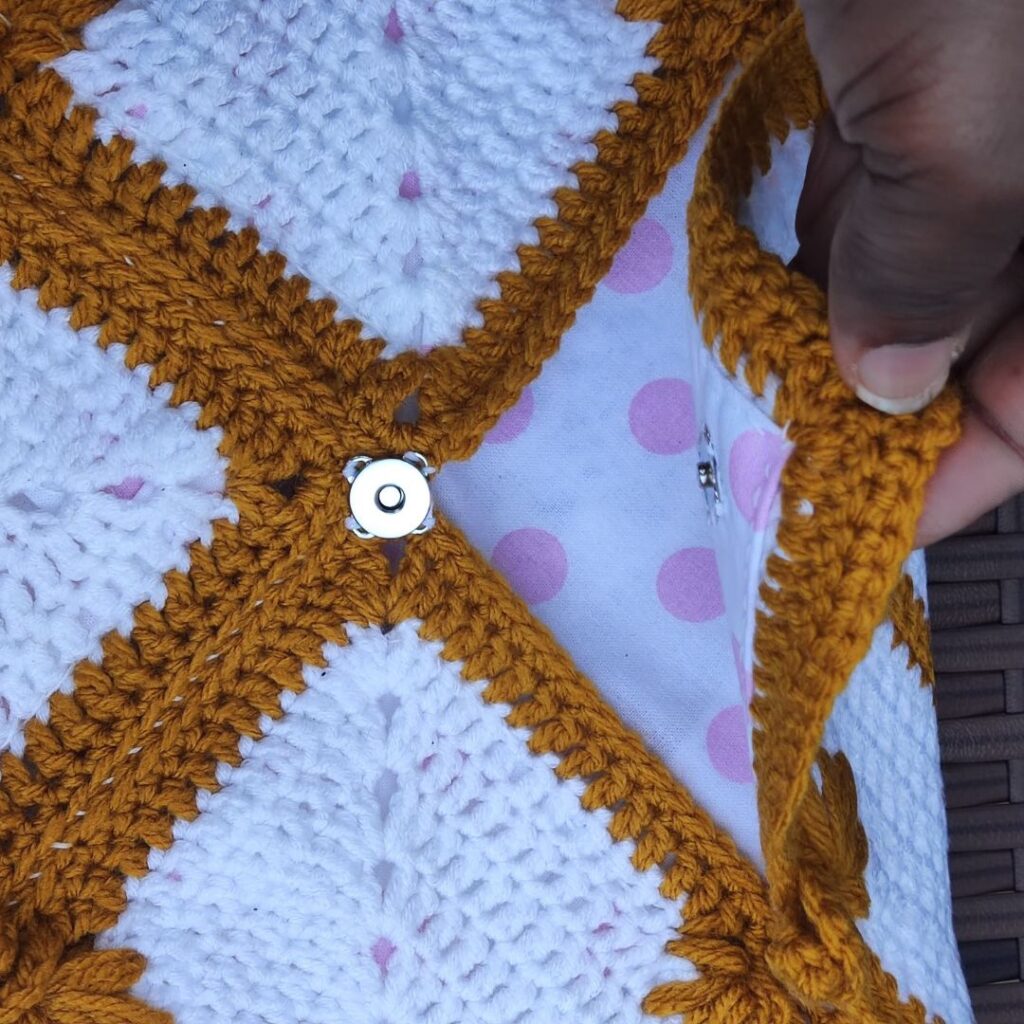
To secure the bag, I added a cute snap on the body and front flap.
What supply is needed for the crochet envelope bag Pattern
Yarn – Stylecraft Bellissima DK, #3 (100% Acrylic, 293 yards / 286 meters per 3.5 oz/100g skein).
You can substitute with Deramores Studio DK or any other DK weight yarn.
Estimated Yardage
100 yards in color A
30 yards in color B
Hook and other materials
- 4. 5 mm Crochet Hook
- Snap Fastener – 1 pcs
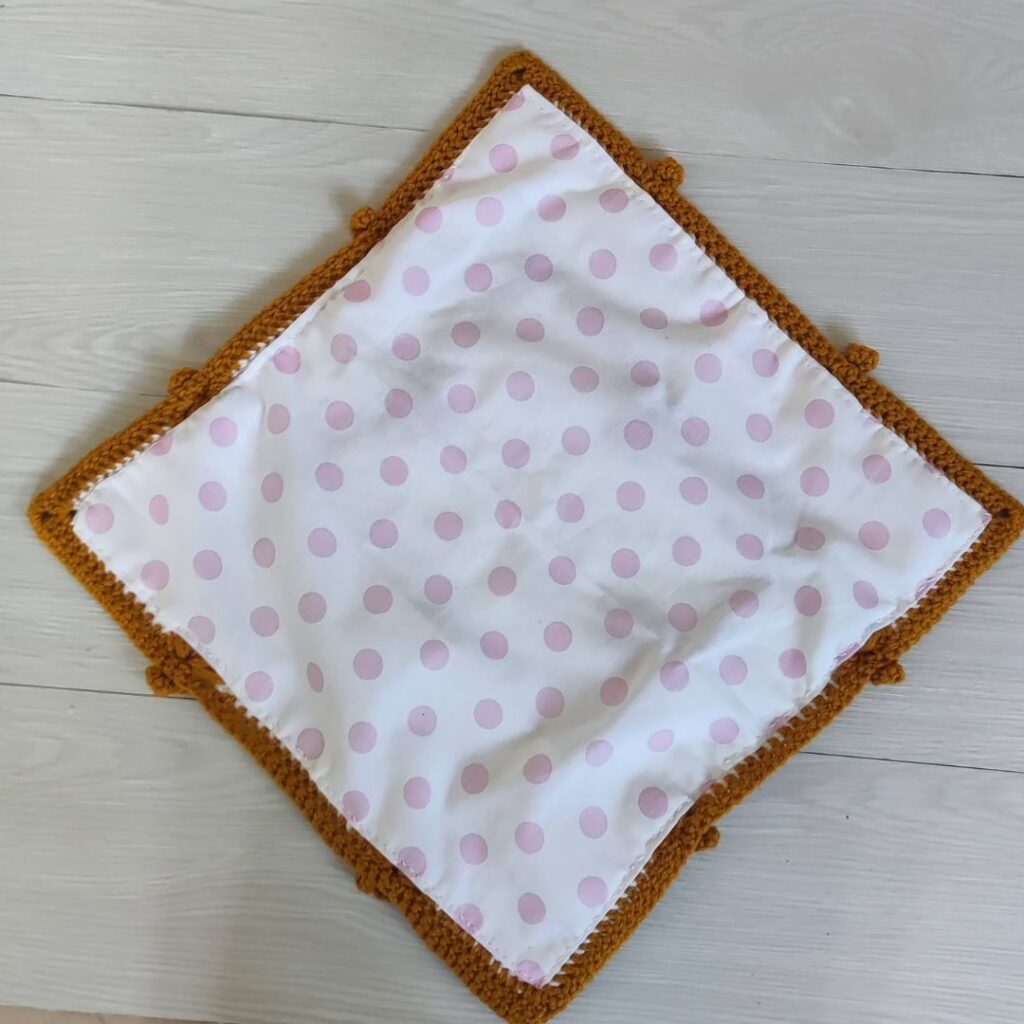
- Fabric to line the bag
- Pair of Scissors
- Tapestry Needle.

Gauge
16 sts over 10 Rows = 4” across, made using hdc, before blocking.
Pattern Notes
- Please kindly read through the pattern before starting.
- Any #3 weight yarn can be substituted
- Chains at the beginning of rounds do not count as the 1st st.
Skill Level – Easy
Terms – US Terminology
Stitch Abbreviation
Chain(s) – ch(s)
Slip Stich – sl st
Half Double Crochet – hdc
Rep – repeat
Crossed Half Double Crochet – Xhdc
Special Stitch
Extreme Drop Stitch:
- (working in the next skipped st a row below) yo, insert hook, pull up a loop, *yo, insert hook in same ch sp, pull up a loop, rep from * one more time (7 loops on hook)
- (working in next skipped st 2 rows below) yo, insert hook, pull up a loop, *yo, insert hook in same ch sp, pull up a loop, rep from * one more time (13 loops on hook)
- (working in next skipped st 3 rows below) yo, insert hook, pull up a loop, *yo, insert hook in same ch sp, pull up a loop, rep from * one more time (19 loops on hook)
- (working in next skipped st 2 rows below) yo, insert hook, pull up a loop,*yo, insert hook in same ch sp, pull up a loop, rep from * one more time (25 loops on hook)
- (working in next skipped st 1 row below) yo, insert hook, pull up a loop, *yo, insert hook in same ch sp, pull up a loop, rep from * one more time (31 loops on hook). Yo, pull through all loops, ch 1.
Leaf stalk = ch 6, 2 sc in 2nd ch from hook, 3 dc in each chain across. 14 sts
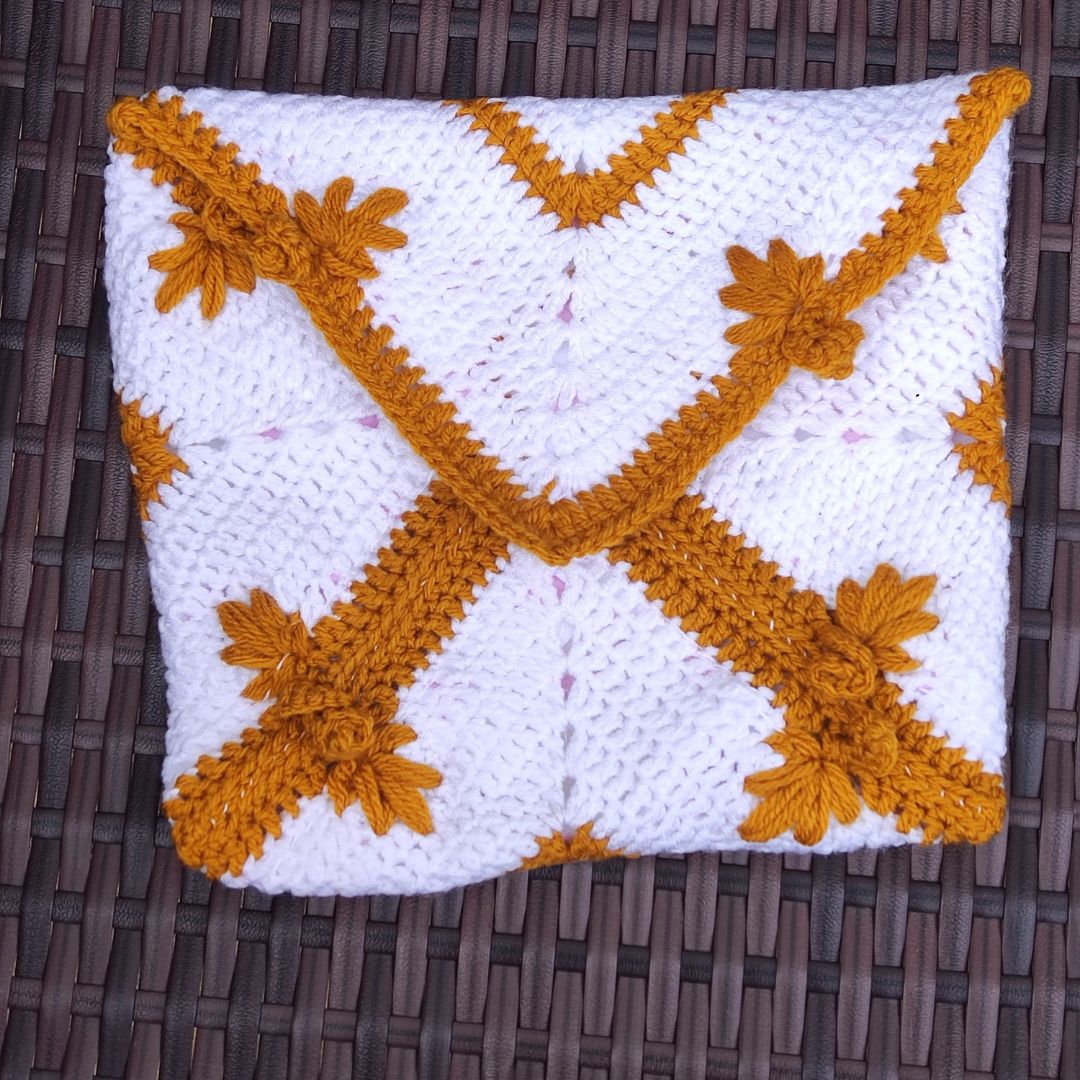
Final Measurement of the bag:
7” by 7”
Are you ready to add handmade pieces?
How to crochet envelope bag Pattern
Body of the bag
With White
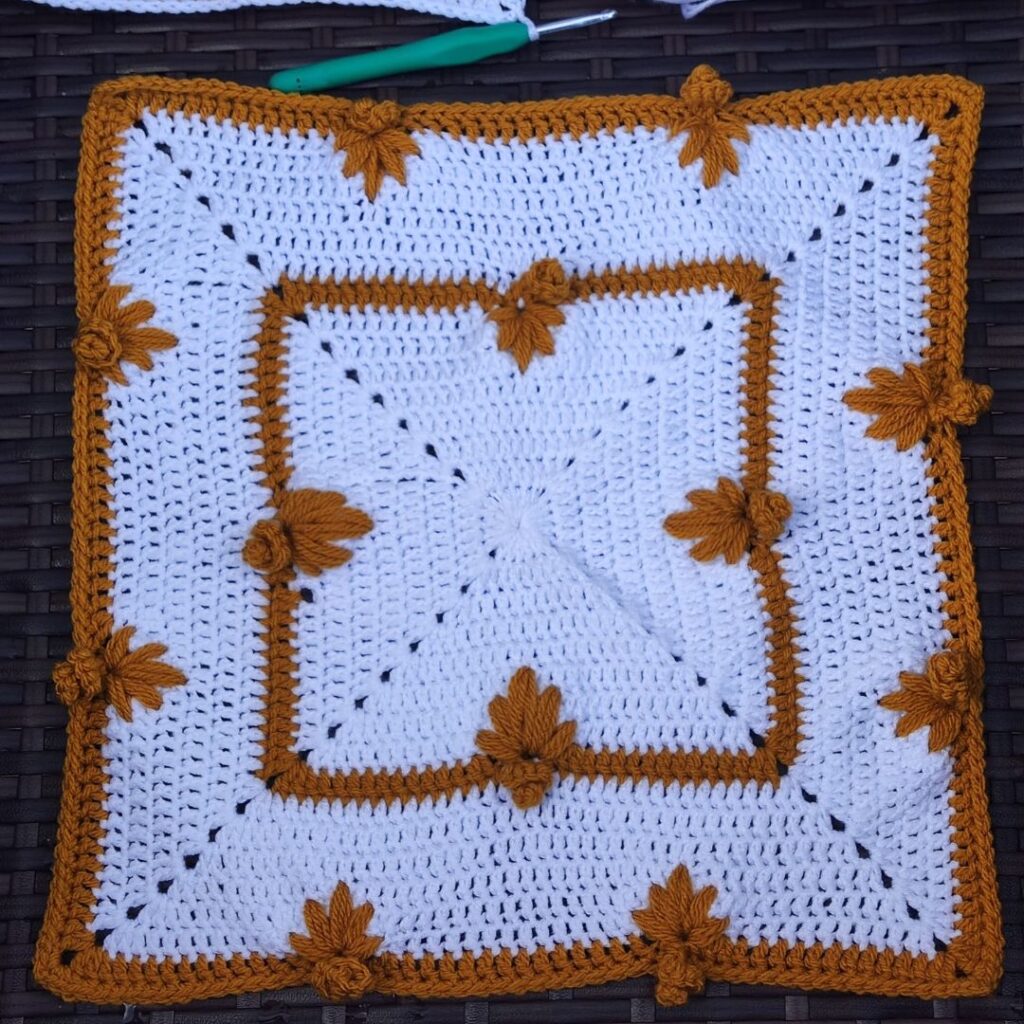
Round 1: In a magic ring, ch 3 (counts as the first dc, here and throughout), in the magic ring, 4 dc, *ch 2, 5 dc, rep from * two more times, ch 2, join with a sl st to the 3rd ch from the beginning. 20 dc, 4 corners
Round 2: Ch 3, dc in same corner (ch sp), *dc in each st across until next corner, (2 dc, ch 2, 2 dc) in next corner, rep from * 2 more times, dc in each st across until last corner, (2 dc, ch 2) in last corner, join with a sl st to the 3rd ch from the beginning. 36 dc, 4 corners.
Round 3: Rep Round 2 = 52 dc, 4 corners.
Round 4: Rep Round 2 = 68 dc, 4 corners.
Round 5: Rep Round 2 = 84 dc, 4 corners.
Round 6: Ch 3, dc in the same corner, *dc in next 10 sts, ch 1, skip next st, dc in next 10 sts, (2 dc, ch 2, 2 dc) in next corner, rep from* 2 more times, dc in next 10 sts, ch 1, skip next st, dc in next 10 sts, (2 dc, ch 2) in next corner, join with a sl st to the 3rd ch from the beginning. 96 dc, 4 corners, 4 ch 1 sp.
Round 7: Ch 3, dc in same corner, *dc in next 10 sts, ch 1, skip next st, dc in next st, ch 1, skip next ch sp, dc in next st, ch 1, skip next st, dc in next 10 sts, (2 dc, ch 2, 2 dc) in next corner, rep from* 2 more times, dc in next 10 sts, ch 1, skip next st, dc in next st, ch 1, skip next ch sp, dc in next st, ch 1, skip next st, dc in next 10 sts, (2 dc, ch 2) in last corner, join with a sl st to the 3rd ch from the beginning. 104 dc, 4 corners, 12 ch 1 sp
Round 8: Ch 3, dc in the same corner, *dc in next 10 sts, ch 1, skip next st, dc in next st, {ch 1, skip next ch sp, dc in next st}, rep {} two more times, ch 1, skip next st, dc in next 10 sts, (2 dc, ch 2, 2 dc) in next corner, rep from* 2 more times, dc in next 10 sts, ch 1, skip next st, dc in next st, {ch 1, skip next ch sp, dc in next st}, rep {} two more times, ch 1, skip next st, dc in next 10 sts, (2 dc, ch 2) in next corner, join with a sl st to the 3rd ch from the beginning. 112 dc, 4 corners, 20 ch 1 sp.
Drop White and join Mustard with a sl st to any of the ch 2 sps at the corner.
With Color B
Round 9: Ch 3, dc in the same corner, [dc in next 11 sts, 2 dc in next st, {extreme drop st over next 5 ch-1 sp from previous rows, ch 1, sl st in same ch sp, leaf stalk, sc in next st (that’s the ch 1 made after the leaf), 2 dc next st, dc in next 11 sts, (2 dc, ch 2, 2 dc) in next corner], rep from [ ] 2 more times, [dc in next 11 sts, 2 dc in next st, {extreme drop st over next 5 ch-1 sp from previous rows, ch 1, sl st in same ch sp, leaf stalk, sc in next st,
2 dc next st, dc in next 11 sts, (2 dc, ch 2) in last corner, join with a sl st to the 3rd ch from the beginning.120 dc, 4 corners, 4 extreme drop leaves
Drop Mustard and join White with a sl st to any of the ch 2 sps at the corner.
Round 10: Ch 3, dc in same corner, *dc in next 14 sts, working into both next st and the 3rd st on the stalk, dc in last 2 sts on the stalk, dc in next 15 sts, (2 dc, ch 2, 2 dc) in next corner, rep from* 2 more times, dc in next 14 sts, working into both next st and the 3rd st on the stalk, dc in last 2 sts on the stalk, dc in next 15 sts, (2 dc, ch 2) in last corner, join with a sl st to the 3rd ch from the beginning. 144 dc, 4 corners
Round 11: Ch 3, dc in same corner, *dc in each st across until the next corner, (2 dc, ch 2, 2 dc) in next corner, rep from* 2 more times, dc in each st across until the next corner, (2 dc, ch 2) in last corner, join with a sl st to the 3rd ch from the beginning. 160 dc, 4 corners
Round 12: Rep round 11 = 176 dc, 4 corners
Round 13: Ch 3, dc in same corner, *dc in next 10 sts, ch 1, skip next st, dc in next 22 sts, ch 1, skip next st, dc in next 10 sts, (2 dc, ch 2, 2 dc) in next corner, rep from* 2 more times, dc in next 10 sts, ch 1, skip next st, dc in next 10 sts, (2 dc, ch 2) in next corner, join with a sl st to the 3rd ch from the beginning. 184 dc, 4 corners, 8 ch 1 sp
Round 14: Ch 3, dc in the same corner, *dc in next 10 sts, ch 1, skip next st, dc in next st, ch 1, skip next ch sp, dc in next st, ch 1, skip next st, dc in next 18 sts, ch 1, skip next st, dc in next st, ch 1, skip next ch sp, dc in next st, ch 1, skip next st, dc in next 10 sts, (2 dc, ch 2, 2 dc) in next corner, rep from* 2 more times, dc in next 10 sts, ch 1, skip next st, dc in next st, ch 1, skip next ch sp, dc in next st, ch 1, skip next st, dc in next 20 sts, ch 1, skip next st, dc in next st, ch 1, skip next ch sp, dc in next st, ch 1, skip next st, dc in next 10 sts, (2 dc, ch 2) in last corner, join with a slst to the 3rd ch from the beginning. 184 dc, 4 corners, 24 ch 1 sp
Round 15: Ch 3, dc in same corner, *dc in next 10 sts, ch 1, skip next st, dc in next st, {ch 1, skip next ch sp, dc in next st}, rep {} two more times, ch 1, skip next st, dc in next 14 sts, ch 1, skip next st, dc in next st, {ch 1, skip next ch sp, dc in next st}, rep {} two more times, ch 1, skip next st, dc in next 10 sts, (2 dc, ch 2, 2 dc) in next corner, rep from * 2 more times, ch 1, skip next st, dc in next 10 sts, ch 1, skip next st, dc in next st, {ch 1, skip next ch sp, dc in next st}, rep {} two more times, dc in next 14 sts, ch 1, skip next st, dc in next st, {ch 1, skip next ch sp, dc in next st}, rep {} two more times, dc in next 9 sts, (2 dc, ch 2) in last corner, join with a slst to the 3rd ch from the beginning. 152 dc, 4 corners, 40 ch 1 sp
Drop White and join Mustard with a sl st to any of the ch 2 sps at the corner.
With Color B
Round 16: Ch 3, dc in the same corner, [dc in next 11 sts, *2 dc in next st, {extreme drop st over next 5 ch-1 sp from previous rows, ch 1, sl st in same ch sp, leaf stalk, sc in next st (that’s the ch 1 made after the leaf), 2 dc next st**, dc in next 12 sts, rep from * to **, once, dc in next 11 sts, (2 dc, ch 2, 2 dc) in next corner}, rep from [ ] 2 More times, dc in next 11 sts, 2 dc in next st, {extreme drop st over next 5 ch-1 sp from previous rows, ch 1, sl st in same ch sp, leaf stalk, sc in next st, 2 dc next st, dc in next 11 sts, (2 dc, ch 2) in last corner, join with a sl st to the 3rd ch from the beginning.184 dc, 4 corners, 8 extreme drop leaves.
Round 17: Ch 1, sc in the same corner, *sc in next 12 sts, {working into both next st and the 3rd st on the stalk, sc in last 2 sts on the stalk, sc in next 16 sts}, rep {} one more time, (2 sc, ch 2, 2 sc) in next corner, rep from* 2 more times, sc in next 16 sts, {working into both next st and the 3rd st on the stalk, sc in last 2 sts on the stalk, sc in next 16 sts}, (2 sc, ch 2) in last corner, join with a sl st to the 3rd ch from the beginning. 156 sc, 4 corners.
Block your panel. The next step is to line your crochet clutch bag. The post has full details on how to line your bag.
To sew the corners of the tote.
Turn the panel to the right side.
Step 1: Rotate the square to have one corner at the top (for buttonhole).
Step 2: Fold the bottom corner midway.
Step 3: Fold the right corner to meet the corner from the bottom.
Step 4: Sew the sides of the two corners from the tip towards the corners.
Step 5: Fold the left corner to meet the bottom and right corners.
Step 6: Continue the sewing from the sides to the end.
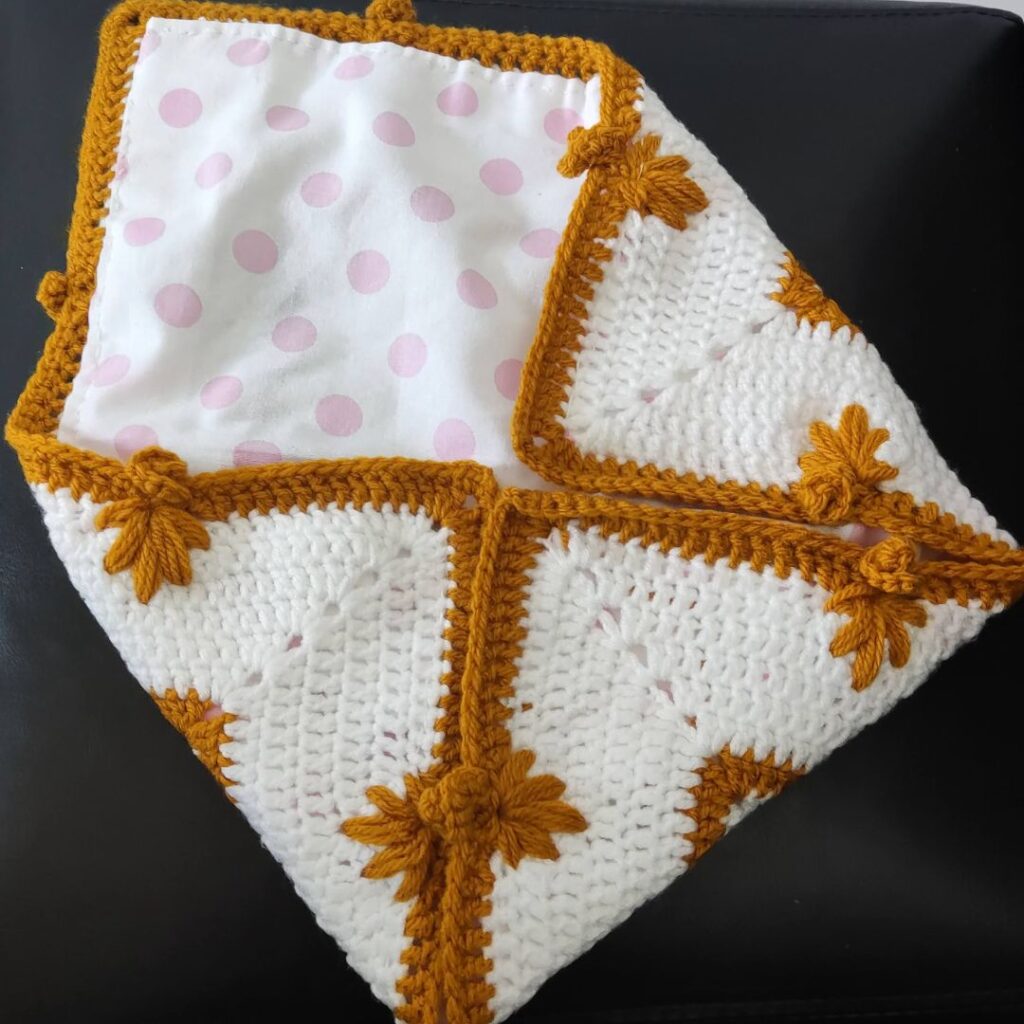
Step 7: Sew the snap or a button to the point where the corners meet.
Sew the other side of the snap on the tip of the top flap or use the ch 2 at the top corner as the buttonhole.
Optional: Sew straps on either side of the opening to create a cross-body bag.
Sew in all loose ends.
Conclusion:
Making a crochet envelope bag is a satisfying project. I love that this envelope bag is chic and practical, showcasing your crochet skills and artistic vision.
You are welcome to sell the finished product and have a bestselling crochet envelope bag!
Get the large print, pdf pattern on Ravelry or Etsy

When you make your version of this crochet envelope bag using my free Pattern, kindly share your makes with me on social media.
More crochet tops to checkout on the blog:
Pearl’s peplum top
I can’t wait to see your beautiful makes! Come share your projects with me and the crochet community on Facebook and on Instagram.
Fosbas
About the Designer
Say Hi on Instagram and Subscribe To my email List for pattern discounts and freebies. For questions, send such to [email protected]. Read more about me here.
Hi im lost when it comes to joining the stalks in round 10 cld u provide pictures as to where the links are on the stalks other than that the pattern is a nice pattern overall thanks kindly.
Kay
Hi Kay, the PDF on Ravelry and Etsy has the stepwise photos. Unfortunately, I am unable to add stepwise photos on the blog.