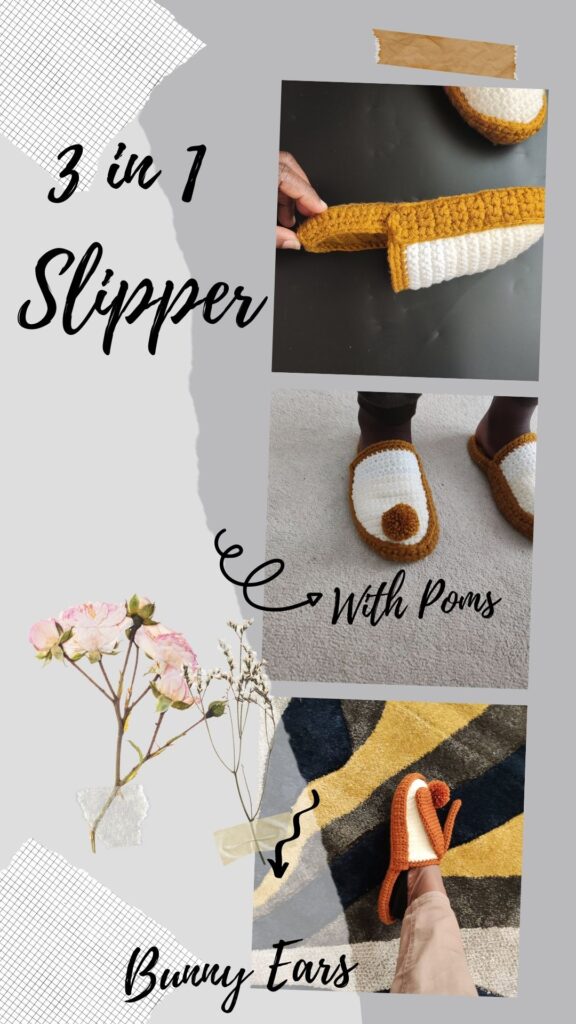
Bunny crochet slippers free pattern
This easy bunny crochet slippers-free pattern has many options for you to customize according to your preference. You can leave your finished crochet slippers plain, add a pom, or use them as a bunny-inspired slipper! The possibilities for this crochet slipper pattern are endless!
Get comfy making your own pair of Bunny crochet slippers.
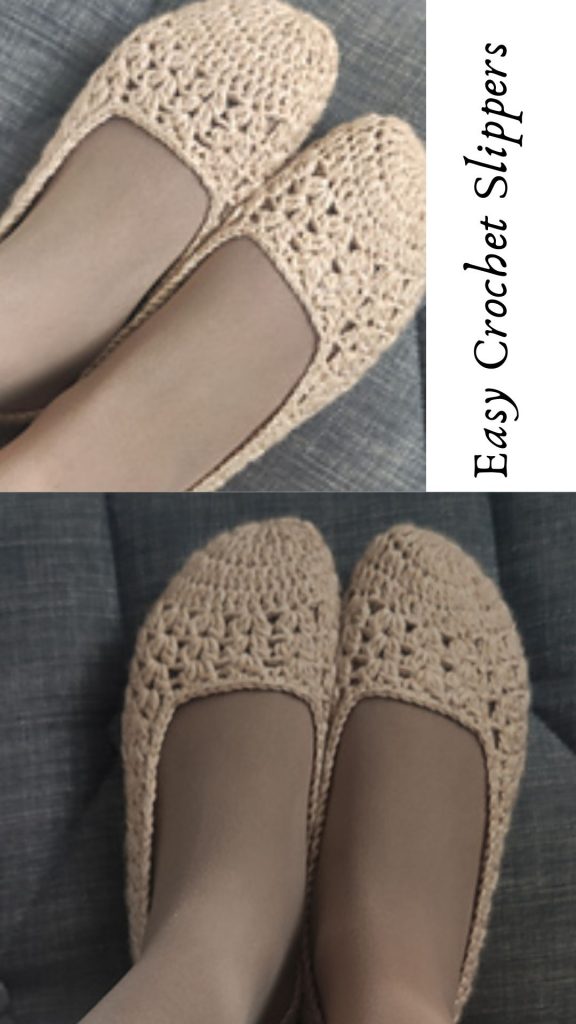
Easy crochet slippers with a free pattern
I love that these easy crochet slippers can be used by both men and women. And the fact that you can make this as a matching set and twin with your kids is also fascinating.
My son loves mine and couldn’t resist; he asked me to make him one! Since completing his own version of the bunny-inspired crochet slippers, he’s been wearing this pair around the house!
I have detailed the instructions for the adult version below, you can however get the PDF of both the adult and the kids sizes either on ETSY or Ravelry using the links below.
Kid’s Bunny crochet slippers on ETSY
Kid’s Bunny crochet slippers on Ravelry
Adult’s Bunny crochet slippers on Ravelry
Adult’s Bunny crochet slippers on ETSY
More crochet slippers to check out here on the blog include;
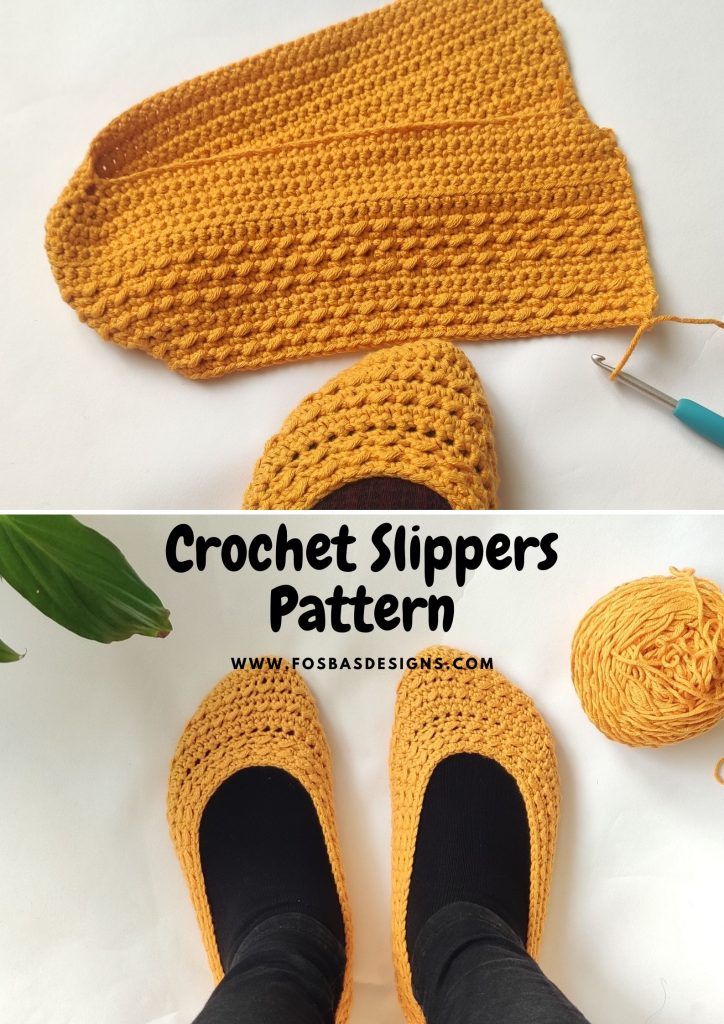
Have you ever made a crochet slipper that uses an insole? This crochet pattern would help you make your very first set of slippers using an insole for extra cushion.
Materials needed for this easy crochet slipper pattern with an insole
Yarn – A chunky-weight yarn is advised. These prototypes are made using 2 strands of DK yarn held together throughout.
Yarn
Hobbii Kind Feather, DK, #3 lightweight (100% Acrylic, 257 yards/235 m per 3.75 oz/100g Skein)
Brown – Main Color = MC
Cream – Contrasting Color = CC
Estimated Yardage
200 (230, 260, 290, 320, 360, 390, 420, 450, 480, 500) yards in MC
60 (70, 70, 70, 80, 80, 90, 90, 90, 100, 100) yards in CC
Hook and other Materials
- 4 mm Crochet Hook
- 2 stitch markers.
- Insole – a pair
- Yarn needle
Difficulty level – Intermediate
Terms – US Terminology
Gauge – 16 sts over 12 rows = 4 x 4” made in hdc, using #5 or 2 strands of DK held together.
Abbreviations
Chain(s) – ch(s)
Slip Stitch – sl st
Single Crochet – sc
Single Crochet 2 stitches together – sc2tog
Half Double crochet – hdc
Half Double Crochet 2 stitches together – hdc2tog
Repeat – rep
Main Color = MC
Contrasting Color = CC
Pattern notes
- Please kindly read through the pattern before starting.
- Any #5 weight (chunky) yarn can be substituted; please check the gauge.
- The prototype was made using 2 DK strands, equivalent to a #5.
- Chains at the beginning of the rounds and rows do not count as a stitch.
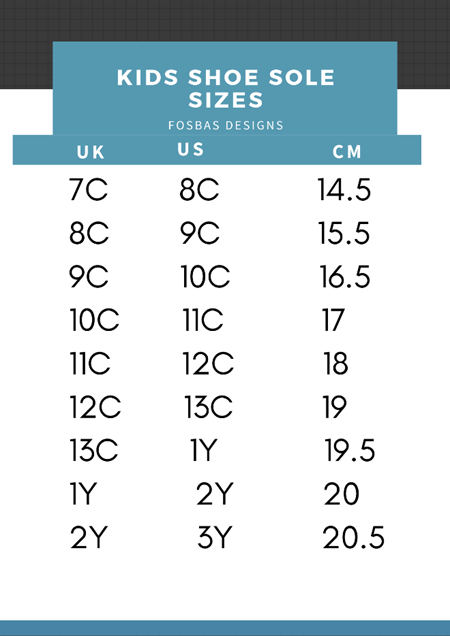
Finished Measurements
| UK | US | EURO | CM |
| 3 | 5 | 36 | 21 |
| 4 | 6 | 37 | 22 |
| 5 | 7 | 38 | 23 |
| 6 | 8 | 39 | 24 |
| 7 | 9 | 41 | 26 |
| 8 | 10 | 42 | 27 |
| 9 | 11 | 43 | 28 |
| 10 | 12 | 44 | 29 |
| 11 | 13 | 45 | 30 |
| 12 | 14 | 46 | 31 |
Modeled Adult crochet Slippers = 28 cm
Modeled Kid’s crochet slippers = 20 cm
Instructions for the adult-size crochet bunny slipper pattern
Section 1
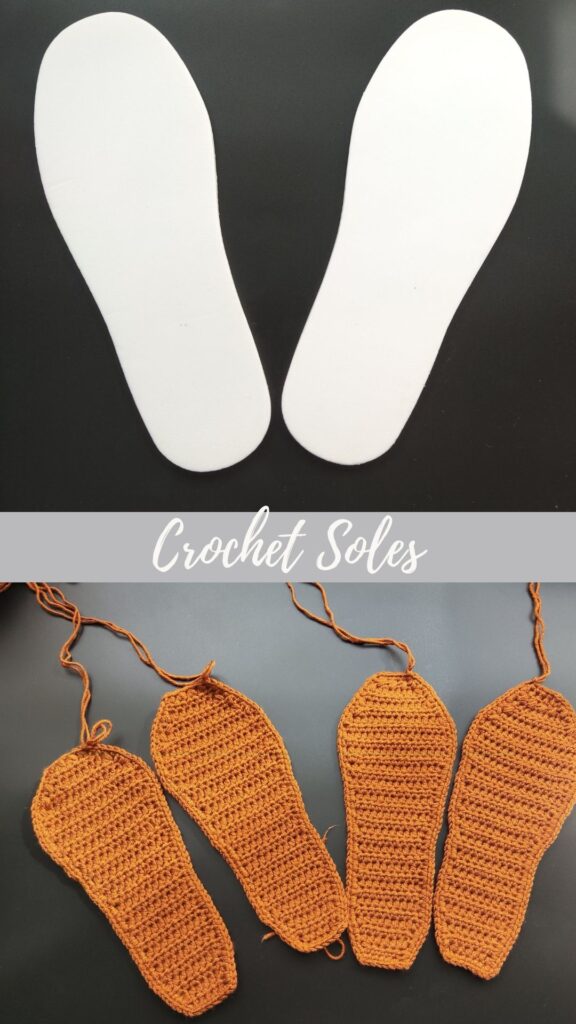
Sole – Make 4 pieces.
With MC, Chain 8
Row 1: Hdc in 3rd ch from hook and in each ch across, turn. 6 hdc.
Row 2: Ch 1, 2 hdc in first st, hdc in next 4 sts, 2 hdc in last st, turn. 8 hdc
Row 3: Ch 1, hdc in each st across, turn. 8 hdc
Row 4: Ch 1, 2 hdc in first st, hdc in next 6 sts, 2 hdc in last st, turn. 10 hdc
Rows 5 – 7 (8, 9, 10, 11, 12, 13, 14, 15, 16): Ch 1, hdc in each st across, turn. 10 hdc
Row 8 (9, 10, 11, 12, 13, 14, 15, 16, 17): Ch 1, 2 hdc in first st, hdc in next 8 sts, 2 hdc in last st, turn. 12 hdc
Rows 9 (10, 11, 12, 13, 14, 15, 16, 17, 18) – 12 (13, 14, 15, 16, 17, 18, 19, 20, 21): Ch 1, hdc in each st across, turn. 12 hdc
UK size 3, 4, 5/ US size 5, 6, 7 Skip to Row 1 for all sizes below
Row 0 (0, 0, 16, 17, 18, 19, 20, 21, 22): Ch 1, 2 hdc in first st, hdc in next 10 sts, 2 hdc in last st, turn. 14 hdc
Rows 0 (0, 0, 17, 18, 19, 20, 21, 22, 23) – 0 (0, 0, 18, 19, 20, 21, 22, 23, 24): Ch 1, hdc in each st across, turn. 14 hdc
UK size 6, 7, 8, 9/ US size 8, 9, 10, 11, skip to row 1 for all sizes below.
UK size 10, 11, 12/ US size 12, 13, 14 = Continue below
Row 0 (0, 0, 0, 0, 0, 0, 23, 24, 25): Ch 1, 2 hdc in first st, hdc in next 12 sts, 2 hdc in last st, turn. 16 hdc
For all sizes
Rows 1 – 4: Ch 1, hdc in each st across, turn. 12 (12, 12, 14, 14, 14, 14, 16, 16, 16) hdc
Row 5: Ch 1, hdc2tog, hdc in each st until the last 2 sts, hdc2tog, turn. 10 (10, 10, 12, 12, 12, 12, 14, 14, 14) hdc
Row 6: Ch 1, hdc2tog, hdc in each st until the last 2 sts, hdc2tog, turn. 8 (8, 8, 10, 10, 10, 10, 12, 12, 12) hdc
UK size 3, 4, 5/ US size 5, 6, 7 to Row 8 for all sizes below
Row 7: Ch 1, hdc2tog, hdc in each st until the last 2 sts, hdc2tog, turn. 0 (0, 0, 8, 8, 8, 8, 10, 10, 10) hdc
Row 8: Ch 1, hdc in each st across, turn. 8 (8, 8, 8, 8, 8, 8, 10, 10, 10) hdc
Row 9: Ch 1, hdc2tog across, turn. 4 (4, 4, 4, 4, 4, 4, 5, 5, 5) hdc
Note = measure the first sole to make sure you have your desired length.
If too short/long, decrease or increase the number of repeats in Rows 9 (10, 11, 12, 13, 14, 15, 16, 17, 18) – 12 (13, 14, 15, 16, 17, 18, 19, 20, 21
Edging
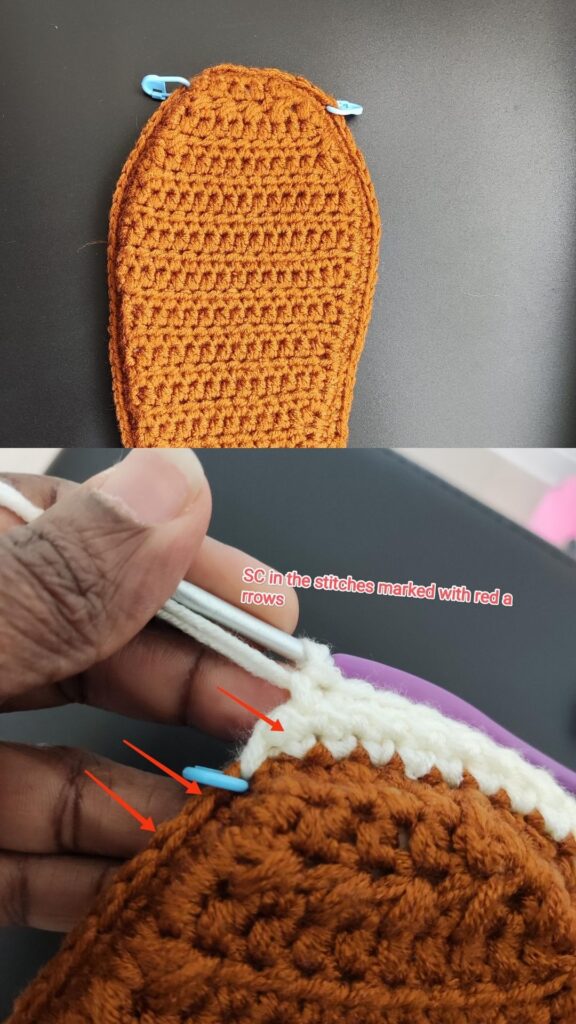
Round 1: Ch 1, sc in next 4 (4, 4, 4, 4, 4, 4, 5, 5, 5) sts, *ch 2, crocheting down the edges, aim for sc in each ch 1 sp and 2 sc in each hdc and ch 2 at each corner**, sc in next 6 sts, rep * one more time, join with a sl st to the beginning chain.
To Assemble
- Place an insole in between 2 soles
- Join yarn with a sl st to any stitch through the soles.
Tips to help make crocheting around easier
- Secure with either stitch markers or yarn, on both sides of the soles with the insole in the middle.
- Do not forget to trim the insole if it is too big for your foot to your desired measurement.
With both soles and insole in between them, sc over both sides around.
Fasten off.
Make your insoles non- slip using any of the 10+ methods highlighted in this post.
Repeat the second sole
Section 2 – Upper part
If you do not flip the second pair, you end up with the same leg!!!
Count 8 sts on the toes of the sole, place stitch counts
Join CC with a sl st to same stitch as with one of the stitch markers.
Row 1: Ch1, sc in each st across, turn. 8 sc
Row 2: Ch1, (place stitch marker in the ch 1 sp) skip first st, sc in each st across, sc in next 2 sts on the sole, turn. 9 sc
Row 3: Ch1, skip first st, sc in each st across, sc in ch 1 sp from a row below, (move the stitch marker to the ch 1 at the beginning of this row), sc in next 2 sts on the sole, turn. 11 sc
Remove the second stitch marker.
Rows 4 – 7 (7, 7, 9, 9, 9, 9, 11, 11, 13): Rep Row 3.
Stitch counts after Row 7 (7, 7, 9, 9, 9, 9, 11, 11, 13) = 19 (19, 19, 21, 21, 21, 21, 23, 23, 25) sc
Row 8 (8, 8, 10, 10, 10, 10, 12, 12, 14): Ch 1, skip first st, sc in each st across, skip last ch 1 sp from the row below, sc in next st on the sole, turn. 18 (18, 18, 20, 20, 20, 20, 22, 22, 24) sc
Rows 9 (9, 9, 11, 11, 11, 11, 13, 13, 15) – 30: Rep Row 8 (8, 8, 10, 10, 10, 10, 12, 12, 14).
Increase or reduce the number of rows for a comfortable fit.
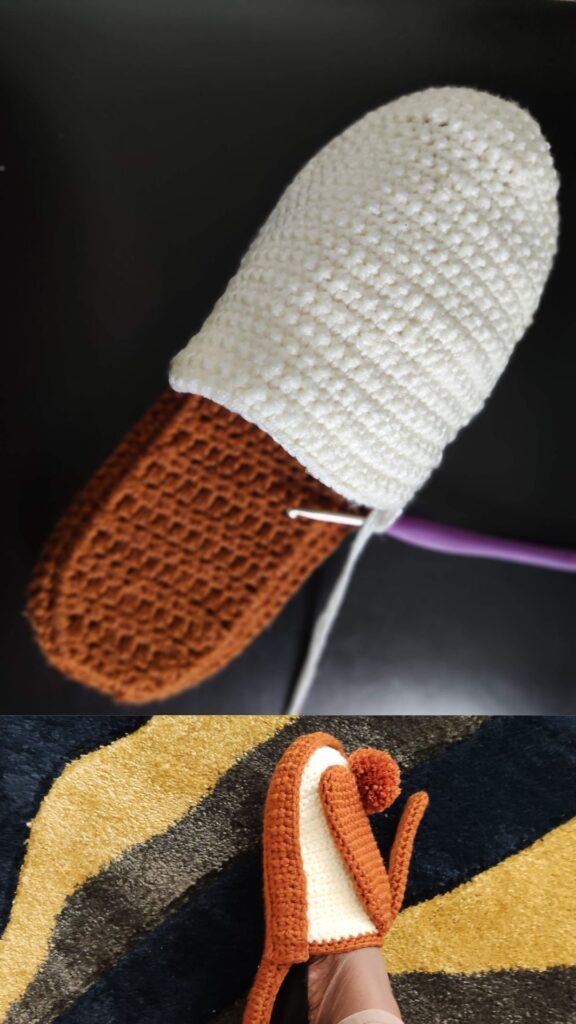
Fasten off CC, join MC
Crocheting into the remaining sts on the sole
Round 1: Ch 1, sc in each st left on the side of the sole, until you get back to the other side of the sole, continue to the upper part of the slipper, sc in each st around, join with a sl st to the beginning chain.
Round 2: Ch 1, *sc2tog, sc in next 3 sts, rep from * until the start of the upper part, sc in remaining sts, join with a sl st to the beginning chain.
Fasten off.
Row 1: Chain 4, sc in 2nd ch from hook and in the remaining chain, turn. 3 sc
Rows 2 – 56 (56, 60, 60, 66, 66, 70, 70, 70, 70): Ch 1, sc in each st across, turn. 3 sc
Increase or decrease the repeats for a comfortable wrap across the upper part
Edging
Crocheting around the 4 sides of the strap
Round 1: Ch 1, sc in each st around, join with a sl st to the beginning chain.
Do not fasten off
Secure the strap onto the slipper with 2 stitch markers.
Joining the strap to the upper part of the slipper.
With either a darning needle or crochet hook, carefully join the straps to the slippers (upper part and sole)
Lower end
Ch 1, sl st over both last round of the sole and the edging made around the strap.
Fasten off.
Upper edge
Join MC with yarn needle or crochet, using either mattress stitch or sl st to the upper edge of the strap, with sl st, join both the strap and the upper part together.
Fasten off
Sew in all ends.
Section 4 – Bunny Ears
Make 4
You can either use 1 strand of DK or chunky. I have typed each separately.
You only need one yarn weight.
Crocheting in spirals throughout.
Using DK (#3) and with MC
Round 1: In a magic ring, 7 hdc in magic ring. 7 hdc
Place a stitch marker in the 7th stitch, move this after each round.
Round 2: 2 hdc in each st around. 14 hdc
Rounds 3 – 10 (10, 12, 12, 14, 14, 16, 16, 16, 16): hdc in each st around. 14 hdc
Round 11 (11, 13, 13, 15, 15, 17, 17, 17, 17): *hdc2tog, hdc in next st, rep from * around. 9 hdc
Round 12 (12, 14, 14, 16, 16, 18, 18, 18, 18): Hdc in each st around. 9 hdc
Round 13 (13, 15, 15, 17, 17, 19, 19, 19, 19): *hdc2tog, hdc in next st, rep from * around. 6 hdc
Round 14 (14, 16, 16, 18, 18, 20, 20, 20, 20): Hdc in each st around. 6 hdc
Leave a long tail of yarn, fasten off.
If using Chunky yarn
Using Chunky (#5) and with MC
Round 1: In a magic ring, 6 hdc in magic ring. 6 hdc
Place a stitch marker in the 6th stitch, move this after each round.
Round 2: 2 hdc in each st around. 12 hdc
Rounds 3 – 10: hdc in each st around. 12 hdc
Round 11: *hdc2tog, hdc in next st, rep from * around. 8 hdc
Round 12: hdc in each st around
Round 13: Rep Round 11
Round 14: Rep Round 12
Leave a long tail of yarn, fasten off.
Make 2 poms using MC
To assemble
To sew the ears to the slippers
Pick up the first and count about 6 – 8 sts on the last row of the upper part of the slippers; sew the ear with the tail left from Round 14 to the slippers.
Count 2 sts away from the other ear and sew the second ear.
Sew a pom on each slipper on the distal part of the upper part.
I would love to see your own beautiful versions of these bunny-inspired crochet slippers. Kindly tag me with your makes.