Modern crochet dress pattern
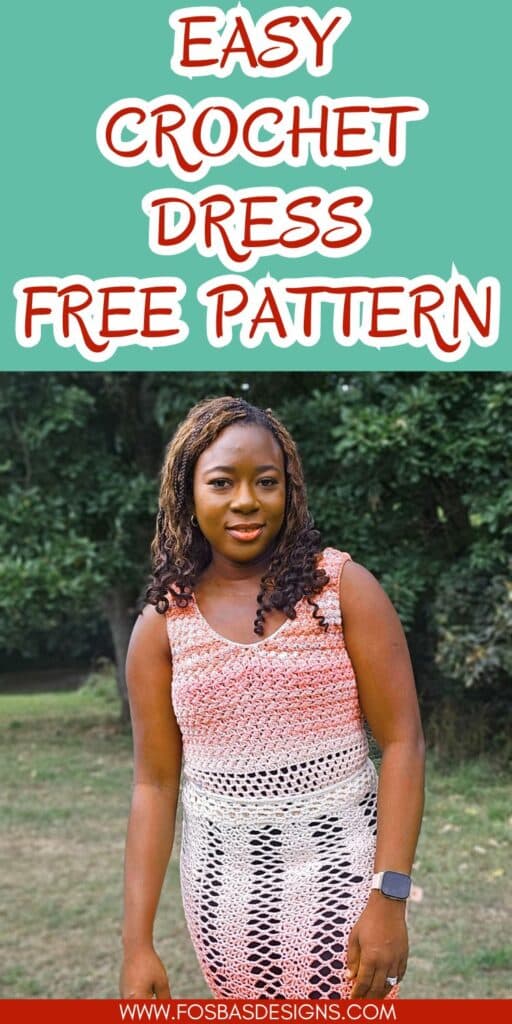
Meet the new addition to my dress projects, the Serena crochet dress pattern, a size inclusive and fun project.
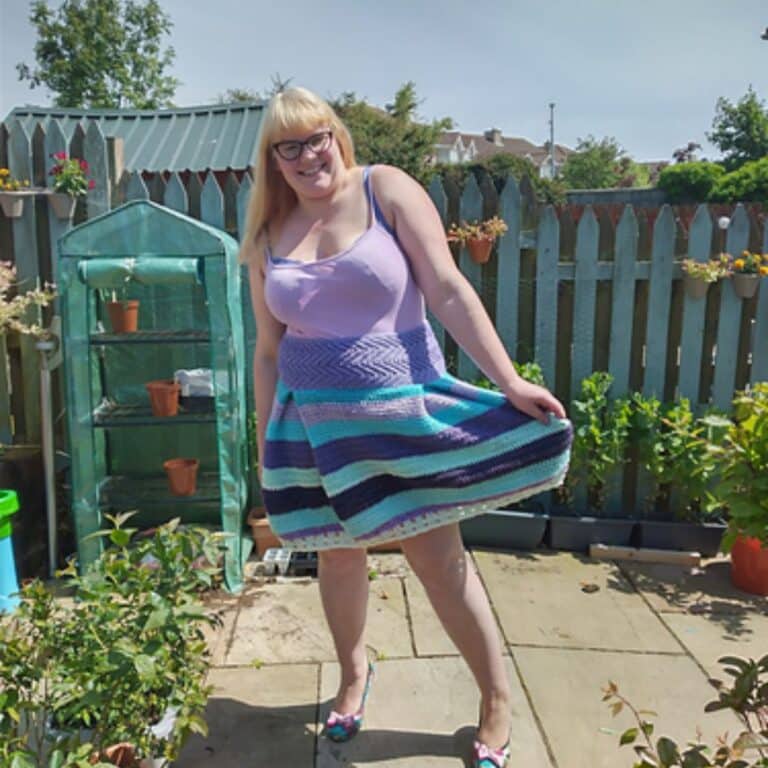
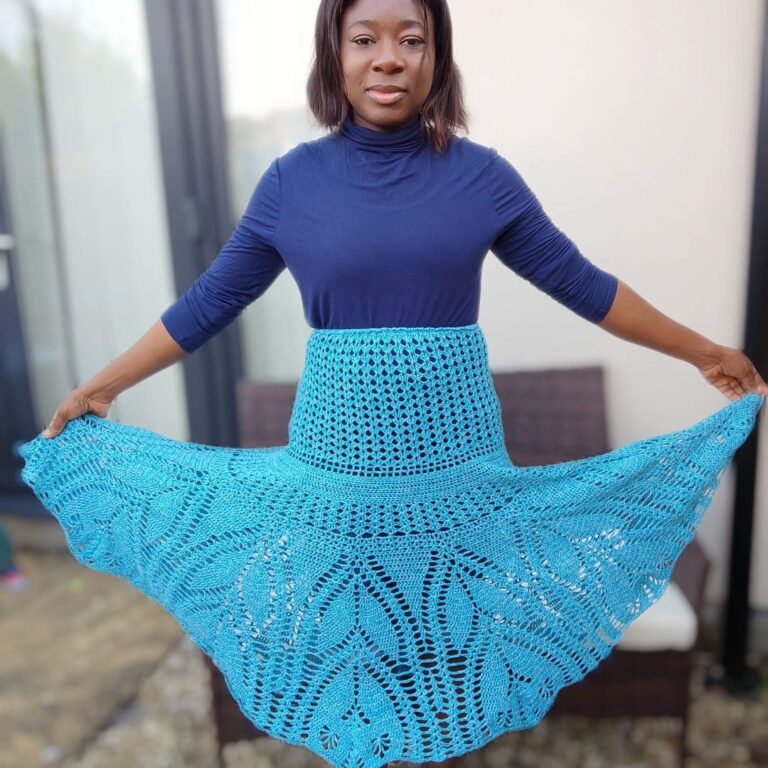
If you’re dreaming of a lightweight and elegant dress that flows with every step, this Free Long Crochet Dress Pattern is just what you need.

Designed with comfort and style in mind, this eye-catching piece features an ombre effect, flattering mesh panels, and a breathable silhouette perfect for warm weather.
Whether you’re heading to the beach, brunch, or simply want a handmade piece that turns heads, this maxi dress is a showstopper. Best of all, it’s beginner-friendly and includes simple shaping with plenty of visual interest. Let’s get started!
This stunning long crochet dress pattern is completely free and ideal for summer layering. With its airy mesh stitches, body-flattering fit, and flared hemline, it’s the perfect project for warm weather.
The pattern includes step-by-step instructions and tips for adjusting the length or width. Whether you’re dressing up for a beach trip or adding a handmade piece to your wardrobe, this elegant crochet dress brings comfort and beauty together effortlessly.
Scroll down for the free pattern, or get the PDF – print friendly version on Etsy or Ravelry using the images below. Use code “SerenaDress” for a 20% discount at checkout. Valid through August 20th, 2025.


Crochet maxi dress
There are two versions, you can pick between a floor length or a knee length.
Materials needed
Yarn – Any DK weight yarns in colors of your choice.
The prototype was made using 2 strands of #2 to get DK equivalent.
Estimated Total Yardage
Ankle-length Dress =
2400 (2600, 2800, 3000, 3200, 3400, 3600, 3800, 4000) Yards
Knee-length Dress =
2000 (2200, 2400, 2600, 2800, 3000, 3200, 3400, 3600) Yards
Hook – 5 mm Crochet Hook
Gauge – 18 sts over 12 Rows = 4 x 4” made using the stitch pattern, before blocking.
Gauge pattern
Chain 21 and follow the pattern for 12 rows.
Pattern Notes
- Please kindly read through the pattern before starting.
- The stitch count is written after each row/round, with the smallest XS written first and the others in the ().
- Stitch count written in black is for all sizes, but at some points, the stitch counts are color-coded for clarity, i.e. XS (S, M, L, XL, 2XL, 3XL, 4XL, 5XL)
Difficulty Level – Intermediate
Terms – US Terminology

Ombre Crochet Dress Pattern Stitches Abbreviations
Chain/chains – ch/chs
Chain space – ch sp
Stitch(es) – st(s)
Slip Stitch – sl st
Single Crochet – sc
Double crochet – dc
Special stitch:
Shell = dc, ch 1, dc, ch 1, dc

Serena Crochet Dress Pattern: Finished Measurement
Size(s) and color codes – XS (S, M, L, XL, 2XL, 3XL, 4XL, 5XL)
Bust Measurement: 30 (34, 38, 42, 46, 50, 54, 58, 62)”
Armhole Circumference: 14 (14, 16, 16, 16, 16, 18, 18, 18)”
Length of Top: 18 (20, 20, 20, 22, 22, 24, 24, 24)”
Hip Measurement: 32 (36, 40, 44, 48, 52 56, 60, 64)”
Skirt Length: 40 (42, 44, 44, 46, 46, 48, 48, 50)”
Model skirt shown in Medium
The modeled garment is shown in M, with about 1” of Positive Ease.
Construction Notes
- This project is made in sections.
- The top is made without sewing, starting from the shoulder and then downwards. Two parts are needed, which are then joined together.
- You then continue in rounds until your piece gets to your belly button.
Picking a size:
For the top – Use your bust measurement.
For the skirt – Use your hip measurement, it’s okay if the size differs from your top’s.
1 FREE DOWNLOAD PER MONTH
WITH JUST $3 PER MONTH!
- Pick your desired pattern each month.
- It can be a new or old pattern.

2 FREE DOWNLOADS PER MONTH
WITH JUST $5 PER MONTH!
- Pick your desired patterns each month.
- It can be a new or old pattern.
- You get 2 patterns per month.

3 FREE DOWNLOADS PER MONTH
WITH JUST $8 PER MONTH!
- Pick your desired patterns each month.
- You get 3 free patterns per month.
- It can be a new or old pattern.

How to crochet a modern dress
Section 1: Make 2
Front panel
Row 1: Chain 12, 2 dc in 3rd ch from hook, *skip 2 chs, sc in next ch, 2 dc in same ch, repeat from * until the last 3 chs, sc in last ch, turn. 6 dc, 3 sc
Row 2: Ch 2(does not count as a stitch, here and throughout), 2 dc in first sc below, *skip next 2 dc, (sc, 2 dc) in next sc, repeat from * across row, sc in last st, turn. 6 dc, 3 sc
Rows 3 – 10 (10, 12, 12, 8, 6, 6, 6, 4): Rep row 2
Plus size row numbering is not off, it’s to create a fitting neckline that is not too wide.
Shaping for the Neckline
Row 1: Ch 2, (2 dc, sc, 2 dc) in first sc, *skip next 2 dc, (sc, 2 dc) in next sc. Repeat from * across row, sc in last st, turn. 8 dc, 4 sc
Row 2: Ch 2, 2 dc in first sc below, *skip next 2 dc, (sc, 2 dc) in next sc, repeat from * across row, sc in last st, turn. 8 dc, 4 sc
Rows 3 – 8 (10, 12, 14, 16, 18, 20, 22, 24): Rep Rows 1 – 2.
Row 9 (11, 13, 15, 17, 19, 21, 23, 25): Rep Row 1
Counts after the last row:
14 (16, 18, 20, 22, 24, 26, 28, 30) dc,
7 (8, 9, 10, 11, 12, 13, 14, 15) sc
Fasten off.
Back Panel
Check fit: Neckline depth.
- Check the neckline length of your piece.
- If you prefer it extends more, add more rows before shaping the neckline below.
- For a shorter neckline, reduce the number of rows before neckline shaping.
Join yarn with a sl st to the starting chain in row 1.
The skipped chs from the foundation chs while making the front panel will be used for the next row.
Row 1: Ch 2, 2 dc in same st, *skip next 2 sts, sc in next ch-sp, 2 dc in same ch-sp, repeat from * to end of row, sc in final ch st of row, turn.
Row 2: Ch 2, 2 dc in first sc below, *skip next 2 dc, (sc, 2 dc) in next sc, repeat from * across row, sc in turning ch 2 at end of row, turn. 6 dc, 3 sc
Rows 3 – 9 (11, 11, 11, 7, 7, 5, 5, 5): Rep Row 2
- If you made adjustments to the strap of the front, add the same number of rows on the back panel.
- Make sure you have an odd number of rows for the back panel.
Shaping for the Neckline
Ensure the next row (shaping for the neckline) is on the same side as the front panel.
Repeat the neck line shaping as with the front panel.
Do not fasten off.
Connect the back panel to the front.
Chain 12 (12, 18, 18, 18, 18, 24, 24, 24)
sl st to the last st on the front panel.
Fasten off for the first piece.
Joining the two pieces together.
- Continue in rounds, starting with the front panel.
- Pick up the front panel of panel A, continue until the chain sps, and then proceed to the back panel (panel A completed), proceed to the back panel of panel B, and then to the chain space of panel B.
- Join with a sl st to the top of chain 2 sp.
Round 1: Ch 2, 2 dc in first sc below, *skip next 2 dc, (sc, 2 dc) in next sc, repeat from * until the last sc in this panel, (sc, 2 dc) in last sc of this panel,** pick up next front panel (panel A), (sc, 2 dc) in ch 2 sp, rep from * until **. Continue to the chain spaces, {skip 2 chs, sc in next ch, 2 dc in same ch}, repeat from { } to the last 2 chains, skip the last 2 chains, continue to the back panel.
Rep from * to ** end of back panel, rep { } to the last 2 chains, skip the last 2 chains, join with a sl st to the top of ch 2 sp. { } to the last 2 chains, skip the last 2 chains, join with a sl st to the top of the beginning ch 2. 62 (70, 82, 90, 98, 106, 118, 126, 134) dc, 31 (36, 41, 45, 49, 53, 59, 64, 67) scTurn your work to work the next round from the wrong side.
This step is vital to continue the “raised sts”
Round 2: Ch 2, 2 dc in first sc below, *skip next 2 dc, (sc, 2 dc) in next sc, repeat from * around, sc in last st, join with a sl stitch to the beginning ch 2.
Turn, crocheting from the right side (the next st will be a sc)
Round 3: Ch 2, 2 dc in first sc below, *skip next 2 dc, (sc, 2 dc) in next sc, repeat from * around, sc in last st, join with a sl stitch to the beginning ch 2.
Rounds 4 – 16 (16, 18, 20, 20, 22, 22, 24, 24): Repeat rounds 2 and 3.
For plus sizes, consider adding more rounds for enhanced coverage around your bust.
Mini Granny Mesh section
Round 1: Ch 5 (counts as the first dc + ch 2 sp, here and throughout), *skip next 2 dc, dc in next sc below, ch 2, rep from * around, join with a sl stitch to the beginning ch 2.
Round 2: Ch 5, *2 dc in ch sp, ch 1, rep from * around, join with a sl stitch to the beginning ch 2.
Rounds 3 – 6 (6, 8, 8, 8, 8, 8, 8, 8): Repeat round 2
The length should be around your belly button.
Round 7 (7, 9, 9, 9, 9, 9, 9, 9): Ch 3, 4 dc in first ch sp, *sc in next ch sp, 5 dc in next ch sp, rep from * to the end, join with a sl st to the beginning ch.
Fasten off.
Skirt Instructions
Chain 153 (170, 187, 204, 221, 238, 255, 272, 289) join with a sl st to the beginning chain, make sure you do not have any twists.
Round 1: Ch 1(does not count as a st here and throughout), sc in first ch, *ch 5, skip next 4 chs, sc in next ch, {skip next 2 chs, shell in next ch, skip next 2 chs, sc in next ch}, rep { } once more, rep from * until the last 2 chs, skip last 2 chs, sl st to join the beginning ch.
9 (10, 11, 12, 13, 14, 15, 16, 17) ch 5 sps
27 (30, 33, 36, 39, 42, 45, 48, 52) sc
18 (20, 22, 24, 26, 28, 30, 32, 34) shells
Round 2: Ch 4, sc in ch 5 sp, ch 5, *sc in 2nd dc st, shell in next sc st, sc in 2nd dc st, ch 5, sc in next ch 5 sp, ch 5, rep from * until the last shell, ch 3, join with a sl st to the 2nd ch sp from the beginning ch.
9 (10, 11, 12, 13, 14, 15, 16, 17) shells
18 (20, 22, 24, 26, 28, 30, 32, 34)ch 5 sps
27 (30, 33, 36, 39, 42, 45, 48, 52) sc
Round 3: Ch 5, sc in ch 5 sp, *shell in next sc st, sc in 2nd dc st, shell in next sc st, sc in next ch 5 sp, ch 5, sc in next ch 5 sp, rep from * until the last ch 5 sp, shell in next sc st, sc in 2nd dc st, shell in next sc st, join with a sl st to the 2nd ch sp from the beginning ch.
9 (10, 11, 12, 13, 14, 15, 16, 17) ch 5 sps
27 (30, 33, 36, 39, 42, 45, 48, 52) sc
18 (20, 22, 24, 26, 28, 30, 32, 34) shells
Rounds 4 – 29: Repeat rounds 2 – 3
Increase or decrease the repeats until your project gets to the knee.
Fasten off for knee length version and follow the instructions from section 3 below.
Section 2: Flared Part
Round 1: *Ch 5, sc in ch 5 sp, ch 5, sc in next sc st, ch 5, sc in 2nd dc st, ch 5, sc in next sc st, ch 5 sp, sc in 2nd dc st, ch 5, sc in next sc st, rep from * until the end, join with a sl st to the 2nd ch sp from the beginning ch.
Round 2: *Ch 5, sc in ch 5 sp, rep from * until the end, join with a sl st to the 2nd ch sp from the beginning ch.
Rounds 3 – 8: Repeat round 2
Round 9: *Ch 6, sc in ch sp, rep from * until the end, join with a sl st to the 2nd ch sp from the beginning ch.
Round 10 – 12: Repeat Round 9
Round 13: *Ch 7, sc in ch sp, rep from * until the end, join with a sl st to the 2nd ch sp from the beginning ch.
Round 14 – 15: Repeat Round 13
Round 16: *Ch 8, sc in ch sp, rep from * until the end, join with a sl st to the 2nd ch sp from the beginning ch.
Round 17 – 19: Repeat Round 16
Round 20: *Ch 9, sc in ch sp, rep from * until the end, join with a sl st to the 2nd ch sp from the beginning ch.
Check the length of your skirt, if it’s long enough, skip the next repeats and proceed to round 26.
Round 21 – 25: Repeat Round 20
You can adjust the number of rounds until your skirt reaches your ankle.
Round 26: Ch 1, *9 sc in each ch sp around, join with a sl st to the beginning chain.
Round 27: Ch 3, 4 dc in same st, *skip next 2 sts, 5 dc in next st, skip next 2 sts, sc in next st, rep from * around, join with a sl st to the beginning ch sp.
Fasten off.
Section 3: Skirt Band
Join yarn with a sl st to the foundation chain.
Crocheting around the base of the skirt.
Aim for 4 sc in each ch 4 sps.
Round 1: Ch 1, *sc in each st and ch sps around, join with a sl st to the beginning ch.
Round 2: Ch 4, *skip next 2 sts, dc in next 2 sts, ch 2, rep from * to the end, dc in last st, join with a sl st to the 3rd ch from the beginning ch sp.
Round 3: Ch 3, 2 dc in ch sp, *ch 2, skip next 2 sts, 2 dc in ch sp, rep from * to the end, join with a sl st to the 3rd ch from the beginning ch sp.
Round 4: Repeat round 3.
Note
- Continue the repeats until you have your desired skirt length.
- A longer skirt = more repeats.
- A shorter skirt = fewer repeats.
Band
- Cut out 20 (22, 24, 28, 32, 36, 40, 42, 46)” of an elastic band. Or cut to waist size plus 2 inches overlap.
- Videos showing how to crochet around the elastic band;
https://youtu.be/pbiAyKnV MPQ or
Round 5: Ch 1, sc in each st and 2 sc in each ch 2 sp, around, join with a sl st to the beginning chain.
Round 1: Ch 1, crocheting over the elastic band, sc in each st around. Join with a sl st to the beginning chain.
Secure/sew the ends of the elastic band tightly.
Fasten off
Weave in ends.
Optional
Joining the top to the skirt
- Pick up the skirt and the top
- Turn both to the wrong side
- Place the lower end of the top next to the skirt.
- The joining is through the mesh row of the top and the last row of the skirt. The shells from the last round of the top are to cover the joining. This creates a beautiful cover over the joining.
- Using either a darning needle or a crochet hook, and either the mattress stitch or the slip stitch, join the upper part of the skirt to the last round of the mesh on the lower end of the top.
Tip for a perfect joining:
- Count the number of stitches on the lower end of the top and the stitches on the last round of the skirt.
- If the stitches are more on one side, you can join using g 2 stitches on one side and one stitch on the other side to give an even joining. Make sure to even these around.
I would love to see your version made using the Serena crochet dress pattern. When you do, kindly share your versions using the links below.
About the Designer
Say Hi on Instagram and Subscribe To my email List for pattern discounts and freebies. For questions, send such to [email protected]. Read more about me here.