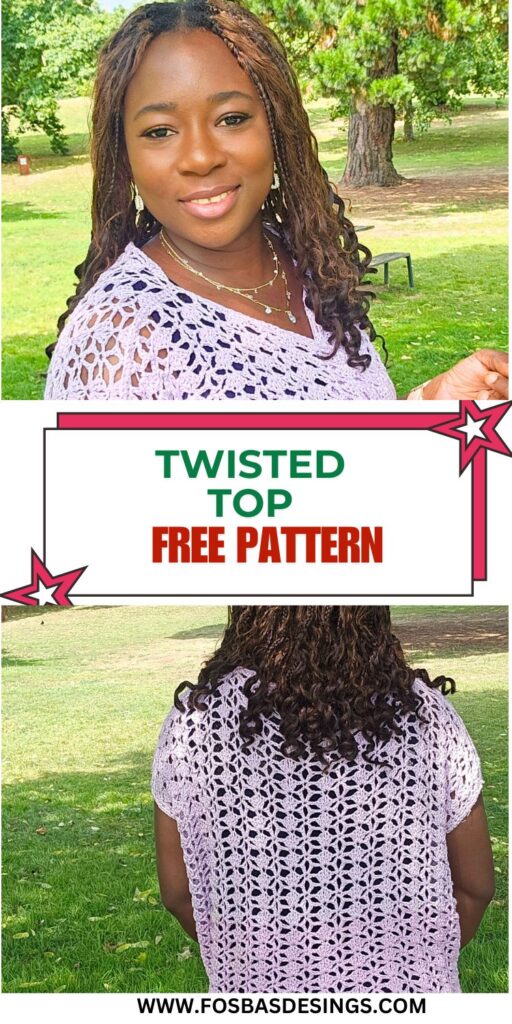
Bessie Knot Twisted Top Free Crochet Pattern
If you’re searching for a stylish yet simple crochet wearable to make this season, the Bessie Twisted Top is the perfect project! This airy and flattering top features a lovely lace texture and a subtle twist detail at the front, giving it a modern, elegant look.

More projects that uses similar crochet sttitch includes: Bessie lace Top, Crop top, lacy dress.
Designed with comfort and drape in mind, it’s light enough for summer yet layers beautifully for transitional weather. Whether paired with jeans, a skirt, or layered over a dress, the Bessie Top will quickly become a wardrobe favorite.
This crochet top celebrates the beauty of minimal shaping and simple stitches, making it accessible even for newer crocheters. The twist creates visual interest without complicated construction — just two panels joined creatively!
Get a PDF copy on ETSY or on Ravelry. Use code: “Knotty” for a 30% discount at checkout.

Construction and Design Inspiration
The Bessie Twisted Top is inspired by timeless wardrobe pieces that combine simplicity with a touch of sophistication.
The stitch pattern creates a soft, open lace texture that’s both breathable and elegant. What makes this design special is the front twist, which instantly elevates a classic crochet top into something fashion-forward.
The construction is straightforward: you’ll work two identical rectangles using a repeat lace stitch, seam the shoulders, and twist the front before joining the sides.
The result is a flattering fit that looks beautiful on every body shape.

Yarn and Materials
This top works best with a lightweight yarn (Category 3) such as cotton, bamboo, or a soft blend that gives drape.
Cotton yarn keeps the top breathable and perfect for warmer months, while bamboo or silk blends add luxurious softness.
You’ll also need a crochet hook suited to your yarn choice, scissors, a yarn needle for seaming, and stitch markers if you like keeping your joins even.
Because this design uses simple stitches, it’s easy to adapt to various yarns. You can use sparkly yarn for a dressy look or matte cotton for a casual, everyday finish.
Yarn – Any DK-weight yarns in colors of your choice
Lion brand Coboo – DK, #3 light weight (51% Cotton, 49% Rayon from Bamboo, 232 yards/212m per 3.5 oz/100g skein)
Hook – 6 mm Crochet Hook
Skill Level
This is an easy-level crochet pattern suitable for adventurous beginners. You’ll need to know basic stitches like chains, double crochet, and slip stitches.
The main pattern repeat is simple to memorize, making it an enjoyable and relaxing project — perfect for evening crocheting or weekend sessions.
Fit and Sizing
The Bessie Twisted Top is written with comfort and versatility in mind. It’s designed with a relaxed fit and plenty of stretch from the lace pattern.
You can easily adjust the length by adding or reducing the number of rows, and the width by adding repeats of the stitch pattern. This pattern can be made cropped, hip length, or tunic-style, depending on your preference.
Size(s) and color codes: XS (S, M, L, XL, 2XL, 3XL, 4XL, 5XL)
Bust Measurement: 30 (34, 38, 42, 46, 50, 54, 58, 62)”
Armhole Circumference: 14 (14, 16, 16, 16, 16, 18, 18, 18)”
Length of Top: 18 (20, 20, 20, 22, 22, 24, 24, 24)”

Styling Tips
This top is effortlessly chic! For a casual look, pair it with jeans or shorts and sandals.
To dress it up, wear it over a camisole with tailored trousers or a maxi skirt.
You can even layer it over a fitted long-sleeve top in cooler weather.
The soft lace makes it an excellent choice for both daywear and evening outings.
Pro Tips for Crocheting the Bessie Top
- Use a yarn with great drape for the best twisted effect.
- Block your panels before joining — this enhances stitch definition and ensures even edges.
- Don’t skip the twist step! It’s the magic moment that gives the top its modern silhouette.
- For a more fitted look, size down slightly or use a smaller hook.
Customizing Your Twisted Top
The pattern is easy to modify — you can adjust the sleeve opening for more coverage, add a decorative border, or play with color blocking.
Try making a gradient version using ombré yarn, or even add a subtle shimmer thread for a festive touch.
Adjustments/fittings
Length: increase or decrease the repeats for part of the Body.
Sleeve Opening:
Too tight? Reduce the length of the part indicated to be joined together.
Too loose: Increase the length of the part indicated to be joined together.
Yarn Substitution Ideas
- Lion Brand Coboo – soft cotton/bamboo blend with great drape
- Paintbox Cotton DK – affordable and easy to work with
- Hobbii Baby Cotton Organic – gentle on the skin and machine washable
Blocking and Finishing
Once your top is complete, lightly block it by pinning to shape and steaming or wet-blocking according to your yarn label.
This step helps define the lace and smooths the twist area. After blocking, weave in all ends neatly for a professional finish.
Estimated Total Yardage
800 (860, 920, 980, 1060, 1120, 1200, 1280, 1360) Yards
Hook – 6 mm Crochet Hook
Gauge – 16 sts over 10 Rows = 4 x 4” made using the stitch pattern, before blocking.
Gauge pattern
Chain 18 and follow the pattern for 10 rows.
Pattern Notes
- Please kindly read through the pattern before starting.
- The stitch count is written after each row/round, with the smallest XS written first and the others in the ().
- Stitch count written in black is for all sizes, but at some points, the stitch counts are color-coded for clarity, i.e. XS (S, M, L, XL, 2XL, 3XL, 4XL, 5XL)
Difficulty Level – Intermediate
Terms – US Terminology
Stitches Abbreviations
Chain/chains – ch/chs
Chain space – ch sp
Stitch(es) – st(s)
Slip Stitch – sl st
Single Crochet – sc
Double crochet – dc
Special Stitch
V stitch = (dc, ch 3, dc)
Construction Notes
- This project is made in flat (rows), after which the panels are joined together at the shoulder seam and the sides.
- The project works from top down – neckline towards the waist/hips (depending on how long you want yours to be) with no need to shape necklines or armholes.


How to crochet a Twisted Top
Section 1 – Front and Back Panels
Make 2
Chain 100 (108, 116, 124, 132, 140, 148, 156, 164)
Row 1: Dc in 4th ch from hook, *ch 2, skip next 3 chs, sc in next ch, ch 2, skip next 3 chs, (dc, ch 3, dc) in next ch, rep from * until the last 8 chains, ch 2, skip next 3 chs, sc in next ch, ch 2, skip next 3 chs, 2 dc in last ch, turn. 4 dc, 11 (12, 13, 14, 15, 16, 17, 18, 19) V sts, 12 (13, 14, 15, 16, 17, 18, 19, 20) sc
Row 2: Ch 1 (count as a st, here and throughout), sc in next st, ch 2, skip ch sp, (2 dc, ch 1, 2 dc) in next st, *ch 2, skip next (ch sp and st), sc in ch 3 sp, ch 2, skip next (st and ch sp), (2 dc, ch 1, 2 dc) in next st, rep from * until the last sc, ch 2, skip ch sp, sc in last 2 sts, turn. 15 (16, 17, 18, 19, 20, 21, 22, 23) 2 sc, 48 (52, 56, 60, 64, 68, 72, 76, 80) dc
Your piece should measure about 28 (30, 32, 34, 36, 38, 40, 42, 54)”
Row 3: Ch 3 (count as a st, here and throughout), dc in next st, *ch 2, sc in next ch 1 sp, ch 2, skip next (2 sts and ch 2 sp), (dc, ch 3, dc) in next st, rep from * until the last sc; ch 2, sc in next ch 1 sp, ch 2, skip next (2 sts and ch 2 sp), dc in last 2 sts, turn. 4 dc, 4 dc, 11 (12, 13, 14, 15, 16, 17, 18, 19) V sts, 12 (13, 14, 15, 16, 17, 18, 19, 20) sc
Row 4 – 43: Rep Rows 2 – 3
Row 44: Rep Rows 2
Edging
- Crocheting around the whole piece.
- With the right side facing.
Round 1: Ch 1, sc in each st around, aim for 2 sc in each ch sp/dc st around, (sc, ch 1, sc) at each corner, join
Finishing and Joining
Front Panel Twist
- Pick up the front panel and number each corner as shown in the photo (see PDF).
- Lift the lower end, number 4, towards the position where 2.
- Adjust so that the number 2 corner is now replacing the number 4.
Shoulder seam(s)
Turn both panels made in section 1 to the wrong side.
- Place the front panel over the back panel, with the right side facing the other.
- Measure about 5” from the side of the panels towards the neckline, and secure with a stitch marker.
- Join yarn with a slip stitch to ch 1 sp at the corner of the edging.
- Crocheting from the edge towards the stitch maker, ch 1, sc over both panels.
- Fasten off and repeat on the other side.
- Try the piece on and adjust the amount joined for a more comfortable fit.
Side seam(s)
- With the wrong side facing you, sew the sides of the front and back panels together.
- Fasten off.
- Repeat on the other side.
Neckline Edging – Optional
Join yarn to any stitch around the neckline.
Crocheting around and the corresponding stitches on the back panel.
Round 1: Ch 1, sc in each st around, join with a sl st to the beginning chain.
Weave in all ends.
FAQs About the Bessie Twisted Top
Can beginners make this top?
Yes! It’s great for beginners looking to make their first wearable piece.
Can I adjust the neckline?
Definitely — you can make it deeper or shallower by changing the front seam position.
What’s the best yarn type?
A light cotton or bamboo yarn works beautifully for stitch definition and flow.
Is it seamless?
Mostly! You’ll only seam the shoulders and sides, with minimal finishing required.#
The Bessie Twisted Top Free Crochet Pattern is a perfect blend of comfort, style, and simplicity. It’s lightweight, flattering, and works for multiple occasions — from casual weekends to chic evenings out. If you love quick, wearable projects that look store-bought, this top is one to add to your crochet list.
So grab your hook, choose your favorite yarn color, and enjoy making your very own Bessie Twisted Top — a handmade piece you’ll wear proudly season after season.