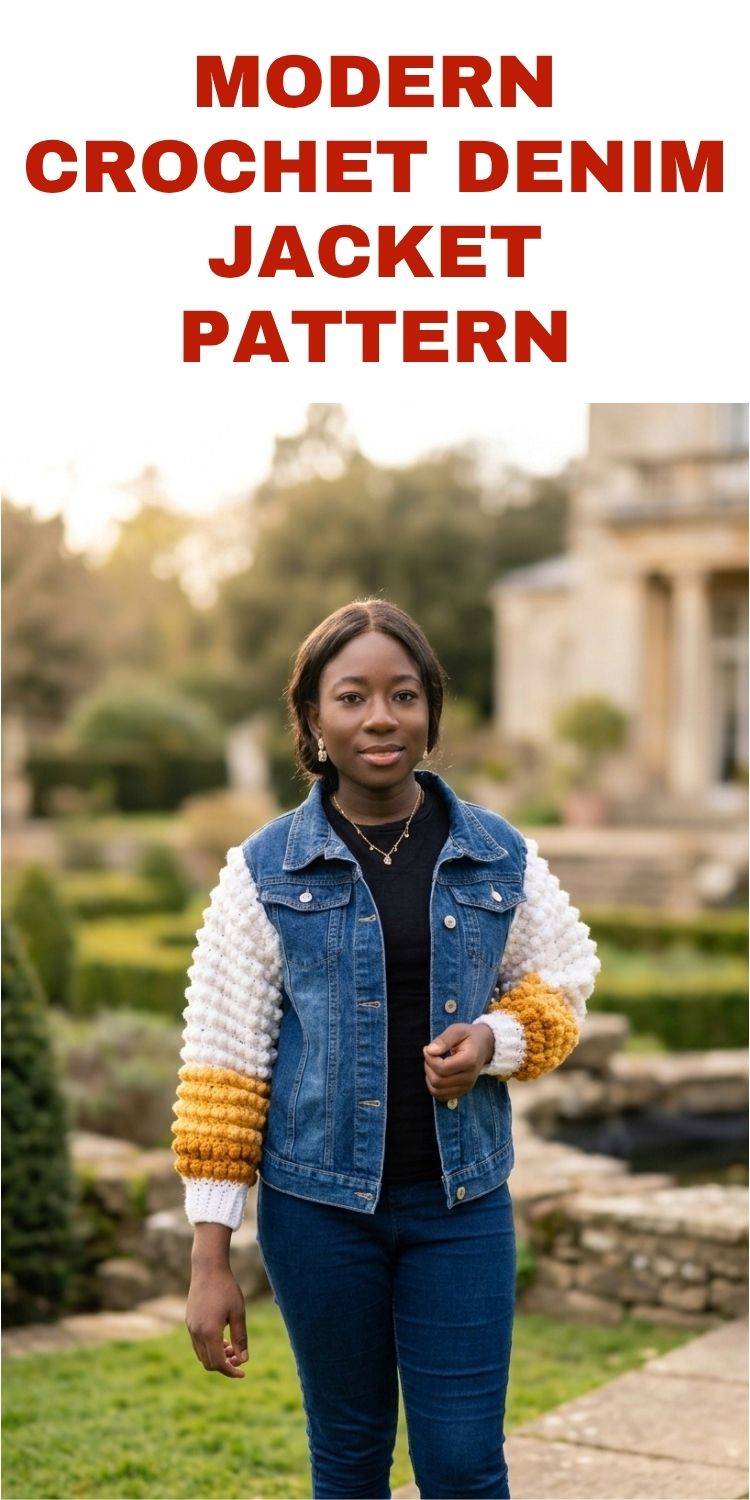
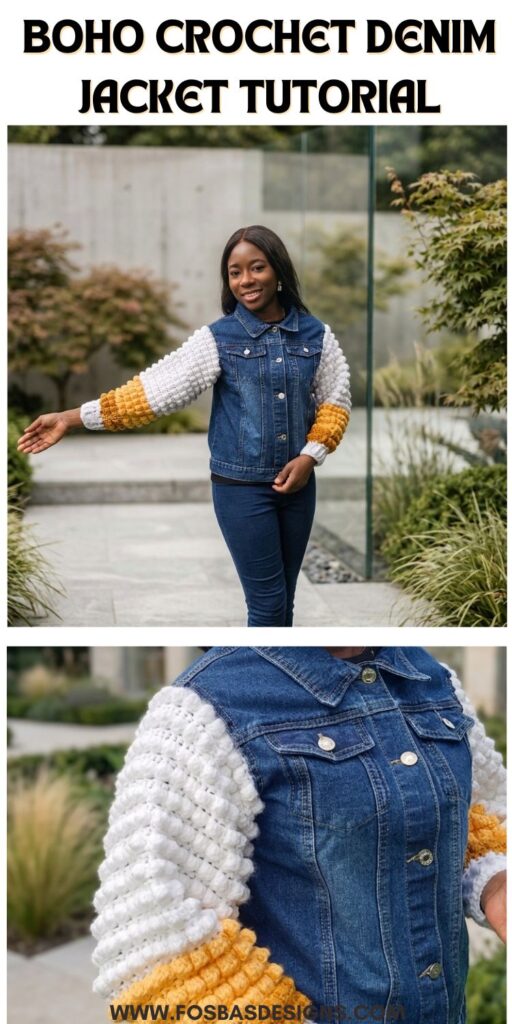
Boho Crochet Denim Jacket Tutorial
There’s something truly special about taking a wardrobe staple and turning it into something completely unique, and this crochet sleeve denim jacket does exactly that.
If you’ve ever had a denim jacket sitting in your wardrobe that felt a little… ordinary, this project is your sign to give it new life. With beautifully textured crochet sleeves and a soft colour transition, this design blends structure with creativity in the most effortless way.
Get a detailed copy on Etsy or Ravelry.
Use code “Denim” for a 30% discount at checkout, valid until April 23rd, 2026.
Here is a video showing how I attached the sleeves to the denim jacket.
This project is perfect if you’re looking to:
- Upgrade an old denim jacket
- Try something different from traditional garments
- Create a statement piece that turns heads
And the best part? You don’t need to be an advanced crocheter to achieve this look.

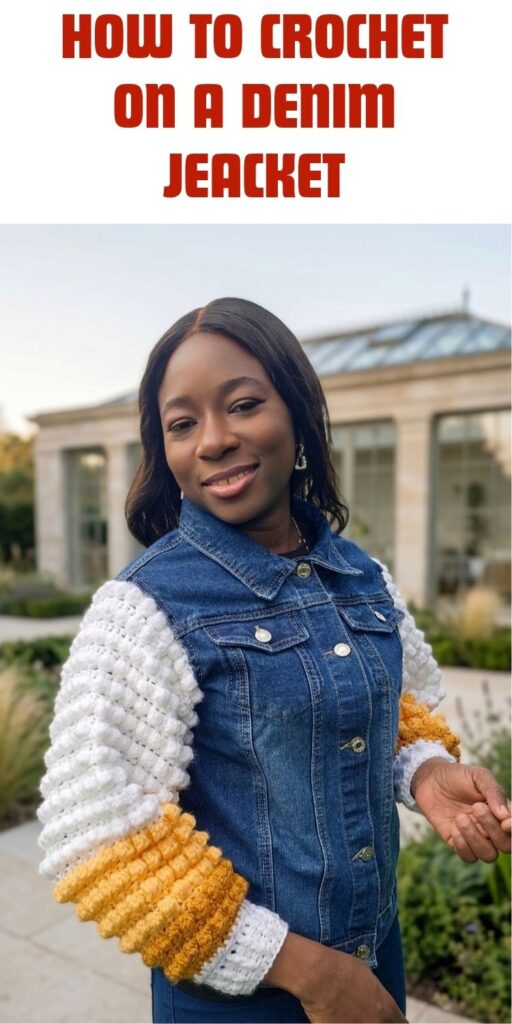
Why Crochet on a Denim Jacket?
Crochet and denim might not be the most obvious pairing, but once you try it, you’ll see just how beautifully they work together.
The denim provides structure and durability, while the crochet sleeves add softness, texture, and personality. It’s the perfect balance between casual and elevated.
This technique also opens up endless possibilities. Once you learn how to combine crochet with clothing, you can:
- Transform jackets, shirts, and dresses
- Add custom details to ready-made garments
- Create truly one-of-a-kind pieces
Boho Denim Jacket Crochet Tutorial: Materials
Sleeveless Denim jacket (base garment)
Yarn: Stylecraft Special Aran, (#4, 100% Acrylic, 196 m per 3.5 oz/100g Ball)
This sample uses three colors: White (A), Chocolate (B), and Mustard (C).
Estimated Yardage per color/size:
Color A = 120 (130, 140, 150, 160, 170, 180, 190, 200) yards
Color B = 50 (60, 70, 80, 90, 100, 110, 120, 130) yards
Color C = 40 (50, 60, 70, 80, 90, 100, 110, 120) yards
Hook and other Materials
6 mm Crochet Hook.
Stitch Markers – 2
Yarn needle
Gauge
12 sts over 8 rows = 4”/10 cm Square made in hdc, before blocking.
Adjust hook size if necessary to obtain gauge.
Pattern Notes
- Please kindly read through the pattern before starting.
- Similar #4 weight yarn can be substituted; please check the gauge.

Skill Level – Intermediate
Terms – US Terminology
Stitches Abbreviations
ch(s) – Chain(s)
sl st – Slip stitch
sc – Single Crochet
hdc – Half Double Crochet
dc – Double Crochet
hdc2tog – Half Double Crochet 2 stitches together
FPdc – Front Post Double Crochet
BPdc – Back Post Double Crochet
Rep – Repeat
7dctog – Bobble
Special Stitch
Bobbles = 7dctog – *Yarn over hook, insert hook into indicated st, yarn over, draw yarn through, yarn over and pull out 2 loops, repeat from * 6 more times, you should have 8 loops around your hook, yarn over, pull through all the loops at once.
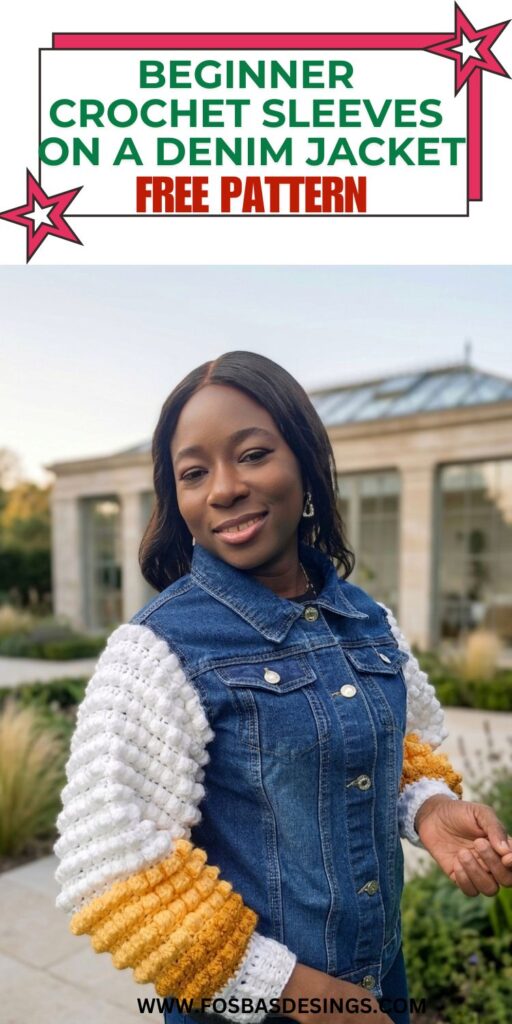
Finished Measurements
Sizes/Color – XS (S, M, L, XL, 2XL, 3XL, 4XL, 5XL)
Sleeve Length – 21 (21, 22, 22, 23, 23, 24, 24, 24)”
Armhole Depth – 18 (18, 18, 18, 20, 20, 20, 20, 20)”
The modeled garment is shown in M with 2” of positive ease for the model.
Construction Notes
- This project is made in 2 sections.
- Section 1 – Sleeves are made in rows, starting at the shoulder and working towards the wrist.
- Section 2 – Sleeves are then attached to the Jacket using sewing needles, after which the sleeves’ underarm is then sewn together.
Adjustments/fittings
- For a smaller bobble, you can substitute 5dctog for 7dctog. However, keep the size of the bobble similar.
- The starting chain should be similar to the jacket armhole.
Length: Increase or decrease the repeat. Remember to replicate this when making the second sleeve.
Get the Boho Crochet Denim Jacket step-by-step print-friendly version with photos on Etsy and Ravelry, use the images below.
Use code “Denim” for a 30% discount at checkout, valid until April 23rd, 2026.


1 FREE DOWNLOAD PER MONTH
WITH JUST $3 PER MONTH!
- Pick your desired pattern each month.
- It can be a new or old pattern.

2 FREE DOWNLOADS PER MONTH
WITH JUST $5 PER MONTH!
- Pick your desired patterns each month.
- It can be a new or old pattern.
- You get 2 patterns per month.

3 FREE DOWNLOADS PER MONTH
WITH JUST $8 PER MONTH!
- Pick your desired patterns each month.
- You get 3 free patterns per month.
- It can be a new or old pattern.

Boho Crochet Denim Jacket Tutorial
Section 1: Sleeves – make two
With Color A, Chain 52 (52, 52, 58, 58, 64, 64, 70, 70)
Row 1: Hdc in 3rd ch from hook and in each ch across, turn. 50 (50, 50, 56, 56, 62, 62, 68, 68) hdc
Row 2: Ch 2, dc in first st, *bobble in next st, dc in next st, rep from *across until the last st, dc in last st, turn. 25 (25, 25, 28, 28, 31, 31, 34, 34) dc/Bobbles
Row 3: Ch 2, hdc in across, turn. 50 (50, 50, 56, 56, 62, 62, 68, 68) hdc
Rows 4 – 15: Rep Rows 2 – 3.
Row 16: Rep Row 2
Start reducing on either side
Row 17: Ch 2, hdc in first st, hdc2tog, hdc in next st, hdc2tog, hdc in each st until the last 6 sts across, hdc2tog, hdc in next st, hdc2tog, hdc in last st turn. 46 (46, 46, 52, 52, 58, 58, 64, 64) hdc
Rows 18 – 19: Repeat Row 2 and 3
Row 20: Rep Row 2. 23 (23, 23, 26, 26, 29, 29, 32, 32) dc/Bobbles
Row 21: Repeat Row 17. 42 (42, 42, 48, 48, 54, 54, 60, 60) hdc
Rows 22 – 23: Repeat Row 2 and 3
Fasten off Color A, join Color C
Row 24: Rep Row 2. 21 (21, 21, 24, 24, 27, 27, 30, 30) dc/Bobbles
Row 25: Repeat Row 17. 38 (38, 38, 44, 44, 50, 50, 56, 56) hdc
Rows 26 – 27: Repeat Row 2 and 3
Row 28: Rep Row 2. 19 (19, 19, 22, 22, 25, 25, 28, 28) dc/Bobbles
Row 29: Repeat Row 17. 34 (34, 34, 40, 40, 46, 46, 52, 52) hdc
Rows 30 – 31: Repeat Row 2 and 3
Fasten off Color C, join Color B
Row 32: Rep Row 2
Row 33: Repeat Row 17. 30 (30, 30, 36, 36, 42, 42, 48, 48) hdc
Fasten off Color B, join Color A
Rows 34 – 35: Repeat Row 2 and 3
The decrease on either side stops here.
Row 36: Rep Row 2
Row 37: Repeat row 3
Fasten off Color A
Join Color B
Sleeve cuff
Row 1: Ch 2, *hdc in next st, hdc2tog, rep from * across, turn. 20 (20, 20, 24, 24, 28, 28, 32, 32) hdc
Row 2: Ch 2, dc in each st across, turn. 20 (20, 20, 24, 24, 28, 28, 32, 32) dc
Row 3: Ch 2, dc in first st,*Fpdc around next st, BPdc around next st, repeat from * across until last st, dc in last st, turn. 10 (10, 10, 12, 12, 14, 14, 16, 16) FPdc/BPdc
Row 4: Ch 2, dc in first st, *BPdc around next st, FPdc around next st, repeat from *across until last st, hc in last at, turn. 10 (10, 10, 12, 12, 14, 14, 16, 16) FPdc/BPdc
Rows 5 – 6: Rep Rows 3 – 4
Row 7: Ch 2, hdc in each st across, turn. 20 (20, 20, 24, 24, 28, 28, 32, 32) hdc
Edging
- Crocheting around the whole panel:
Round 1: Ch 1, sc in each st around the entire panel, (sc, ch 1, sc) at each corner, join with a sl st to the beginning chain.
Fasten off
Section 2: Joining the sleeves to the jean jacket.
- With the right side facing, place the sleeve folded the way you wear it through the armhole of the jacket as shown above.
- Flip the jacket front panels open to expose the end of the sleeves.
- Pin your crochet sleeve into the armhole
- Align:
Shoulder seam
Underarm seam
- Thread a yarn needle with matching yarn
- Sew – using hand sewing – Whip Stitch is recommended, sew through:
Edge of crochet stitches and the jacket armhole.
Denim seam allowance (not the outer layer if possible)
- Work slowly around the armhole.
- Flip the sleeves to the wrong side and sew the sides together.
- Using Running Stitch, sew around the sleeves the second time for durability. This can be done neatly from the right side to prevent the denim trim from obvious creases.
Pro tips for perfect joining
- Use slightly thinner yarn than your sleeve yarn for sewing → cleaner finish.
- Lightly block sleeves before attaching
- Slightly ease the sleeve into the armhole (don’t force it)
- Reinforce the underarm area (the highest stress point)
Common Mistakes to Avoid
- Sewing too tightly → causes puckering
- Skipping pins → leads to uneven sleeves
- Using thick yarn for sewing → bulky seams
- Rushing the process → uneven finish
Fasten off and sew in all ends.
Share Your Project
If you make this crochet sleeve denim jacket, I would absolutely love to see it!
Share your photos and tag me so I can celebrate your work with you.
And if you’re part of the community, don’t forget to post your progress—your version might inspire someone else to start theirs.
This project is more than just a jacket—it’s a reminder of how creative crochet can be.
It’s about transforming something simple into something meaningful, wearable, and uniquely yours.
If you’ve been wanting to try crochet on clothing, this is a beautiful place to start.
About the Designer
Say Hi on Instagram and Subscribe To my email List for pattern discounts and freebies. For questions, send such to [email protected]. Read more about me here.