
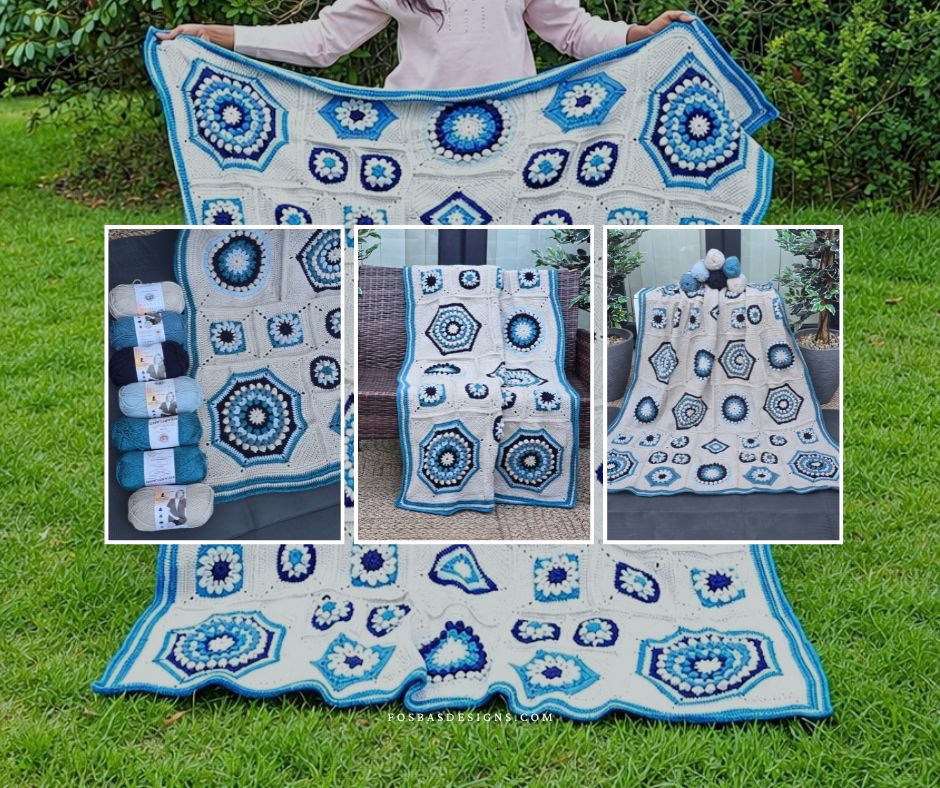
Frosted Window Blanket Crochet Pattern: A Statement Motif Blanket for Winter
The Frosted Window Blanket is finally here, and I am so excited to share this one with you.
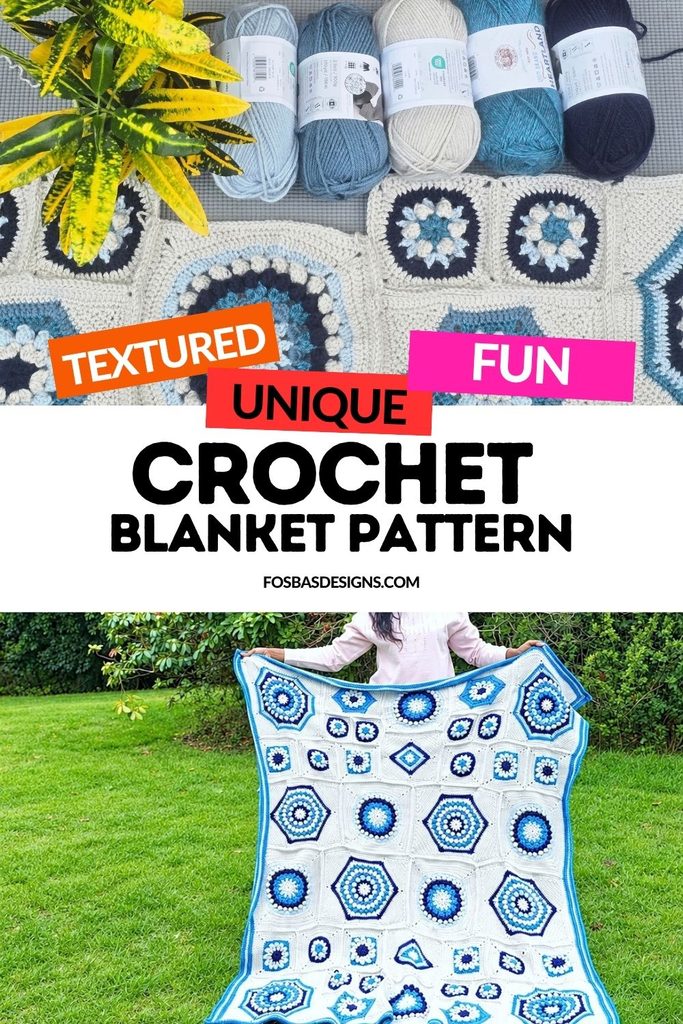
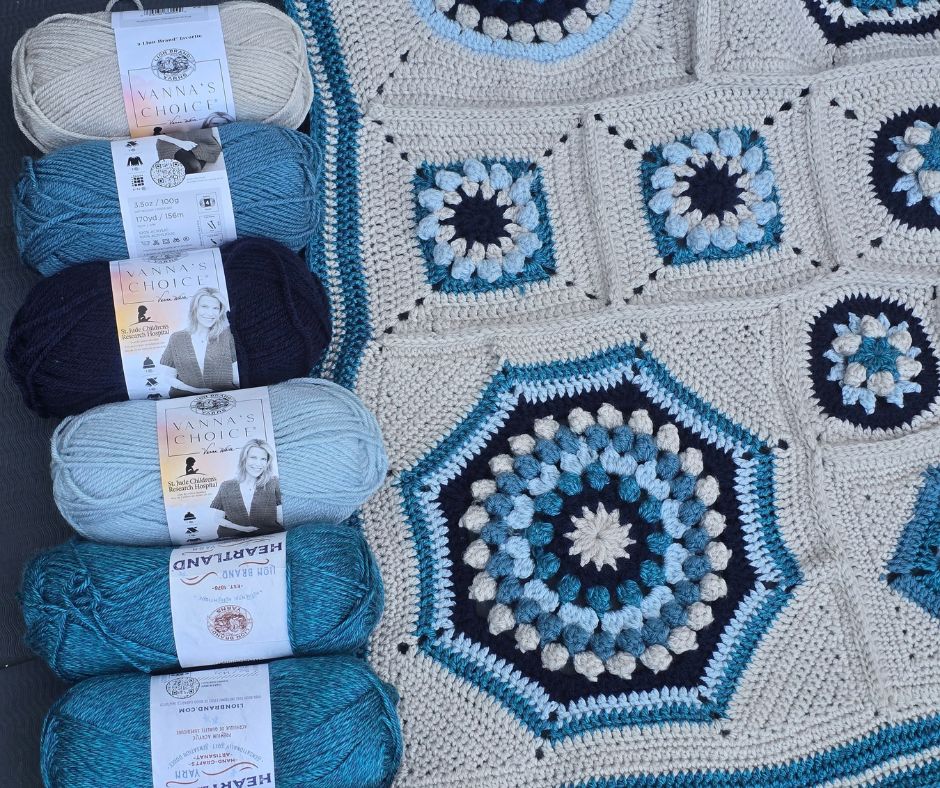
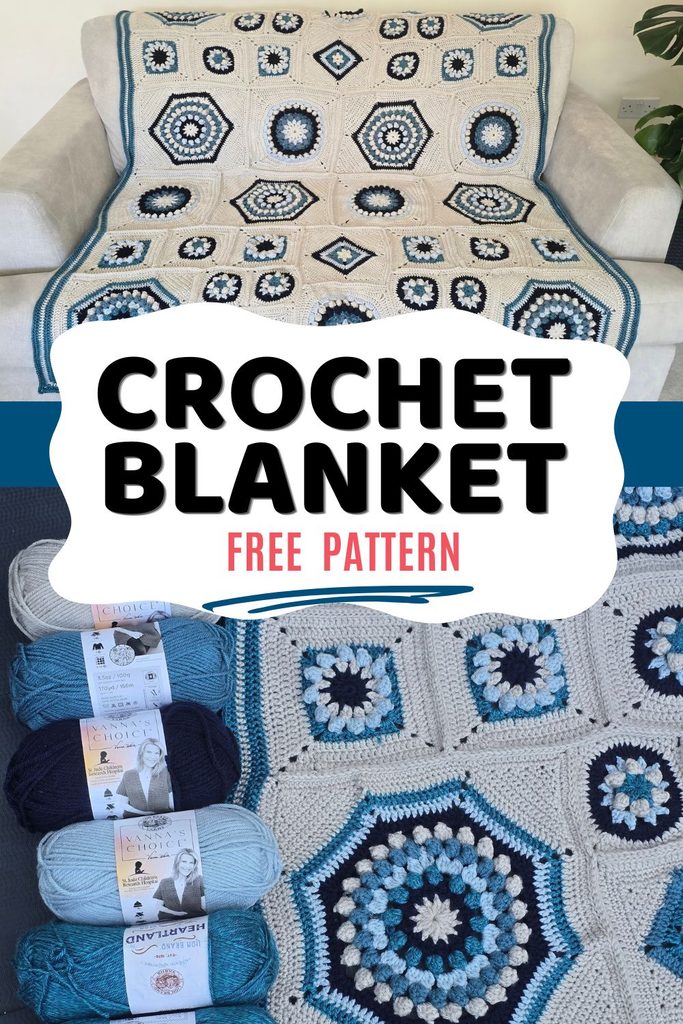
Inspired by frosted winter windows, icy blues, snowflakes and stained glass shapes, this blanket brings together 40 crochet motifs in different sizes and geometric shapes to create one large statement piece. Instead of repeating the same square across the entire blanket, the Frosted Window Blanket combines circles, hexagons, octagons, diamonds and squares to create a beautiful mosaic effect.
Get this pattern
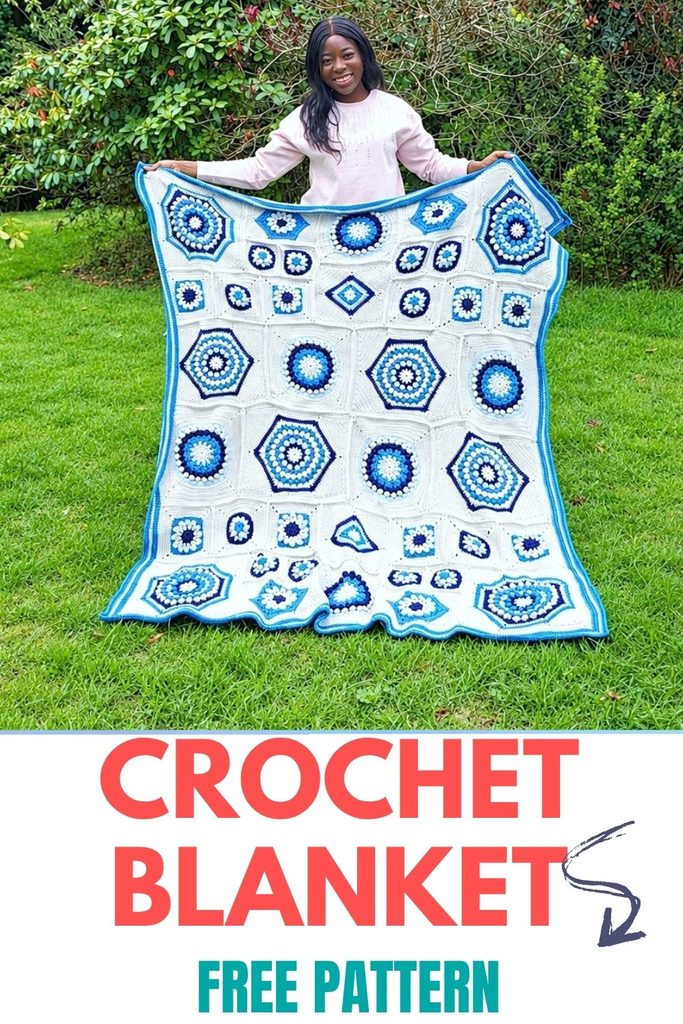
The finished blanket measures approximately 70 inches wide by 80 inches long, making it a wonderfully generous size for a bed, sofa or cosy winter layering.
The Frosted Window Blanket crochet pattern is available now from the Fosbas Designs website, Ravelry and Etsy.
What Makes the Frosted Window Blanket Different?
One of my favourite things about this design is that no single motif has to carry the whole blanket.
There are large statement motifs, smaller detailed motifs and simple geometric shapes positioned throughout the design. As you crochet, the blanket gradually develops its distinctive frosted window appearance.
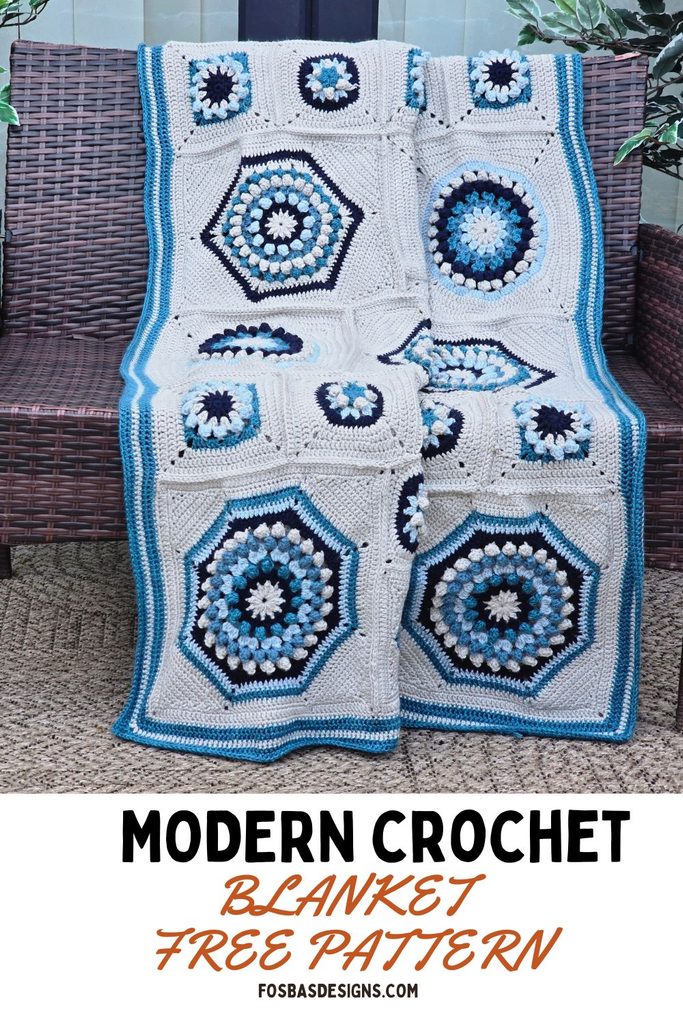
The different motif sizes create movement across the blanket while the cream joining sections allow the blues and navy to stand out beautifully.
More Like This






Another important part of the construction is how the motifs are prepared for joining. Many of the circles, hexagons and octagons are converted into squares or rectangles before the main assembly begins. This reduces the need for lots of tiny filler pieces and makes joining much easier and more enjoyable.
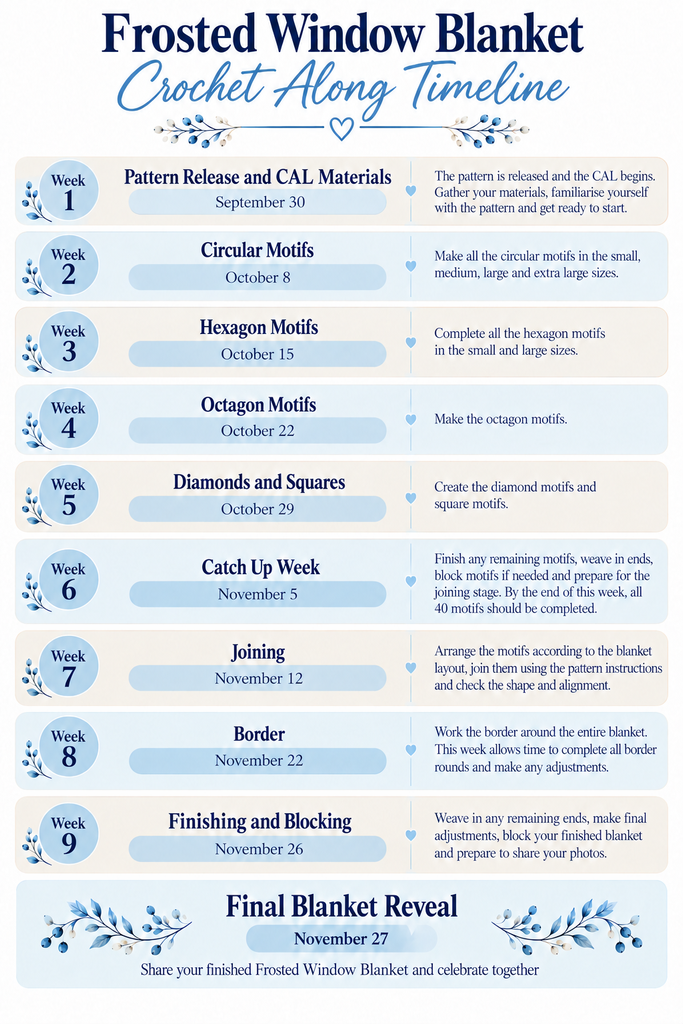
Join the Frosted Window Blanket Crochet Along
If you have been looking at the blanket and thinking that 40 motifs sounds like a lot, this is exactly why I am turning the Frosted Window Blanket into a Crochet Along.
We will work through the project in stages, beginning with the motifs and gradually moving through joining, the border and final blocking.
You can work at your own pace, share your progress and watch the blanket develop one section at a time.
By breaking such a large project into smaller stages, you get the excitement of completing something new throughout the CAL rather than waiting until the very end to see progress.
The 40 Motifs
You will make a total of 40 motifs for the Frosted Window Blanket.
Circular Motifs
Small: 8
Medium: 4
Large: 2
Extra Large: 4
Hexagon Motifs
Small: 4
Large: 4
Additional Motifs
Octagons: 4
Diamonds: 2
Squares: 8
Total motifs: 40
Each group brings something different to the overall blanket, from smaller floral style details to the large geometric motifs that create the main focal points.


Watch the Introductory video here

Frosted Window Blanket Yarn
The prototype was made using Lion Brand Vanna’s Choice together with Lion Brand Heartland.
The combination creates a beautiful palette of warm Linen with layers of icy blue, deeper blue and navy.
Vanna’s Choice
Linen: Quantity: 14 balls
Silver Blue: Quantity: 3 balls
Dusty Blue: Quantity: 2 balls
Navy: Quantity: 3 balls
Heartland
Glacier Bay: Quantity: 3 balls
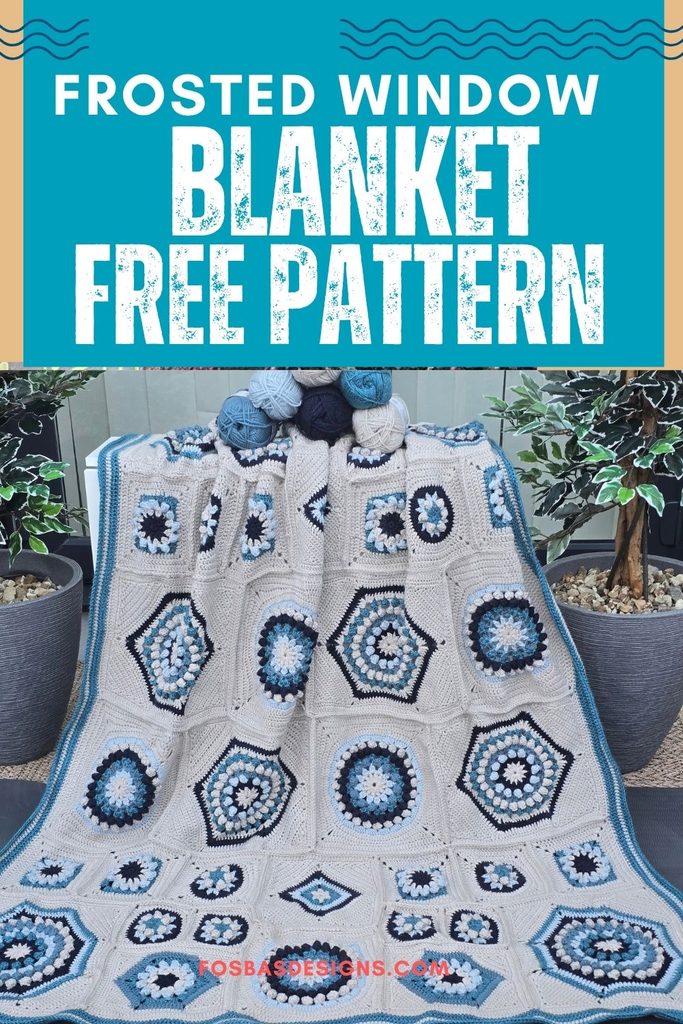
You can absolutely make the blanket in a completely different colour palette. A neutral version, traditional Christmas colours, jewel tones or even a bright multicoloured version could completely transform the finished look.
The most important thing is to use yarns of a similar weight throughout the blanket.
Hook and Gauge
Hook: 5 mm crochet hook
Gauge: 15 stitches over 11 rows in double crochet equals approximately 4 inches.
Gauge is not crucial for this project.
The individual motif measurements provided in the pattern are there as a guide rather than a measurement you must match exactly.
Finished Blanket Size
Approximately 70 inches wide by 80 inches long.
This is a substantial blanket with plenty of coverage, whether you plan to display it across a bed, drape it over the sofa or bring it out every winter as part of your seasonal decor.
How the Frosted Window Blanket Is Constructed
Although the finished blanket looks intricate, the construction is broken into manageable stages.
Step 1: Make the Motifs
You begin by crocheting the different circles, hexagons, octagons, diamonds and squares.
The motifs vary in size, which keeps the project interesting and prevents the repetitive feeling that can sometimes come with making a large motif blanket.
Several motifs are then transformed into squares or rectangles, preparing them for the final layout.
Step 2: Arrange the Blanket
Once the motifs are completed, they are positioned using the included blanket schematic.
This is where the Frosted Window design really begins to come together.
You will start seeing how the different shapes and sizes balance one another and create the mosaic style arrangement.
Step 3: Join the Motifs
The motifs are joined using simple decorative crochet stitches.
Because a few motifs are slightly larger than others, the pattern provides the stitch count needed along each side during joining.
Detailed joining instructions are included to help everything come together neatly, and additional step by step photographs and video links are included for extra support.
Step 4: Add the Border
Once the blanket has been fully assembled, a layered crochet border is worked around the outside.
The border frames all of the different motifs, brings the colour palette together and gives the blanket its polished finished appearance.
Pattern Details
Difficulty level: Intermediate
Terminology: US crochet terms
The pattern includes stitch counts after each round or row, motif guidance, joining instructions, layout information and finishing guidance.
Abbreviations used include:
ch: chain
ch sp: chain space
st or sts: stitch or stitches
sl st: slip stitch
sc: single crochet
hdc: half double crochet
dc: double crochet
RS: right side
WS: wrong side
2 dc cl: 2 double crochet cluster
3 dc cl: 3 double crochet cluster
The pattern also uses popcorn stitches to create some of the raised texture seen throughout the motifs.
Before You Begin
I recommend reading through the complete pattern before starting.
Block your individual motifs before joining where needed, then block the finished blanket again once all of the joining and border rounds are complete. This helps settle the different shapes and creates a cleaner finished layout.
Do not worry if one motif is slightly different from the suggested measurement. The joining section has been designed with these small differences in mind.
Section 1: Circular Motifs
Section 1 Video tutorial
Circular Motifs needed:
- Small – 8 pcs
- Medium 4 pcs
- Large – 2 pcs
- Extra Large – 4 pcs
Small circle
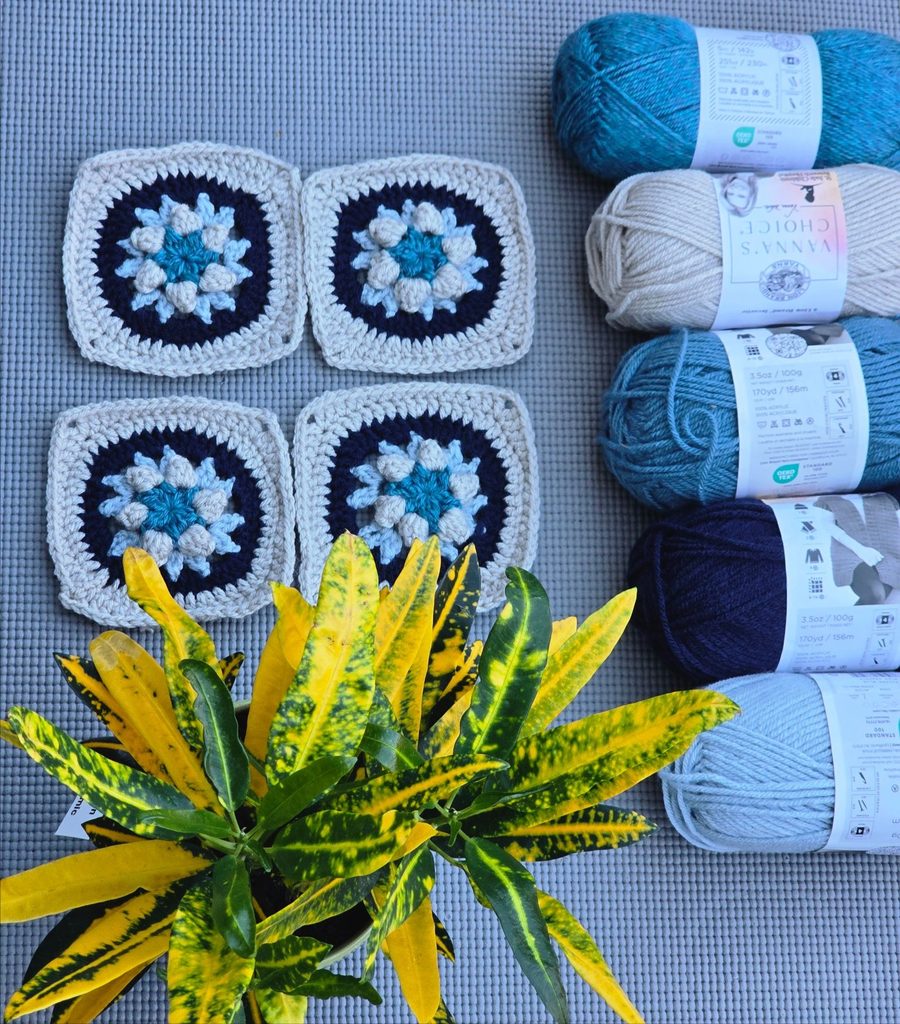
Finished measurement = 14cm
R1 Glacier Bay → R2 Linen → R3 Silver Blue → R4 Navy → R5 Linen → R6 Linen
With Glacier Bay
Round 1: In MR, ch 3, 2 dc-cl, *ch 3, 3 dc-cl), rep from * 4 more times, ch 3, join with a sl st to the top of 3rd ch from the beginning ch 3. 6 clusters of dc-cl, 6 ch 3 sps.
Fasten off Glacier Bay, join Linen to any ch 3 space
Round 2: Ch 3, 4 dc in same st, sl st to the top of the 3rd ch, *ch 3, popcorn in next ch 3 sp, rep from * around, ch 3, join with a sl st to the top of ch 3 sp from the beginning. 6 popcorns, 6 ch sps.
Fasten off Linen, join Silver Blue to any ch 3 space
Round 3: Ch 3, (dc, ch 2, 2 dc-cl) in same ch 3 sp, *ch 3, (2 dc-cl, ch 2, 2 dc-cl) in next ch 3 sp, rep from * around, join with a sl st to the top of ch 3 sp from the beginning. 6 groups of dc-cls, 12 ch sps.
Fasten off Silver Blue, join Navy to any ch 2 space
Round 4: Ch 3, 2 dc in same ch 2 sp, *5 dc in next ch 3, 3 dc in next ch 2 sp, rep from * around, join with a sl st to the top of ch 3 sp from the beginning. 48 dc
Fasten off Navy, join Linen to any st
Round 5: Ch 3, dc in same as starting ch 3 *dc in next 4 sts, 2 dc in next st, rep from * until the last 2 sts, 2 dc in each of the last 2 sts, join with a sl st to the top of ch 3 sp from the beginning. 60 dc
Squaring the circle
Continue with Linen
Round 6: Ch 5 (counts as dc + ch 2), dc in same at as starting ch 5, first corner made, *dc in next 2 sts, hdc in next 2 sts, sc in next 6 sts, hdc in next 2 sts, dc in next 2 sts, (dc, ch 2, dc) in next st, rep from * around, join with a sl st to the top of ch 3 sp from the beginning. 64 sts
Fasten off for a small circle.
Medium circle
Repeat rounds 1 – 6 as for the small circle, then continue with Linen
Rounds 7 – 8: sl st into the ch 2 sp, ch 3 (counts as dc, dc in same ch 2 sp, ch 2, 2 dc), first corner made, *dc in each st until the next corner, (2 dc, ch 2, 2 dc) in next ch sp, rep from * around, join with a sl st to the top of ch 3 sp from the beginning.
Round 7: 80 dc
Round 8: 96 dc
Large circle
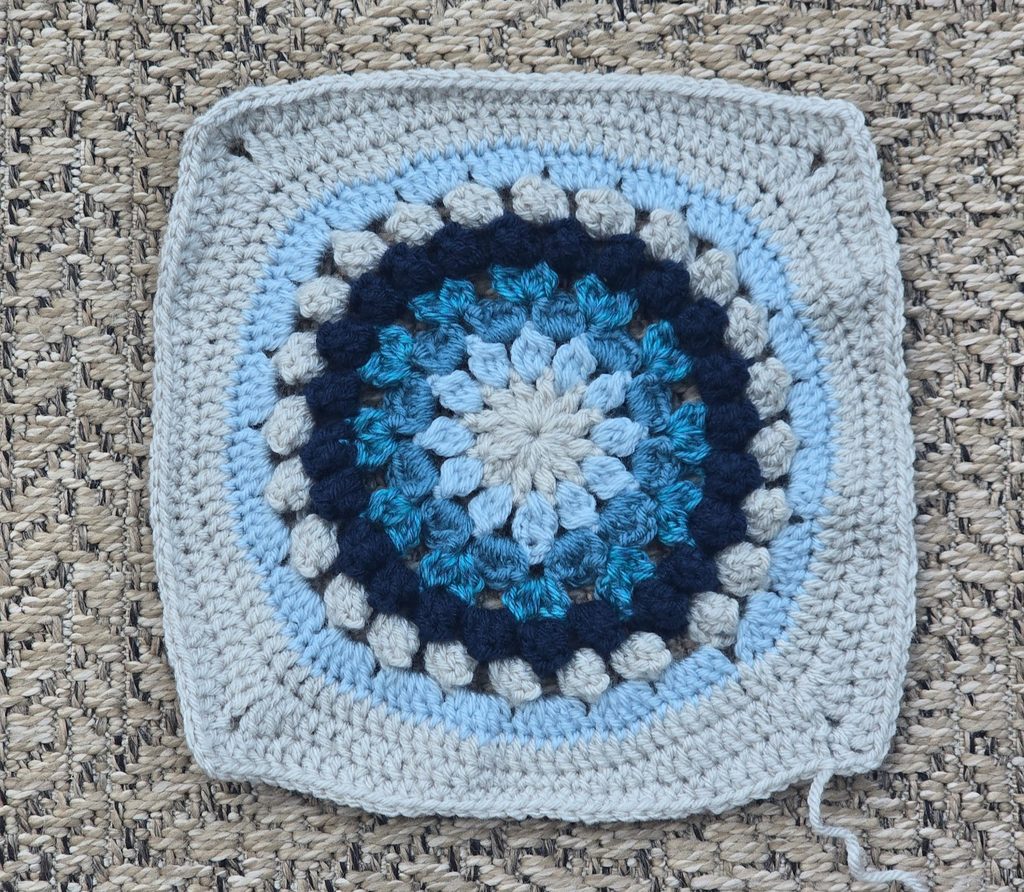
Finished measurement = 26cm
R1 Linen → R2 Silver Blue → R3 Dusty Blue → R4 Glacier Bay → R5 Navy → R6 Linen → R7 Silver Blue
Special sts
- Petals – sc, hdc, 2 dc, hdc, sc in same ch 2 sp
- Popcorn – 5 dc in same st, sl st to the top of the 3rd ch,
With Linen
Round 1: In MR, ch 3, dc, *ch 2, 2 dc-cl, rep from * 10 more times, ch 2, join with a sl st to the top of 3rd ch from the beginning ch 3. 12 groups of dc-cl, 12 ch 2 sps.
Fasten off Linen, join Silver Blue to any of the ch 2 sps
Round 2: Ch 3, 2 dc – cl, *ch 2, 3 dc – cl in next ch 2 sp, rep from * around, ch 2, join with a sl st to the top of 3rd ch from the beginning ch 3. 12 dc-cl, 12 ch 2 sps.
Fasten off Silver Blue, join Dusty Blue to any of the ch 2 sps.
Round 3: Ch 1, *petal in ch 2 sp, ch 3, rep from * around, join with a sl st to the top of 3rd ch from the beginning ch 1. 12 groups of petals, 12 ch 3 sps.
Fasten off Dusty Blue, join Glacier Bay to any of the ch 3 sps.
Round 4: Ch 3, (2 dc – cl, ch 2, 3 dc-cl) in same ch 3 sp, *ch 3, (3 dc – cl, ch 2, 3 dc-cl) in next ch 2 sp, ch 3, (3 dc – cl, ch 2, 3 dc-cl) in next ch 3 sp, rep from * around, ch 3, join with a sl st to the top of 3rd ch from the beginning ch 3. 12 groups of dc-cl
Fasten off Glacier Bay, join Navy Blue to any of the ch 3 sps.
Round 5: Ch 3, 4 dc in same st, sl st to the top of the 3rd ch, *ch 4, popcorn in next ch sp, rep from * around, ch 4, join with a sl st to the top of ch 3 sp from the beginning. 24 popcorns, 24 ch sps.
Fasten off Navy Blue, join Linen to any of the ch 3 sps.
Round 6: Ch 3, 4 dc in same st, sl st to the top of the 3rd ch, *ch 4, popcorn in next ch sp, rep from * around, ch 4, join with a sl st to the top of ch 3 sp from the beginning. 24 popcorns, 24 ch sps.
Fasten off Linen, join Silver Blue to any of the ch 4 sps.
Round 7: Ch 3, 4 dc in same ch 4 sp, *5 dc in next ch 4 sp, rep from * around, join with a sl st to the top of ch 3 sp from the beginning. 120 dc.
Fasten off Silver Blue, join Linen to any stitch from round 7.
Round 8: Ch 3, dc in each st around 120 dc
Turning the circle into a square
Round 9: Ch 6 (counts as tr + ch 2), tr in same st as ch 6, *{(tr, dc) in next st, dc in next 6 sts, hdc in next 4 sts, sc in next 7 sts, hdc in next 4 sts, dc in next 6 sts, (dc, tr) in next st}, (tr, ch 2, tr) in next st, rep from * 2 more times, rep { } 1 more time, join with a sl st to the 4th ch from ch 6 sp. 16 tr, 56 dc, 32 hdc, 28 sc
Round 10: Sl st into ch 2 sp, ch 3, (dc, ch 2, 2 dc) in same ch 2 sp, *{dc in next 6 sts, hdc in next 4 sts, sc in next 13 sts, hdc in next 4 sts, dc in next 6 sts}, (2 dc, ch 2, 2 dc) in next ch sp, rep from * two more times, rep { } one more time, join with a sl st to the top of the 3rd ch sp from the beginning ch 3 sp. 64 dc, 32 hdc, 52 sc
Fasten off
Extra Large circle
R1 Linen → R2 Silver Blue → R3 Dusty Blue → R4 Glacier Bay → R5 Navy → R6 Linen → R7 Silver Blue R8 → Linen
Repeat rounds 1 – 10 as for the large circle, then continue with Linen
Rounds 11 – 12: Sl st into ch 2 sp, ch 5, (ch 2, dc) in same ch 2 sp, *dc in each st until next corner, (dc, ch 2, dc) in next ch sp, rep from * around, join with a sl st to the 2nd ch sp from the beginning ch 4 sp.
Round 11 – 156 dc
Round 12 – 164 dc
Block your motifs
Section 2: Hexagons
- Hexagon Motifs
- Small – 4 pcs
- Large – 4 pcs
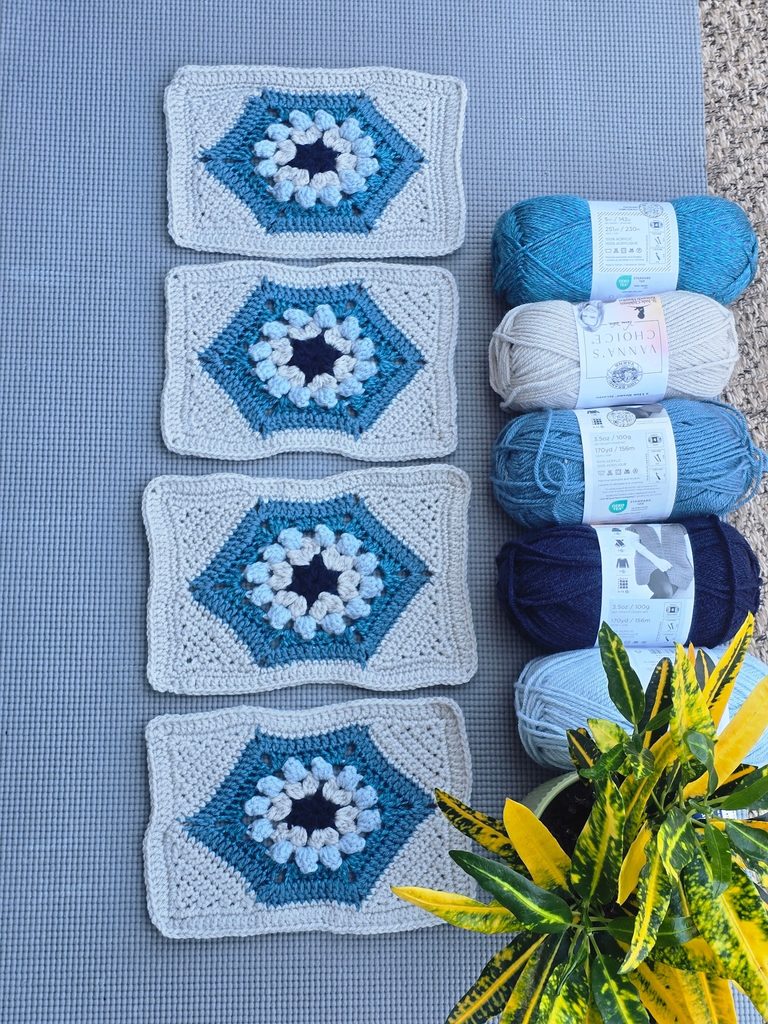
Small Hexagon
- Measures 24 cm by 17cm
- R1 Navy → R2 Linen → R3 Silver Blue → R4 Glacier Bay → R5 Dusty Blue.
With Navy,
Round 1: In MR, ch 3, 2 dc – cl, *ch 2, 3 dc – cl, rep from * 4 more times, ch 2, join with a sl st to the top of ch 3 sp from the beginning. 6 groups of dc – cl, 6 ch 2 sps
Fasten off Navy, join Linen to any ch 2 sp
Round 2: Ch 3, (2 dc – cl, ch 2, 3 dc-cl) in same ch 2 sp, *ch 2, (3 dc – cl, ch 2, 3 dc-cl) in next ch 2 sp, rep from * around, ch 2, join with a sl st to the top of ch 3 sp from the beginning. 12 groups of dc – cl, 12 ch sps.
Fasten off Linen; join Silver Blue to any ch 2 sp
Round 3: Ch 3, 4 dc in same st, sl st to the top of the 3rd ch, *ch 4, popcorn in next ch sp, rep from * around, ch 4, join with a sl st to the top of ch 3 sp from the beginning. 12 popcorns, 12 ch sps.
Fasten off Silver Blue, join Glacier Bay to any ch 4 sp
Round 4: Ch 3, 2 dc in same ch 4 sp, *3 dc in next ch 4 sp, (3 dc, ch 2, 3 dc) in next ch 4 sp, rep from 4 more times, 3 dc in last ch sp, (3 dc, ch 2) in same ch sp as the beginning ch sp with 3 dc already made, join with a sl st to the top of ch 3 sp from the beginning. 6 corners, 54 dc
Fasten off Glacier Bay; join Dusty Blue to any ch 2 sp
Round 5: Ch 3, (dc, ch 2, 2 dc) in same ch 3 sp, *dc in each st until next corner, (2 dc, ch 2, 2 dc) in ch 3 sp, rep from * 4 more times, dc in each st until the end, join with a sl st to the top of ch 3 sp from the beginning. 6 corners, 78 dc
Fasten off in Dusty Blue
- Turning the hexagon into a rectangle.
- This part is made across four sides.
- Join Linen to any ch-2 sp at a corner.
- Crochet across two ch 2 sps.
Side 1
Row 1: Ch 1, sc in same ch 2 sp, sc in each of the next sts until next ch 2 sp, sc in ch 2 sp, turn. 15 sc
Row 2: Ch 1, sc2tog, sc in each st across until the last 2 sts, sc2tog, turn. 13 sc
Rows 3 – 7: Ch 1, sc2tog, sc in each st across until the last 2 sts, sc2tog, turn. 3 sc
Row 8: Ch 1, sc3tog, turn. 1 sc
Fasten off
Side 2
- Crochet in an anti-clockwise direction.
- Join Linen to the next ch 2 sp (this is the same 2nd ch 2 sp used for side 1).
- Repeat as with side 1
Side 3
- Skip next side
- Join Linen to the next ch 2 sp
- Repeat as with side 1
Side 4
- Join Linen to the next ch 2 sp (this is the same 2nd ch 2 sp used for side 3).
- Repeat as with side 1
- Do not fasten off
- Turn, crocheting on the right side.
Edging
Crochet around the sides of the 4 edges
Round 1: Ch 1, *sc in each st/edge until the sc3tog, (sc, ch 2, sc) at this corner, sc in each st across, rep from * around, join with a sl st to the beginning ch 1. 104 sc
Round 2: Ch 2, *dc in each st until the corner, (dc, ch 2, dc) in each ch 2 sp, rep from * around, join with a sl st to the beginning ch 2. 112 dc
Fasten off.
Block your motifs
Large Hexagon
Measures 14 by 11”
R1 Linen → R2 Navy → R3 Silver Blue → R4 Dusty Blue → R5 Linen → R6 Glacier Bay → R7 Linen → R8 Navy → R9 Linen
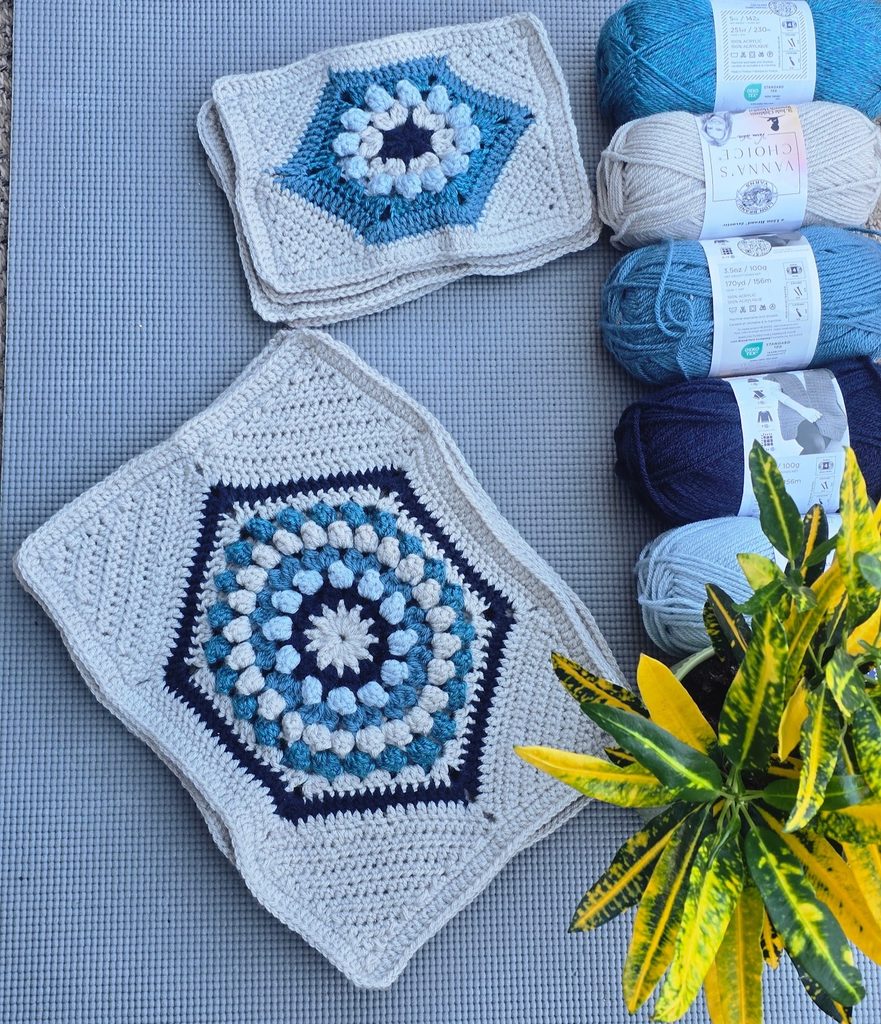
With linen
Round 1: In MR, ch 3, dc, *ch 2, dc-cl, rep from * 10 more times, join with a sl st to the top of 3rd ch from the beginning ch 3. 12 dc-cl, ch 2 sps.
Fasten off Linen; join Navy to any of the ch 2 sps
Round 2: Ch 3, 2 dc – cl in same ch sp, *ch 2, 3 dc-cl in next ch 2 sp, rep from * around, join with a sl st to the top of 3rd ch from the beginning ch 3. 12 dc-cl, 12 ch 2 sps.
Fasten off Navy; join Silver Blue to any of the ch 2 sps.
Round 3: Ch 3, 4 dc in same st, sl st to the top of the 3rd ch, *ch 4, popcorn in next ch sp, rep from * around, join with a sl st to the top of ch 3 sp from the beginning. 12 popcorns, 12 ch sps.
Fasten off Silver Blue; join Dusty Blue to any of the ch 4 sps.
Round 4: Ch 3, (2 dc – cl, ch 2, 3 dc-cl) in same ch 3 sp, *ch 3, (3 dc – cl, ch 2, 3 dc-cl) in next ch 4 sp, rep from * around, ch 3, join with a sl st to the top of 3rd ch from the beginning ch 3. 12 groups of dc-cl
Fasten off Dusty Blue; join Linen to any of the ch 3 sps.
Round 5: Ch 3, 4 dc in same st, sl st to the top of the 3rd ch, *ch 4, popcorn in next ch sp, rep from * around, join with a sl st to the top of ch 3 sp from the beginning. 24 popcorns, 24 ch sps.
Fasten off Linen, join Glacier Bay to any of the ch 4 sps.
Round 6: Ch 3, 4 dc in same st, sl st to the top of the 3rd ch, *ch 4, popcorn in next ch sp, rep from * around, join with a sl st to the top of ch 3 sp from the beginning. 24 popcorns, 24 ch sps.
Fasten off Glacier Bay; join Linen to any of the ch 4 sps.
Round 7: Ch 3, 2 dc in same ch 4 sp, *3 dc in next 3 ch 4 sps, (3 dc, ch 3, 3 dc) in next ch 4 sp, rep from * 4 more times, 3 dc in each ch sps until the end, (3 dc, ch 3) in same ch sp as the beginning ch sp with 3 dc already made, join with a sl st to the top of ch 3 sp from the beginning. 6 corners, 90 dc
Fasten off Linen; join Navy to any ch 3 sp
Round 8: Ch 3, (dc, ch 2, 2 dc) in same ch 3 sp, *dc in each st until next corner, (2 dc, ch 2, 2 dc) in ch 3 sp, rep from * 4 more times, dc in each st until the end, join with a sl st to the top of ch 3 sp from the beginning. 6 corners, 114 dc
Fasten off Navy; join Linen to any ch 3 sp
Round 9: Ch 3, (dc, ch 2, 2 dc) in same ch 3 sp, *dc in each st until next corner, (2 dc, ch 2, 2 dc) in ch 3 sp, rep from * 4 more times, dc in each st until the end, join with a sl st to the top of ch 3 sp from the beginning. 6 corners, 138 dc
Continue with Linen
- Turning the hexagon into a rectangle.
- This part is made across four sides.
- Continue with Linen, sl st until the next ch 2 sp of the corners.
- Crochet across two ch 2 sps.
- Sl st into ch 2 corner
Side 1
Row 1: Ch 1, sc in same ch 2 sp, sc in each of the next sts until next ch 2 sp, sc in ch 2 sp, turn. 25 sc
Row 2: Ch 1, sc2tog, sc in each st across until the last 2 sts, sc2tog, turn. 23 sc
Rows 3 – 11: Ch 1, sc2tog, sc in each st across until the last 2 sts, sc2tog, turn. 3 sc
Row 12: Ch 1, sc3tog, turn. 1 sc
Fasten off
Side 2
- Crochet in an anti-clockwise direction.
- Join Linen to the next ch 2 sp (this is the same 2nd ch 2 sp used for side 1).
- Repeat as with side 1
Side 3
- Skip next side
- Join Linen to the next ch 2 sp
- Repeat as with side 1
Side 4
- Join Linen to the next ch 2 sp, (this is the same 2nd ch 2 sp used for side 3).
- Repeat as with side 1
- Do not fasten off
- Turn, crocheting on the right side.
Edging
Crochet around the sides of the 4 edges
Round 1: Ch 1, *sc in each st/edge until the sc3tog, (2 sc, ch 2, 2 sc) at this corner, sc in each st across, rep from * around, join with a sl st to ch 1 sp from the beginning.
154 sc
Round 2: Ch 2, *dc in each st until the corner, (2 dc, ch 2, 2 dc) in each ch 2 sp, rep from * around, join with a sl st to the top of ch 2 sp from the beginning. 170 dc
Fasten off.
Block your motifs
Octagon 
Make 4 pcs
Measures 33cm by 33 cm
R1 Linen → R2 Navy → R3 Glacier Bay → R4 Silver Blue → R5 Dusty Blue → R6 Linen → R7 Navy → R8 Silver Blue → R9 Linen
With linen
Round 1: In MR, ch 3, dc, *ch 2, 2 dc-cl, rep from * 10 more times, join with a sl st to the top of 3rd ch from the beginning ch 3. 12 dc-cl, ch 2 sps.
Fasten off Linen; join Navy to any of the ch 2 sps
Round 2: Ch 3, 2 dc – cl, in same ch sp as the ch 3, *ch 2, 3 dc-cl in next ch 2 sp, rep from * around, join with a sl st to the top of 3rd ch from the beginning ch 3. 12 dc-cl, 12 ch 2 sps.
Fasten off Navy; join Glacier Bay to any of the ch 2 sps.
Round 3: Ch 3, 4 dc in same st, sl st to the top of the 3rd ch, *ch 4, popcorn in next ch sp, rep from * around, join with a sl st to the top of ch 3 sp from the beginning. 12 popcorns, 12 ch sps.
Fasten off Glacier Bay, join Silver Blue to any of the ch 4 sps.
Round 4: Ch 3, (2 dc – cl, ch 2, 3 dc-cl) in same ch 4 sp, *, ch 3, (3 dc – cl, ch 2, 3dc-cl) in next ch 4 sp, rep from * around, join with a sl st to the top of 3rd ch from the beginning ch 3 sp. 12 groups of 2, 3 dc-cl, 24 ch sps
Fasten off Silver Blue; join Dusty Blue to any of the ch 2 sps.
Round 5: Ch 3, 4 dc in same st, sl st to the top of the 3rd ch, *ch 4, popcorn in next ch sp, rep from * around, join with a sl st to the top of ch 3 sp from the beginning. 24 popcorns, 24 ch sps.
Fasten off Dusty Blue; join Linen to any of the ch 4 sps.
Round 6: Ch 3, 4 dc in same st, sl st to the top of the 3rd ch, *ch 4, popcorn in next ch sp, rep from * around, join with a sl st to the top of ch 3 sp from the beginning. 24 popcorns, 24 ch sps.
Fasten off Linen; join Navy to any of the ch 4 sps.
Round 7: Ch 3, 2 dc in same ch 4 sp, *3 dc in next 2 ch 4 sps, (3 dc, ch 3, 3 dc) in next ch 4 sp, rep from 6 more times, 3 dc in last 2 ch 4 sps, (3 dc, ch 3) in same ch sp as the beginning ch sp with 3dc already made, join with a sl st to the top of ch 3 sp from the beginning. 8 corners, 96 dc
Fasten off Navy, join Silver Blue to any of the ch 3 sps.
Round 8: Ch 5 (counts as dc + ch 3), dc in same ch 3 sp, *dc in each st until next corner, (dc, ch 3, dc) in ch 3 sp, rep from * 4 more times, dc in each st until the end, join with a sl st to the ch 3 sp from the beginning. 8 corners, 112 dc
Fasten off Silver Blue; join Glacier Bay to any ch 3 sp
Round 9: Ch 5, dc in same ch 3 sp, *dc in each st until next corner, (dc, ch 3, dc) in ch 3 sp, rep from * 4 more times, dc in each st until the end, join with a sl st to the top of ch 3 sp from the beginning. 8 corners, 128 dc
Fasten off Glacier Bay; join Linen to any ch 3 sp
Round 10: Ch 5, dc in same ch 3 sp, *dc in each st until next corner, (dc, ch 3, dc) in ch 3 sp, rep from * 4 more times, dc in each st until the end, join with a sl st to the top of ch 3 sp from the beginning. 8 corners, 144 dc
Continue with Linen
Turning the octagon into a square.
This part is made across four sides, meaning that you skip a side after adding a corner.
Join Linen to any of the ch 3 sp of the corners.
Crochet across two ch 3 sps.
Side 1
Row 1: Ch 1, sc in same ch 2 sp, sc in each of the next sts until next ch 2 sp, sc in ch 2 sp, turn. 20 sc
Row 2: Ch 1, sc2tog, sc in each st across until the last 2 sts, sc2tog, turn. 18 sc
Rows 3 – 9: Ch 1, sc2tog, sc in each st across until the last 2 sts, sc2tog, turn. 4 sc
Row 10: Ch 1, sc2tog twice, turn. 2 sc
Row 11: Ch 1, sc2tog, turn. 1 sc
Fasten off
Side 2
Crochet in an anti-clockwise direction.
Skip next ch 2 sp used for side 1).
Join Linen to the next ch 2 sp.
Repeat as with side 1
Side 3
Crochet in an anti-clockwise direction.
Skip next ch 2 sp used for side 2).
Join Linen to the next ch 2 sp.
Repeat as with side 1
Side 4
Crochet in an anti-clockwise direction.
Skip next ch 2 sp used for side 3.
Join Linen to the next ch 2 sp.
Repeat as with side 1
Edging
Crochet around the sides of the 4 edges
Round 1: Ch 1, *sc in each st/edge until the sc2tog, (sc, ch 2, sc) at this corner, sc in each st across, rep from * around, join with a sl st to ch 1 sp from the beginning.
168 sc
Round 2: Ch 3, *dc in each st until the corner, (dc, ch 2, dc) in each ch 2 sp, rep from * around, join with a sl st to the top of ch 3 sp from the beginning. 176 dc
Fasten off.
Block your motifs
Square
Make 8 pcs
Each square measures 6”
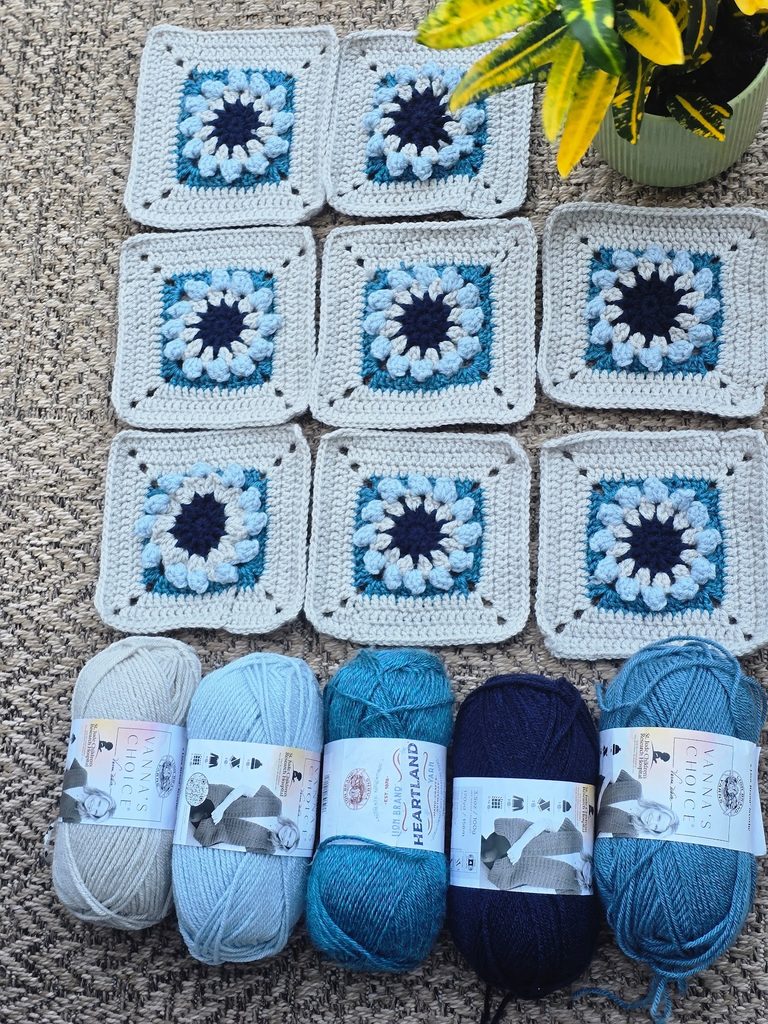
R1 Navy →R2 Navy → R3 Linen → R4 Silver Blue → R5 Glacier Bay → R6 Linen
With Navy
Round 1: in a magic ring, ch 1 (does not count as st, here and throughout), 12 sc in MR, join with a sl st to the ch from the beginning. 12 sc
Round 2: Ch 5 (counts as first dc + ch 2, here and throughout), *dc in next st, ch 2, rep from * around, ch 2, join with a sl st to the 3rd ch from the beginning ch 5 sp. 12 dc/ch sps.
Fasten off Navy, join Linen to any of the ch 2 sps
Round 3: Ch 3 (counts as first dc, here and throughout), dc in same ch 2 sp, *ch 2, 2 dc in next ch 2, rep from * around, ch 2, join with a sl st to the 3rd ch from the beginning ch 5 sp. 24 dc, 12 ch sps.
Fasten off Linen, join Silver Blue with a sl st to any of the ch 2 sps
Popcorn stitch – 5 dc in same st, sl st to the top of the 3rd ch
Round 4: Ch 3, 4 dc in same st, sl st to the top of the 3rd ch, *ch 4, 1 popcorn in next ch 2 sp, rep from * around, ch 4, join with a sl st to the top of ch 3 sp from the beginning. 12 popcorns, 12 ch sps.
Fasten off Silver Blue, join Glacier Bay with a sl st to any of the ch 4 sps
Round 5: Ch 3, 2 dc in same ch 4 sp, 3 dc in next ch 4 sp, *(3 dc, ch 3, 3 dc) in next ch 4 sp, 3 dc in next 2 ch 4 sps, rep from * until the last ch 4 sp, (3 dc, ch 3, 3 dc) in ch 4 sp, join with a sl st to the top of ch 3 sp from the beginning. 6 corners, 48 dc
Fasten off Glacier Bay, join Linen with a sl st to any of the ch 3 sps
Round 6: Ch 3 (counts as dc, dc in same ch 2 sp, 2 dc), first corner made, *dc in each st until the next corner, (2 dc, ch 2, 2 dc) in next ch sp, rep from * 2 more times, dc in each of the remaining sts, join with a sl st to the top of ch 3 sp from the beginning.
64 dc, 4 corners
Rounds 7 – 8: sl st into the ch 2 sp, ch 3 (counts as dc, dc in same ch 2 sp, ch 2, 2 dc), first corner made, *dc in each st until the next corner, (2 dc, ch 2, 2 dc) in next ch sp, rep from * 2 more times, dc in each of the remaining sts, join with a sl st to the top of ch 3 sp from the beginning.
Round 7 – 80 dc
Round 8 – 96 dc
Fasten off.
Block your motifs
Diamond
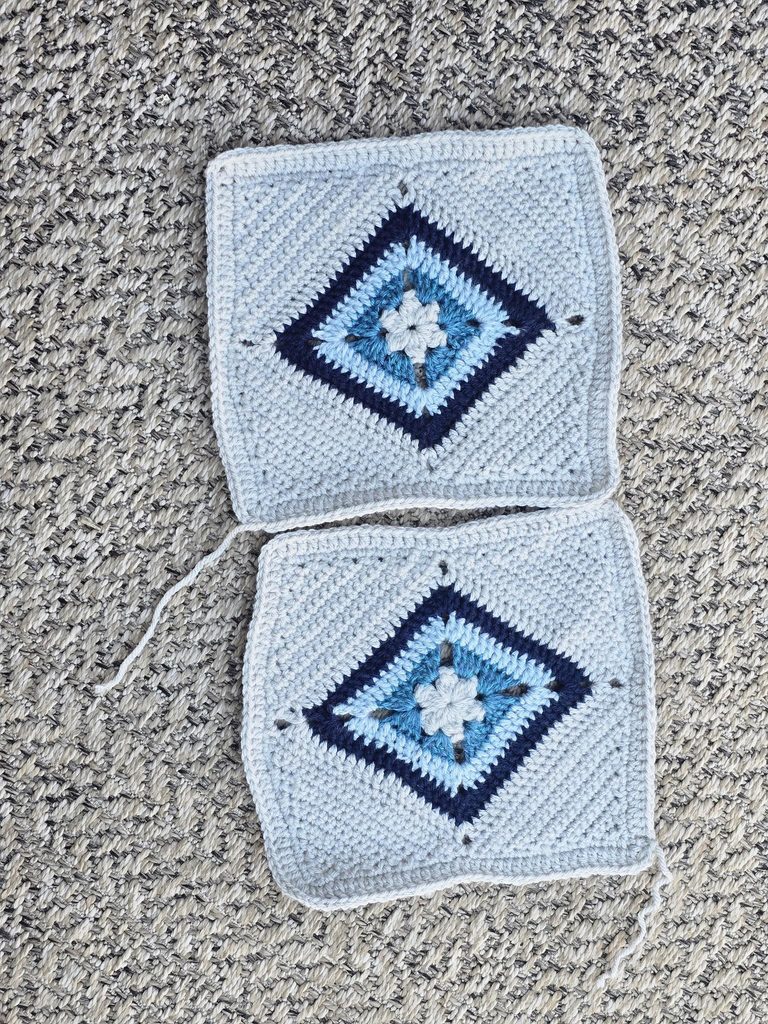
Make 2
R1 Linen → R2 Glacier Bay → R3 Silver Blue → R4 Navy → R5 Linen
With Linen
Round 1: In MR, ch 3, 2 dc – cl, *ch 2, 3 dc – cl, rep from * 4 more times, ch 2, join with a sl st to the top of ch 3 sp from the beginning. 6 groups of dc – cl, 6 ch 2 sps
Fasten off Linen; join Glacier Bay to any ch 2 sp
Round 2: Ch 3, (3 dc, ch 3, 4 dc) in same ch 2 sp, *4 dc in next ch 2 sp, ch 3, 4 dc in next ch 2 sp, (4 dc, ch 3, 4 dc) in next ch 2 sp, 4 dc in next ch 2 sp, ch 3, 4 dc in next ch 2 sp, join with a sl st to the top of ch 3 sp from the beginning. 32 dc, 4 corners.
Fasten off Glacier Bay, join Silver Blue to any ch 3 sp between the 2 groups of 4 dc made in the same space at either the bottom or top part of the diamond.
Round 3: Ch 3, (2 dc, ch 3, 3 dc) in same ch 3 sp, dc in each st until next ch 3 sp, (2 dc, ch 2, 2 dc) in ch 3 sp, dc in each st until next ch 3 sp, (3 dc, ch 3, 3 dc) in ch 3 sp, dc in each st until next ch 2 sp, (2 dc, ch 2, 2 dc) in ch 2 sp, dc in each st until the end, join with a sl st to the top of ch 3 sp from the beginning. 52 dc, 4 corners.
Fasten off Silver Blue, join Navy to any ch 3 sp
Round 4: Ch 3, (2 dc, ch 3, 3 dc) in same ch 3 sp, dc in each st until next ch 2 sp, (2 dc, ch 2, 2 dc) in ch 2 sp, dc in each st until next ch 3 sp, (3 dc, ch 3, 3 dc) in ch 3 sp, dc in each st until next ch 2 sp, (2 dc, ch 2, 2 dc) in ch 2 sp, dc in each st until the end, join with a sl st to the top of ch 3 sp from the beginning. 72 dc, 4 corners.
Fasten off Navy, join Linen to any ch 3 sp
Round 5: Ch 3, (dc, ch 3, 2 dc) in same ch 3 sp, dc in each st until next ch 2 sp, (dc, ch 2, dc) in ch 2 sp, dc in each st until next ch 2 sp, (2 dc, ch 3, 2 dc) in ch 3 sp, dc in each st until the end, join with a sl st to the top of ch 3 sp from the beginning. 84 dc, 4 corners.
Continue with Linen
- Turning the Diamond into a square.
- This part is made across four sides, one side at a time.
- Join Linen to any of the ch 3/2 sp of the corners.
- Crochet across two ch sps.
Side 1
Row 1: Ch 1, sc in same ch sp, sc in each of the next sts until next ch sp, sc in ch sp, turn. 23 sc
Row 2: Ch 1, sc2tog, sc in each st across until the last 2 sts, sc2tog, turn. 21 sc
Rows 3 – 11: Ch 1, sc2tog, sc in each st across until the last 2 sts, sc2tog, turn. 3 sc
Row 12: Ch 1, sc3tog. 1 sc
Fasten off
Side 2
- Join Linen to the next ch 2 sp
- Repeat as with Side 1
Side 3
- Join Linen to the next ch 2 sp
- Repeat as with side 1
Side 4
- Join Linen to the next ch 2 sp
- Repeat as with side 1
- Do not fasten off
Edging
Crochet around the sides of the 4 edges.
Aim for 13 sts across each side of the added edge.
Round 1: Ch 1, *sc in each st/edge until the sc3tog, (2 sc, ch 2, 2 sc) at this corner, sc in each st across, rep from * around, join with a sl st to ch 1 sp from the beginning.
120 sc
Round 2: Ch 3, *dc in each st until the corner, (2 dc, ch 2, 2 dc) in each ch 2 sp, rep from * around, join with a sl st to the top of ch 3 sp from the beginning. 136 dc
Fasten off.
How to join the frosted windows crochet blanket
Suggested joining methods:
- Use both loops from both motifs (join on the right side)
- Use only the inner loop of the next stitch on Motif 1 and the inner loop of the corresponding stitch on Motif 2. Make a sl st through both loops. (join on the right side)
- Use a darning needle and mattress stitch
- Join on the wrong side, using either number 1 or 2 above.
Joining the motifs together.
Arrange the motifs as shown above.
- Mark the edges with stitch markers – it would be easier to pile the motifs in each line and then secure per line to reduce the number of stitch markers needed.
- Note that some of the motifs might have a few excess stitches when joining. To fix this, count the number of sts per side of the motifs you are about to join; you can then join 2 sts from the motif with more sts to 1 st on the other motif to cover the difference.
- Join across the sides of 2 motifs at a time until you have used all the sts/ch sps.
- Use a crochet hook and a slip stitch or single crochet to connect the sides of the motifs.
Line 1
Motif needed
- 2 octagons, 2 small hexagons, 1 large circle, 4 small circles, 1 diamond.
Joining line 1
- Start with 1 Octagon, 1 small hexagon
- Use Linen for joining. Keep the right sides of the motifs facing you throughout.
- You can use your preferred joining method.
Step 1: Join the octagon to the small hexagon
Align the ch 3 space of the octagon with the ch 3 space on the short side of the small hexagon.
Insert your hook through both ch 3 spaces, join Linen with a sl st, then ch 1 to secure the yarn.
Insert the hook through the inner loop of the next stitch on Motif 1 and the inner loop of the corresponding stitch on Motif 2. Make a sl st through both loops.
Continue joining the motifs together in this way until you reach the ch 2 space on the short side of the small hexagon.
At the ch 2 space, join 2 stitches from the octagon into the ch 2 space of the small hexagon.
Step 2: Add the first small circle
Place 1 small circle beside the remaining edge of the small hexagon.
Without cutting the yarn, continue joining the small circle to the octagon.
Step 3: Join the small circle to the small hexagon
Continue around the motif and join the lower edge of the small circle to the small hexagon.
Do not cut the yarn.
Step 4: Add the second small circle
Place the second small circle directly beside the first small circle.
Continue joining the second small circle to the small hexagon.
Step 5: Join the two small circles
Secure the sides of the small circles to the small hexagon. If there are st differences, adjust evenly.
Join the adjoining sides of the two small circles together.
This completes this section of the small hexagon and small circles.
Step 6: Add the large circle
Place the large circle beside the small hexagon.
Join the large circle to the small hexagon, working towards the small circle already attached to the hexagon.
Twice along the join, work 2 stitches from the large circle to 1 stitch on the small hexagon. Space these adjustments evenly so the motifs lie flat without puckering.
Aim for 2 sts on the large circle to ch 2 sp of small hexagon, and repeat this with the ch 2 sp of the small circle.
You should have 8 sts left on the large circle after joining to the small hexagon.
Continue joining the large circle to the small circle.
You should have 8 sts left on the small circle after joining to the large circle.
Step 7: Add the diamond
Place the diamond beside the large circle as shown in the layout.
First, join the adjoining edge of the small circle using the remaining 8 sts to the short edge of the diamond.
Next, join the long edge of the diamond to the large circle.
The stitch counts along these two edges are slightly different:
Diamond: 34 sts + 2 ch 3 spaces
Large Circle: 37 sts + 2 ch 2 spaces
To accommodate the difference, twice along the join, work 2 stitches from the large circle to 1 stitch on the diamond. Space these adjustments evenly so the motifs lie flat without puckering.
Set this joined section aside.
Make the Second Side
Repeat Steps 1–5 to create the matching section for the opposite side of Line 1.
Step 8: Complete Line 1
Position the two sections as shown in the layout.
Join the remaining edge of the large circle to the small hexagon, continuing towards the small circle attached to the small hexagon.
Complete the remaining joins between the motifs as required so that all pieces in the row are securely connected and lie flat.
Line 1 is now complete
Joining the Motifs – Line 2
Motifs Needed
For Line 2, you will need:
4 Squares
2 Medium Circles
1 Diamond previously used as part of the Line 1 layout
Please note that there is an error in the arrangement above; the arrangement above has two squares next to each other instead of having a circle, as on the other side.
Use Linen for joining and keep the right sides of the motifs facing you throughout.
The motif sequence for Line 2 is:
Square → Medium Circle → Square → Diamond → Square → Medium Circle → Square
Step 1: Make the First Square and Circle Section
Place 1 medium circle between 2 squares, with the edges aligned as shown in the layout.
Starting with the first square, join Linen with a sl st and ch to secure the yarn.
Working through the inner loops of both motifs, join the first square to the medium circle using sl sts.
Continue across the adjoining edge until the first square and medium circle are completely joined.
Without changing the orientation of the motifs, join the opposite side of the medium circle to the second square.
The sequence should now be:
Square → Medium Circle → Square
Set this section aside.
Step 2: Make the Second Square and Circle Section
Using the remaining 2 squares and 1 medium circle, repeat Step 1.
Join the motifs in the same sequence:
Square → Medium Circle → Square
Set this section aside.
You should now have 2 matching sections, each consisting of 2 squares with a medium circle between them.
Step 3: Add the Diamond
Place the diamond between the two completed sections as shown in the layout.
The full arrangement should now read:
Square → Medium Circle → Square → Diamond → Square → Medium Circle → Square
Join one side of the diamond to the adjoining square from the first section.
Continue around as required, then join the opposite side of the diamond to the adjoining square from the second section.
Make sure the diamond remains centred between the two sections and that the motifs lie flat.
Step 4: Position Line 2 Beside Line 1
Place the completed Line 2 beside Line 1, following the blanket layout.
Check that all motifs are positioned correctly before beginning the long join.
The corresponding joining edges have the following stitch counts:
Line 1: 82 sts + 6 ch 2 spaces
Line 2: 75 sts across the joined squares and medium circles
Line 1 therefore has 7 more stitches than Line 2.
Step 5: Join Line 2 to Line 1
Start at the diamond/square section and join Linen with a sl st. Ch 1 to secure the yarn.
Working through the inner loops of both pieces, continue joining in a straight line:
Diamond/Square → Small Circle → Octagon
Because Line 1 has 7 additional stitches, evenly distribute 7 adjustments across the join.
At each adjustment point, join:
2 sts from Line 1 to 1 st from Line 2
Space these adjustments as evenly as possible so the joined section lies flat without gathering or stretching.
Continue to the end of the octagon.
Fasten off.
Step 6: Join the Opposite Side
Repeat Step 5 on the opposite side of the blanket.
Begin at the corresponding diamond/square section and continue joining towards the small circle and octagon.
Remember to distribute the stitch adjustments evenly across the join.
Fasten off.
Line 2 is now complete.
Joining the Motifs – Line 3
Motifs Needed
For Line 3, you will need:
2 Extra Large Circles
2 Large Hexagons
Use Linen for joining and keep the right sides of the motifs facing you throughout.
The motif sequence for Line 3 is:
Extra Large Circle → Large Hexagon → Extra Large Circle → Large Hexagon
Arrange all 4 motifs in a straight line as shown in the layout before beginning the joins.
Note: Place the short edge of the hexagon next to the circle.
Step 1: Join the First Extra Large Circle and Large Hexagon
Place 1 extra large circle beside 1 large hexagon, aligning the adjoining edges; use the short edge of the hexagon.
Join Linen with a sl st and ch 1 to secure the yarn, starting at the corner (ch sps of both motifs)
Working through the inner loops of both motifs, join the extra large circle to the large hexagon using sl sts.
41 sts on extra large circle
35 sts on hexagon
To accommodate the difference, along the joining, work 2 stitches from the circle to 1 stitch on the hexagon. Space these adjustments evenly so the motifs lie flat without puckering.
Continue across the entire adjoining edge, making sure the motifs remain flat as you work.
Step 2: Add the Second Extra Large Circle
Place the second extra large circle beside the large hexagon.
Without changing the orientation of the motifs, join the adjoining edge of the large hexagon to the extra large circle.
Continue joining across the entire edge.
The sequence should now be:
Extra Large Circle → Large Hexagon → Extra Large Circle
Step 3: Add the Second Large Hexagon
Place the remaining large hexagon beside the second extra large circle.
Join the extra large circle to the large hexagon in the same manner, working through the inner loops of both motifs.
The completed Line 3:
Extra Large Circle → Large Hexagon → Extra Large Circle → Large Hexagon
Fasten off.
Step 4: Position Line 3 Beside Line 2
Place the completed Line 3 beside Line 2, following the blanket layout.
Before joining, make sure the motifs are correctly aligned and that the upper and lower edges of both lines match the overall blanket shape.
Pin or temporarily secure the motifs if needed to prevent them from shifting while joining.
Step 5: Join Line 3 to Line 2
Join Linen with a sl st at the starting point indicated in the layout and ch 1 to secure the yarn.
Working through the inner loops of both pieces, join Line 3 to Line 2 using sl sts.
Continue along the adjoining edges in a straight line, moving from one motif to the next without cutting the yarn.
Where the stitch counts of the adjoining motifs differ, distribute any necessary adjustments evenly across the join rather than placing them together. This will help the blanket lie flat and prevent puckering or stretching.
Continue joining until you reach the end of the adjoining edge.
Fasten off.
Check the completed section and gently smooth the motifs into position.
Line 3 is now complete.
Joining the Motifs – Line 4
Motifs Needed
For Line 4, you will need:
2 Extra Large Circles
2 Large Hexagons
Replicate the adjustments made when joining the motif’s as the line before.
Use Linen for joining and keep the right sides of the motifs facing you throughout.
Line 4 uses the same motifs and joining method as Line 3. The only difference is the arrangement of the motifs.
The motif sequence for Line 4 is:
Extra Large Circle → Large Hexagon → Extra Large Circle → Large Hexagon
Arrange all 4 motifs in this order before beginning the joins.
Step 1: Join the First Extra Large Circle to the Large Hexagon
Place 1 extra large circle beside 1 large hexagon, aligning the adjoining edges.
Join Linen with a sl st and ch 1 to secure the yarn.
Working through the inner loops of both motifs, join the extra large circle to the large hexagon using sl sts.
Continue across the entire adjoining edge, keeping both motifs flat as you work.
Step 2: Add the Second Extra Large Circle
Place the second extra large circle beside the first large hexagon.
Continue joining the adjoining edge of the large hexagon to the extra large circle, working through the inner loops of both motifs.
The sequence should now be:
Extra Large Circle → Large Hexagon → Extra Large Circle
Step 3: Add the Second Large Hexagon
Place the remaining large hexagon beside the second extra large circle.
Join the adjoining edge of the extra large circle to the large hexagon in the same manner.
The completed Line 4:
Extra Large Circle → Large Hexagon → Extra Large Circle → Large Hexagon
Fasten off.
Step 4: Position Line 4 Beside Line 3
Place the completed Line 4 beside Line 3, following the blanket layout.
Check the placement carefully before joining. Because the motifs alternate differently between the two lines, make sure each motif is positioned against the correct corresponding section of Line 3.
Smooth the motifs flat and pin them temporarily if needed.
Step 5: Join Line 4 to Line 3
Join Linen with a sl st at one end of the adjoining edge and ch 1 to secure the yarn.
Working through the inner loops of both pieces, join Line 4 to Line 3 using sl sts.
Continue along the adjoining edges in a straight line, moving from one motif to the next without cutting the yarn.
Where the stitch counts between adjoining motifs differ, distribute the necessary adjustments evenly across the join so the blanket remains flat and does not pucker or stretch.
Continue to the end of the row.
Fasten off.
Check that all 4 motifs are lying flat and that the alternating arrangement is maintained.
Line 4 is now complete.
Joining the Motifs – Line 5
Motifs Needed
For Line 5, you will need:
4 Squares
2 Medium Circles
1 Diamond
Use Linen for joining and keep the right sides of the motifs facing you throughout.
The motif sequence for Line 5 is:
Square → Medium Circle → Square → Diamond → Square → Medium Circle → Square
The construction is similar to Line 2, but when Line 5 is attached to Line 4, the diamond must extend outward away from Line 4. This protruding section will later be used when joining Line 6.
Step 1: Make the First Square and Circle Section
Place 1 medium circle between 2 squares, following this sequence:
Square → Medium Circle → Square
Align the adjoining edges.
Join Linen with a sl st and ch 1 to secure the yarn.
Working through the inner loops of both motifs, join the first square to the medium circle using sl sts.
Continue across the adjoining edge.
Next, join the opposite side of the medium circle to the second square in the same manner.
The completed section should read:
Square → Medium Circle → Square
Set this section aside.
Step 2: Make the Second Square and Circle Section
Using the remaining 2 squares and 1 medium circle, repeat Step 1.
Join the motifs in the same sequence:
Square → Medium Circle → Square
Set this section aside.
You should now have 2 matching sections.
Step 3: Add the Diamond
Place the diamond between the two completed sections, following the blanket layout.
The full arrangement should read:
Square → Medium Circle → Square → Diamond → Square → Medium Circle → Square
Join one side of the diamond to the adjoining square from the first section.
Next, join the opposite side of the diamond to the adjoining square from the second section.
Keep the motifs flat and make sure the diamond remains centred between the two sections.
Step 4: Position Line 5 Beside Line 4
Place the completed Line 5 beside Line 4.
Before joining, check the orientation carefully.
Important: Position Line 5 so that the extension created by the diamond faces outward, away from Line 4.
Do not join across this projecting diamond edge. This section must remain available for joining Line 6 later.
Smooth the motifs flat and pin them in place if necessary before beginning the long join.
Step 5: Join Line 5 to Line 4
Join Linen with a sl st at one end of the adjoining edge and ch 1 to secure the yarn.
Working through the inner loops of both pieces, join Line 5 to Line 4 using sl sts.
Continue in a straight line from one motif to the next, joining only the edges that sit directly against Line 4.
Where the stitch counts of the adjoining motifs differ, distribute any necessary adjustments evenly across the join so that the blanket remains flat.
Continue until you reach the point where the diamond begins to extend beyond Line 4.
Leave this outward-facing section of the diamond unjoined.
Resume or continue the join along the corresponding adjoining edges as required by the layout, keeping the diamond extension free for Line 6.
Fasten off when the Line 5-to-Line 4 join is complete.
Check that the motifs lie flat and that the protruding diamond section remains clearly exposed.
Line 5 is now complete and ready for Line 6.
Joining the Motifs – Line 6
Use Linen for joining and keep the right sides of the motifs facing you throughout.
Line 6 is joined to Line 5 in the same manner that Lines 1 and 2 were joined. The adjoining edges have slightly different stitch counts, so the excess stitches must be distributed evenly across the join to keep the blanket flat.
Stitch Counts
The corresponding joining edges have the following stitch counts:
Longer Edge – Line 6:
82 sts + 6 ch 2 spaces
This section runs across the large hexagon and 2 small circles.
Shorter Edge – Line 5:
75 sts across the 2 joined squares and 1 medium circle
There is a difference of 7 stitches, with the Line 6 edge having 7 more stitches than the corresponding Line 5 edge.
Adjusting for the Stitch Difference
To accommodate the additional 7 stitches, evenly distribute 7 decreases within the join.
At each adjustment point:
Join 2 sts from Line 6 to 1 st from Line 5.
Make this adjustment 7 times, spacing the points as evenly as possible along the joining edge.
Do not work all 7 adjustments close together, as this may cause the blanket to gather or pucker.
Step 1: Position Line 6
Place Line 6 beside Line 5, following the blanket layout.
Make sure the motifs are correctly aligned before beginning the join.
The projecting section created by the diamond on Line 5 should now meet the corresponding section of Line 6.
Smooth both lines flat and pin them temporarily if needed.
Step 2: Begin at the Diamond Section
Start the joining at the diamond/square section, just as you did when joining Lines 1 and 2.
Join Linen with a sl st and ch 1 to secure the yarn.
Working through the inner loops of both pieces, begin joining Line 6 to Line 5 using sl sts.
Continue from the diamond towards the adjoining motifs, keeping the join in a straight line.
Step 3: Continue Along the Small Circle Section
Continue joining towards the small circle, matching the edges of Line 5 and Line 6 as you work.
Begin incorporating the stitch-count adjustments where needed.
At 7 evenly spaced points across the complete joining edge, work:
2 sts from Line 6 to 1 st from Line 5.
Continue joining normally between each adjustment.
Step 4: Join Across the Large Hexagon
Continue from the small-circle section towards and across the large hexagon.
Maintain the same inner-loop sl-st joining method used throughout the blanket.
Keep checking the fabric as you work. The motifs should lie naturally beside each other without either edge being stretched or gathered.
Complete any remaining stitch adjustments before reaching the end of the joining edge.
Fasten off when the first side is complete.
Step 5: Join the Opposite Side
Repeat the same joining process on the opposite side of Line 6.
Start at the corresponding diamond/square section and work towards the small circle and large hexagon.
Again, accommodate the 7-stitch difference by joining:
2 sts from Line 6 to 1 st from Line 5 – 7 times evenly across the join.
Continue to the end of the adjoining edge.
Fasten off.
Finishing Line 6
Lay the blanket flat and gently smooth the joined sections into position.
Check that:
- the diamond section is securely incorporated into Line 6;
- the joining line remains straight;
- the 7 stitch adjustments are evenly distributed; and
- there is no puckering, pulling or excess fullness along the join.
Line 6 is now complete.
Section 6: Border – updated November 11th
Make Your Own Frosted Window Blanket
The Frosted Window Blanket is one of those projects that gives you plenty to enjoy while you are making it, but the real reward comes when all of those separate motifs finally become one blanket.
Whether you recreate the original icy blue palette or choose colors that are completely your own, I cannot wait to see your version.
The Frosted Window Blanket crochet pattern is available now on the Fosbas Designs website, Ravelry and Etsy.
Happy crocheting,
Susanna
Fosbas Designs
1 FREE DOWNLOAD PER MONTH
WITH JUST $3 PER MONTH!
- Pick your desired pattern each month.
- It can be a new or old pattern.

2 FREE DOWNLOADS PER MONTH
WITH JUST $5 PER MONTH!
- Pick your desired patterns each month.
- It can be a new or old pattern.
- You get 2 patterns per month.

3 FREE DOWNLOADS PER MONTH
WITH JUST $8 PER MONTH!
- Pick your desired patterns each month.
- You get 3 free patterns per month.
- It can be a new or old pattern.

About the Designer
Say Hi on Instagram and Subscribe To my email List for pattern discounts and freebies. For questions, send such to [email protected]. Read more about me here.
Buy this pattern for $10.00, or get it free with a membership from $3 a month.
Buy the PDF
Hi, I’m Susanna!
I am Susanna, the designer and maker behind Fosbas Designs. Here, I share not only crochet designs but also the inspirations and process of each project. I am a happy mother of two handsome boys and a wife to my prince charming. These guys are…
More about me