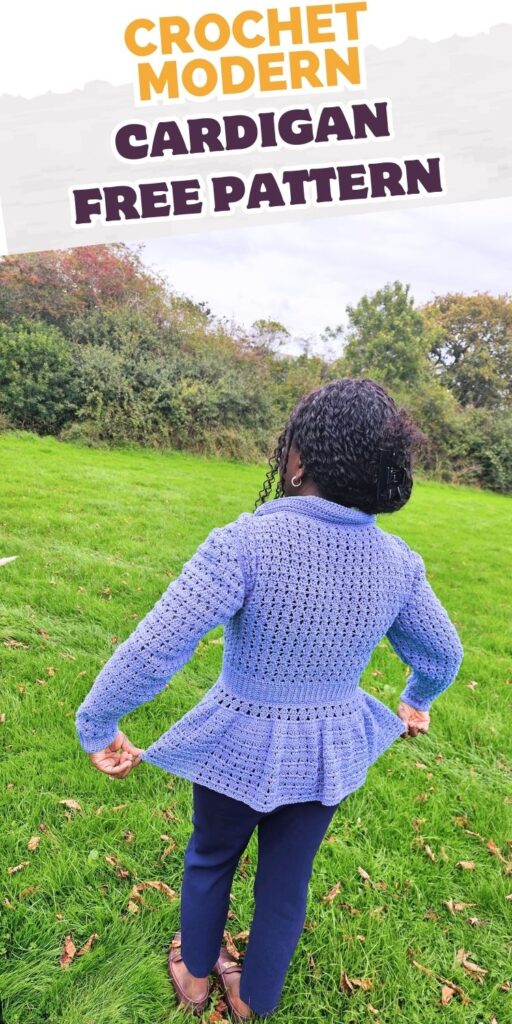
Modern Crochet Flared Cardigan Free Pattern
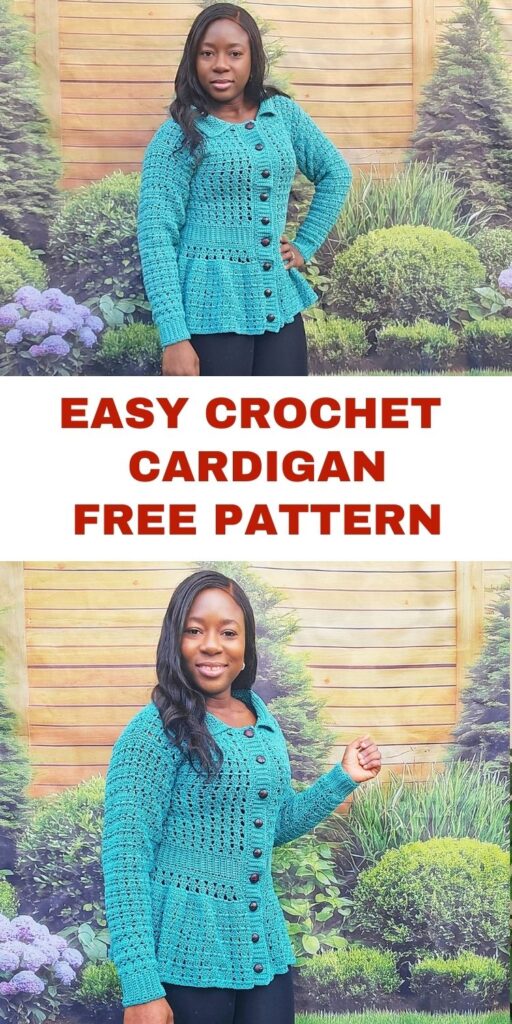
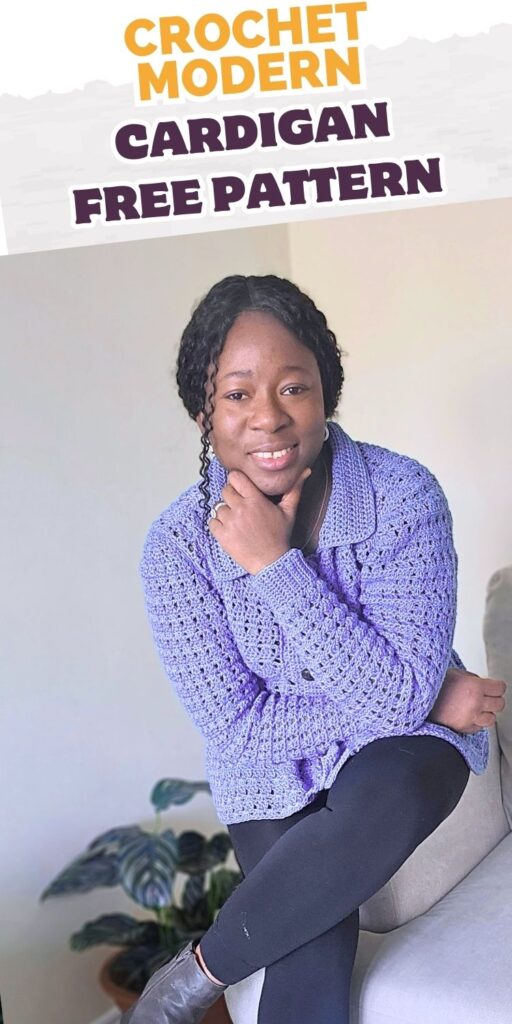
If you’ve been dreaming of a stylish, flattering, and easy-to-wear handmade cardigan, this Modern Crochet Flared Cardigan will quickly become your new favorite wardrobe piece. The stitch texture makes this even more flattering with a perfect fit.
This cardigan is perfect for layering, dressing up outfits, or adding a cozy, handmade touch to your everyday wardrobe.

Get the print friendly version with step by step photos and ad-free using the code “hdcflare” for a 50% discount, valid until December 25th 2025.
Skill Level – Confident Beginner to Intermediate
If you’ve made simple garments before or enjoy learning new stitch patterns, this cardigan will feel intuitive. The construction is straightforward, and the flare shaping is incorporated in a way that doesn’t overwhelm the project.
This pattern is also a great skill builder for crocheters wanting to try a more advanced garment without diving into complicated shaping.
Tips for A Perfect Fit
- Measure your gauge before starting for the best fit, and adjust the hook or yarn size.
- Don’t forget to block your cardigan to give it its perfect structure and drape.
- Choose lightweight worsted yarn.
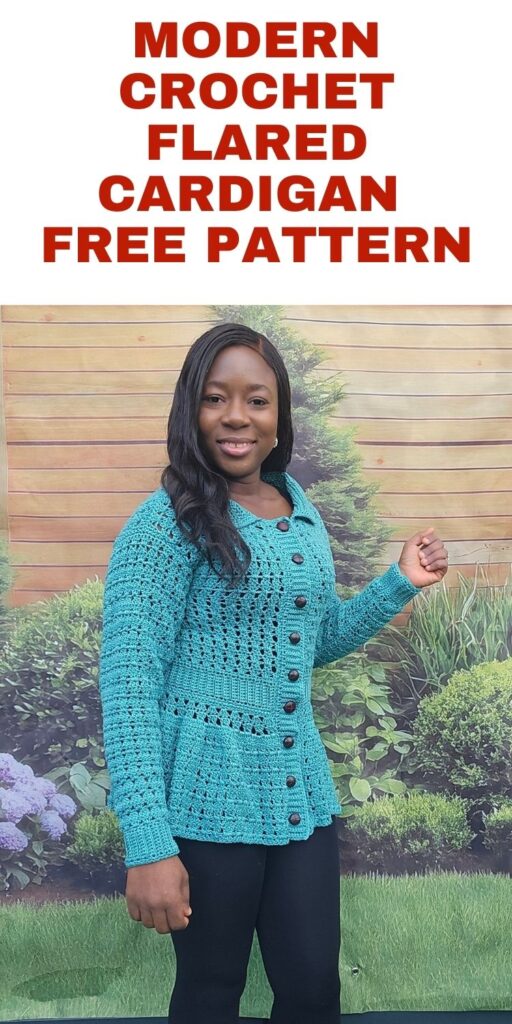
How to Style Your Crochet Flared Cardigan
This cardigan pairs beautifully with jeans, leggings, dresses, or maxi skirts. For colder seasons, it layers well over turtlenecks or long-sleeve tops. You can also dress it up with boots or keep it casual with sneakers. Its versatility makes it ideal for year-round use.
Materials
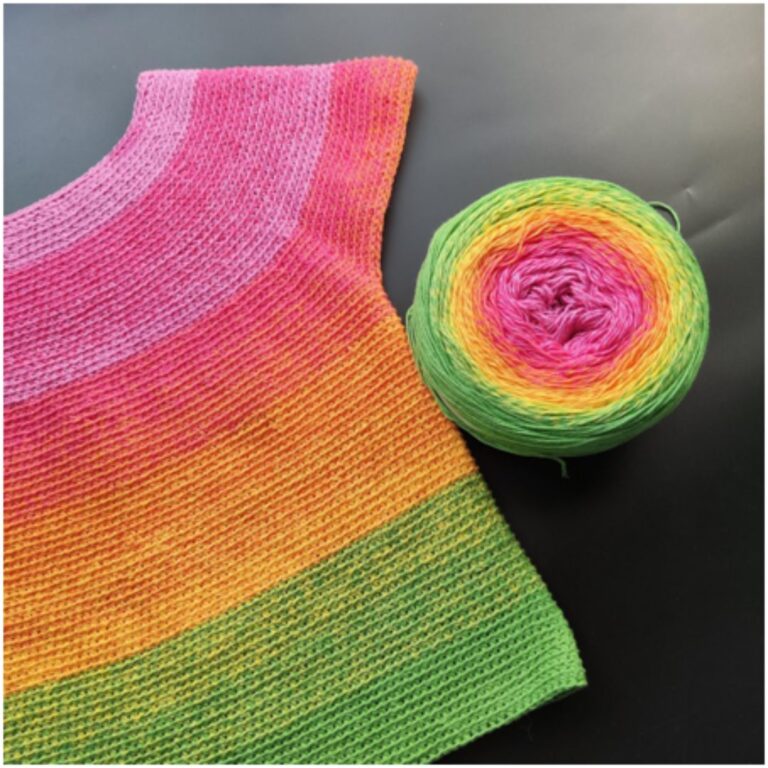
Yarn – Any Worsted weight yarns in colors of your choice.
I used 24/7 Worsted weight for mine
Estimated Total Yardage
1100 (1200, 1300, 1400, 1500, 1600, 1700, 1800, 1900) Yards
Hook
5 mm Crochet Hook for the body and sleeves
4.5mm and 5.5mm crochet hooks for the peplum skirt
Other materials
Crochet stitch markers for the central points
9 – 12 buttons (18mm)
Gauge – 15 sts x 9 rows = 10 cm / 4” square in dc before blocking
Pattern Notes
- Please kindly read through the pattern before starting.
- The stitch count is written after each row/round, with the smallest XS written first and the others in the ( ).
- Stitch count written in black is for all sizes, but at some points, the stitch counts are color-coded for clarity, i.e. XS (S, M, L, XL, 2XL, 3XL, 4XL, 5XL)
Difficulty Level – Intermediate
Terms – US Terminology

Stitches Abbreviations
Chain space – ch sp
Double crochet – dc
Back loop only of sc – BLO
Double Crochet 3 stitches together – dc3tog
Slip stitch – sl st
Special stitches
Dc cluster = 3 dc in specified stitch
Finished Measurements
Size(s) and color codes – XS (S, M, L, XL, 2XL, 3XL, 4XL, 5XL)
Bust Measurement: 30 (34, 38, 42, 46, 50, 54, 58, 62)”
Armhole Circumference: 14 (14, 16, 16, 16, 16, 18, 18, 18)”
Length of sleeve from underarm: 18 (S20 20, 20, 21, 21, 22, 22, 22)”
Arm hole Measurement: 15 (16, 16, 17, 17, 18, 18, 20, 20)”
Length of Cardigan: 20 (22, 22, 24, 24, 25, 25, 25, 26)” including the peplum
The modeled garment is shown in M, with about 1” of Positive Ease.
Construction Notes
- This cardigan is worked from the waist up.
- Front and back panels are then seamed together at the shoulder.
- The lower part (peplum/flare) is then joined to the lower end of the band, and also in rows, you can continue until you have your desired length.
- Sleeves are worked in rows and joined to the body.
Adjustments/fittings:
1. Length of cardigan:
Increase or decrease the repeats as instructed when making the flare/peplum
2. Sleeves:
Too tight at the biceps? Repeat Rows 14 – 25, which is a repeat of Rows 10 – 13
Too short/long – increase/reduce the number of repeats from Row 26.


Modern Crochet Flared Cardigan Free Pattern
Section 1: Body
Band
Row 1: Chain 9, sc in 2nd ch from hook and in each ch across, turn. 8 sc
Row 2: Ch 1, sc in first st, sc in BLO across until the last st, sc in both loops, turn. 8 sc
Rows 3 – 104 (116, 128, 140, 152, 164, 176, 188, 200): Repeat Row 2
Or until your piece measures about 28 (32, 36, 40, 44, 48, 52, 56, 60)”
Do not fasten off.
Edging
Row 1: Ch 1, sc in each st across the long side of the panel, turn. 104 (116, 128, 140, 152, 164, 176, 188, 200) sc
Body
Row 1: Ch 3 (does not count as a stitch here and throughout), dc in first st, skip next st, 3 dc in next st, *skip next 2 sts, 3 dc in next st, rep from * to last 2 sts, skip next st, dc in last st, turn. 34 (38, 42, 46, 50, 54, 58, 62, 66) dc clusters, 2 dc
Row 2: Ch 3, dc in first st, ch 1, dc3tog, * ch 2, dc3tog, rep from * to last st, ch 1, dc, turn. 35 (39, 43, 47, 51, 55, 59, 63, 67) ch sps, 34 (38, 42, 46, 50, 54, 58, 62, 66) dc3tog, 2 dc.
Row 3: Ch 3, dc in first st, *skip ch sp, 3 dc in next, rep from * to last st, dc, turn. 34 (38, 42, 46, 50, 54, 58, 62, 66) dc clusters, 2 dc
Rows 4 – 8 (8, 10, 10, 12, 12, 14, 14, 16): Rep Rows 2 and 3, ending with Row 2.
Do not fasten off.
Bust
On either side, place stitch markers on the 8 (9, 10, 11, 12, 13, 14, 15, 16)th ch sp
Right side
Working towards the 1st stitch marker
Row 1: Ch 3, dc in first st, *skip ch sp, 3 dc in next, rep from * to st marker, dc in last st with the marker, turn. (2 dc) 7 (8, 9, 10, 11, 12, 13, 14, 15) dc clusters
Row 2: Ch 3, * dc3tog, ch 2, rep from * to last st, ch 1, dc, turn. (1 dc)7 (8, 9, 10, 11, 12, 13, 14, 15) dc3tog
Row 3: Ch 3, dc in first st, *skip ch sp, 3 dc in next, rep from * to end, dc in last st, turn. 2 dc, 7 (8, 9, 10, 11, 12, 13, 14, 15) dc clusters
Rows 4 – 11 (13, 15, 15, 17, 17, 19, 19, 19): Rep Row 2 and 3
Row 12 (14, 16, 16, 18, 18, 20, 20, 20): Rep Row 2
Shape neckline
Row 13 (15, 17, 17, 19, 19, 21, 21, 21): Ch 1, sl st through the the first 3 dc clusters, ch 3, dc in same st, *skip ch sp, 3 dc in next, rep from * till the end, dc in last st, leave the last 3 dc clusters unworked, turn. (2 dc), 4 (5, 6, 7, 8, 9, 10, 11, 12) dc clusters
Row 14 (16, 18, 18, 20, 20, 22, 22, 22): Ch 3, * dc3tog, ch 2, rep from * to last st, ch 1, dc. (2 dc), 4 (5, 6, 7, 8, 9, 10, 11, 12) dc3tog
Row 15 (17, 19, 19, 21, 21, 23, 23, 23): Ch 3, dc in same st, *skip ch sp, 3 dc in next, rep from * till last st, dc in last st. (2 dc), 4 (5, 6, 7, 8, 9, 10, 11, 12) dc clusters
Fasten off.
Left side
Join yarn with a sl st from the edge, working toward the 2nd stitch marker, repeat as for the right side.
Back Panel
Working between the 2 stitch markers, join yarn with a sl st to the dc3tog next to either stitch marker.
Row 1: Ch 3, dc, *skip ch sp, 3 dc in next, rep from * to next st marker, turn. (2 dc), 20 (22, 24, 26, 28, 30, 32, 34, 36) dc clusters
Row 2: Ch 3, * dc3tog, ch 2, rep from * to last st, ch 2, dc, turn. (2 dc), 20 (22, 24, 26, 28, 30, 32, 34, 36) dc3tog
Row 3: Ch 3, dc, *skip ch sp, 3 dc in next, rep from * to last st, dc, turn. (2 dc), 20 (22, 24, 26, 28, 30, 32, 34, 36) dc clusters
Rows 4 – 15 (17, 19, 19, 21, 21, 23, 23, 23): Rep Rows 2 and 3
Do not fasten off.
Shoulder seam(s)
Fold the front panels over the back panel.
Join together the sts on both the right side of the front panel and the corresponding sts on the back panel.
Repeat on the left side.
Collar
With your cardigan right side out, have the back facing you, and work from right to left following the shape for the neckline.
Note: Aim for 2 sc in each ch 2 sp.
RS Row 1: Ch 1, sc in each st across, turn
WS Row 2: Ch 1, in BLO, hdc in each st across, turn
RS Row 3: Ch 1, in FLO, hdc in each st across, turn
In both loops from here:
Rows 4 – 13: Ch 2, hdc in each st across, turn.
Fasten off.
Section 3: Peplum
With a 4.5mm hook
Crochet across the lower end of the band.
Join yarn with a sl st to the edge of the band.
Row 1: Ch 1, sc in each st across, turn. 104 (116, 128, 140, 152, 164, 176, 188, 200) sc
Drop 4.5mm hook and switch to 5.5 mm hook
Row 2: Ch 3, dc in first st, skip next st, 3 dc in next st, *skip next 2 sts, 3 dc in next st, rep from * to last 2 sts, skip next st, dc in last st, turn. 34 (38, 42, 46, 50, 54, 58, 62, 66) dc clusters, 2 dc
Row 3: Ch 3, dc, ch 1, dc3tog, * ch 2, dc3tog, rep from * to last st, ch 1, dc, turn. 35 (39, 43, 47, 51, 55, 59, 63, 67) ch sps, 34 (38, 42, 46, 50, 54, 58, 62, 66) dc3tog, 2 dc.
Increase row – just row 4
Row 4: Ch 3, dc in first st, skip ch sp, *3 dc in next st, 3 dc in next ch sp, rep from * to last st, dc in last st, turn. 69 (77, 85, 93, 101, 109, 117, 125, 133) dc clusters, 2 dc.
Row 5: Ch 3, dc, ch 1, dc3tog, * ch 2, dc3tog, rep from * to last st, ch 1, dc, turn. 69 (77, 85, 93, 101, 109, 117, 125, 133) dc3tog, 2 dc.
Row 6: Ch 3, dc in first st, *skip ch sp, 3 dc in next st, rep from * to last st, dc in last, turn.69 (77, 85, 93, 101, 109, 117, 125, 133) dc clusters, 2 dc
Rows 7 – 13 (15, 17, 17, 19, 19, 19, 19, 19): Rep Rows 4 – 5, ending with Row 5.
Fasten off.
Cardigan opening edging
With the right side facing, join yarn with a sl st to the base of the collar, using a crochet hook size 5mm
Ch 1, sc in each st, 2 sc in ch 3/dc st across
Fasten off.
Repeat on the other side.
Front band
Left Opening of the cardigan
Option 1: band made directly on the cardigan.
- Join yarn with a sl st to the base of the collar, aiming at crocheting the band down towards the flare.
- The collar will not be included in the band.
Row 1: Chain 9, sc in 2nd ch from hook and in each chain across, skip corresponding st on the cardigan body, sl st into the next 2 sts on the body of the cardigan, turn. 8 sc
Row 2: Skip the first 2 sl sts, sc BLO in each st across, turn. 8 sc
Row 3: Ch 1, sc in first st, sc in next st, ch 2, skip next 2 sts, sc in BLO of the remaining across, skip corresponding st on the cardigan, sl st into the next 2 sts on the Cardigan, turn. 6 sc
Row 4: Skip the first 2 sl sts, sc in BLO of each st and ch 2 sp across, turn. 8 sc
Row 5: Ch 1, in BLO, sc in each st across, skip corresponding st on the Cardigan, sl st into the next 2 sts on the Cardigan, turn. 8 sc
Rows 6 – 16: Repeat rows 4 – 5
Notes:
- Adjust the number of rows between the buttonholes as you would prefer.
- Adjust the number of chains/skipped sts in accordance with the size of your button.
Rows 17 – end: Repeat Rows 3 to 16 until you have crocheted into all the stitches on both sides of the cardi.
Edge
Row 1: Chain 9, sc in 2nd ch from hook and in each chain across, skip corresponding st on the cardigan body, sl st into the next 2 sts on the body of the cardigan, turn. 8 sc
Row 2: Skip the first 2 sl sts, sc in BLO of each st across, turn. 8 sc
Row 3: Ch 1, sc in BLO of each st across, skip corresponding st on the Cardigan, sl st into the next 2 sts on the Cardigan, turn. 8 sc
Rows 4 – end: Repeat Rows 2 and 3 until you have crocheted into all the stitches on the cardi.
Do not fasten off.
Band Edging
Crocheting across the band just made
Row 1: Ch 1, sc evenly across.
Fasten off.
Option 2: The band is made separately and then joined to the cardigan
Row 1: Chain 9, sc in 2nd ch from hook and in each ch across, turn. 8 sc
Row 2: Ch 1, sc in first st, sc in BLO across until the last st, sc in both loops, turn. 8 sc
Rows 3 – 30 (34, 62, 42, 48, 54, 60, 66): Repeat Row 2
Or until you have a length long enough from the neckline (excluding the collar) through the end of the peplum.
Edging
Row 1: Ch 1, sc evenly around the band, (sc ch 2, sc) at each corner, join with a sl st to the beginning chain.
Button holes (Right side)
Row 1: Chain 9, sc in 2nd ch from hook and in each ch across, turn. 8 sc
Row 2: Ch 1, sc in first st, sc in BLO across until the last st, sc in both loops, turn. 8 sc
Row 3: Ch 1, sc in first st, sc in BLO of next st, ch 2, skip next 2 sts, sc in BLO of the remaining across until the last st, sc in both loops, turn. 6 sc
Row 4: Ch 1, sc in first st, sc in BLO of next 3 sts, 2 sc in ch sp, sc in BLO of next st, sc in both loops, turn. 8 sc
Rows 5 – 16: Ch 1, sc in first st, sc in BLO across until the last st, sc in both loops, turn. 8 sc
Notes:
- Adjust the number of rows between the buttonholes as you would prefer.
- Adjust the number of chains/skipped sts in accordance with the size of your button.
Rows 17 – 18: Rep Rows 3 – 4
Rows 19 – 30: Ch 1, sc in first st, sc in BLO across until the last st, sc in both loops, turn. 8 sc
Continue the repeats (Rows 3 – 16) until you have a similar length to the other side.
Aim for a similar length to the other side.
Band Edging
Crocheting across the band just made
Row 1: Ch 1, sc evenly around the band, (sc ch 2, sc) at each corner.
Fasten off.
Joining the band with the cardigan
For option 2 only
Step 1: Place the band next to the cardigan.
Step 2: Turn the band and cardigan to the wrong side.
Step 3: Using sl st or sc to join the band to the cardigan.
Fasten off.
Repeat on the other side.
Sew buttons on the left side corresponding to the button holes.
Option 2: Band made directly on the front panel.
Section 4: Sleeves
With 5 mm crochet hook
Row 1: Chain 11, sc in 2nd ch from hook and in each ch across, turn. 10 sc
Row 2: Ch 1, sc in first st, sc in BLO across until the last st, sc in both loops, turn. 10 sc
Rows 3 – 32 (32, 32, 32, 32, 36, 36, 36, 36): Repeat Row 2
Adjust the width for a comfortable fit around your wrist.
Edging
Aim for a multiple of 3
Row 1: Ch 1, sc in each st/edge across, turn. 33 (33, 33, 33, 33, 36, 36, 36, 36) sc
Ch 3 does not count as a stitch for the sleeves.
Row 2: Ch 3, 2 dc in first st, *skip next 2 sts, 3 dc in next st, rep from * to last 5 sts, skip next st, 3 dc in next st, skip next 2 sts, 2 dc in last st. 4 dc, 10 (10, 10, 10, 10, 12, 12, 12, 12) dc clusters
Row 3: Ch 3, dc in first 2 sts, *ch 2, dc3tog, rep from * to last 2 sts, ch 2, dc in last 2 sts. 4 dc, 10 (10, 10, 10, 10, 12, 12, 12, 12) dc3tog
Row 4: Ch 3, dc in first 2 sts, *skip ch sp, 3 dc in next st, rep from * to last 2 sts, dc in last 2 sts, turn. 4 dc, 10 (10, 10, 10, 10, 12, 12, 12, 12) dc clusters
Rows 5 – 9: Rep Row 3 – 4 (end on a row 3 repeat)
Row 10: Ch 3, 2 dc in first st, dc in next st, *skip ch sp, 3 dc in next, rep from * to last 2 sts, dc in next st, 2 dc in last st, turn. 6 dc, 10 (10, 10, 10, 10, 12, 12, 12, 12) dc clusters)
Row 11 Ch 3, dc in first 3 sts, *ch 2, dc3tog, rep from * to last 3 sts, ch 2, dc in last 3 sts, turn. 6 dc, 10 (10, 10, 10, 10, 12, 12, 12, 12) dc3tog
Row 12: Ch 3, 2 dc in first st, skip next st, *3 dc in next st, skip ch sp, rep from * to last 3 sts, 3 dc in next st, skip next st, 2 dc in last st, turn. 4 dc, 12 (12, 12, 12, 12, 14, 14, 14, 14) dc clusters
Row 13: Ch 3, dc in first 2 sts, *ch 2, dc3tog, rep from * to last 2 sts, ch 2, dc in last 2 sts, turn. 4 dc, 12 (12, 12, 12, 12, 14, 14, 14, 14) dc3tog
Rows 14 – 25: Repeat Rows 10 – 13
Counts after Row 25 = 4 dc, 18 (18, 18, 18, 18, 20, 20, 20, 20) dc3tog
Stop increasing
Check the fit around the widest part of your arm.
- If too loose, you can frog back 2 – 4 rows for a better fit.
- If it’s too tight, rep rows 10 – 13 once or twice. Make sure to check the fit.
Row 26: Ch 3, 2 dc, skip next st and next ch sp, *3 dc in next, skip ch sp, rep from * to last 2 sts, skip next st, 2 dc in last st, turn. 4 dc, 18 (18, 18, 18, 18, 20, 20, 20, 20) dc clusters
Row 27: Ch 3, dc in first 2 sts, * ch 2, dc3tog, rep from * to last 2 sts, dc last 2 sts, turn. 4 dc, 18 (18, 18, 18, 18, 20, 20, 20, 20) dc clusters
Rows 28 – 39: Rep Rows 26 – 27
Rows 40: Rep Row 26
Continue the repeat until you have a length long enough for your sleeve.
Edging
Crocheting around the whole sleeve
Ch 1, sc in each st, 2 sc in ch 3 and dc st around, join with a sl st to the beginning ch.
Leave a long tail of yarn for sewing, cut yarn.
Make the left sleeve.
Sleeve Seam(s)
- To join the sleeves to the body of your cardigan.
- Turn both sleeves and the body of the cardigan to the wrong side, with the sleeve placed next to the shoulder.
- If your main panel has more rows than the opening on the sleeves, you can close (sew) a few sts together on the front and back panels.
- Secure the sleeve to the body of the cardigan with stitch markers.
- With the wrong side facing you, sew the sleeve to the cardigan, starting from the front panel and then the back panel. Continue to join the sides of the sleeves together towards the sleeve cuffs.
- Repeat on the other side.
Fasten off and break yarn.
Finishing: Weave in ends and block to measurement.
This crochet flared cardigan is an elegant, comfortable, and truly enjoyable project that becomes a staple in any handmade wardrobe. Whether you’re making one for yourself or gifting it, the finished piece is guaranteed to impress.
1 FREE DOWNLOAD PER MONTH
WITH JUST $3 PER MONTH!
- Pick your desired pattern each month.
- It can be a new or old pattern.

2 FREE DOWNLOADS PER MONTH
WITH JUST $5 PER MONTH!
- Pick your desired patterns each month.
- It can be a new or old pattern.
- You get 2 patterns per month.

3 FREE DOWNLOADS PER MONTH
WITH JUST $8 PER MONTH!
- Pick your desired patterns each month.
- You get 3 free patterns per month.
- It can be a new or old pattern.

About the Designer
Say Hi on Instagram and Subscribe To my email List for pattern discounts and freebies. For questions, send such to [email protected]. Read more about me here.