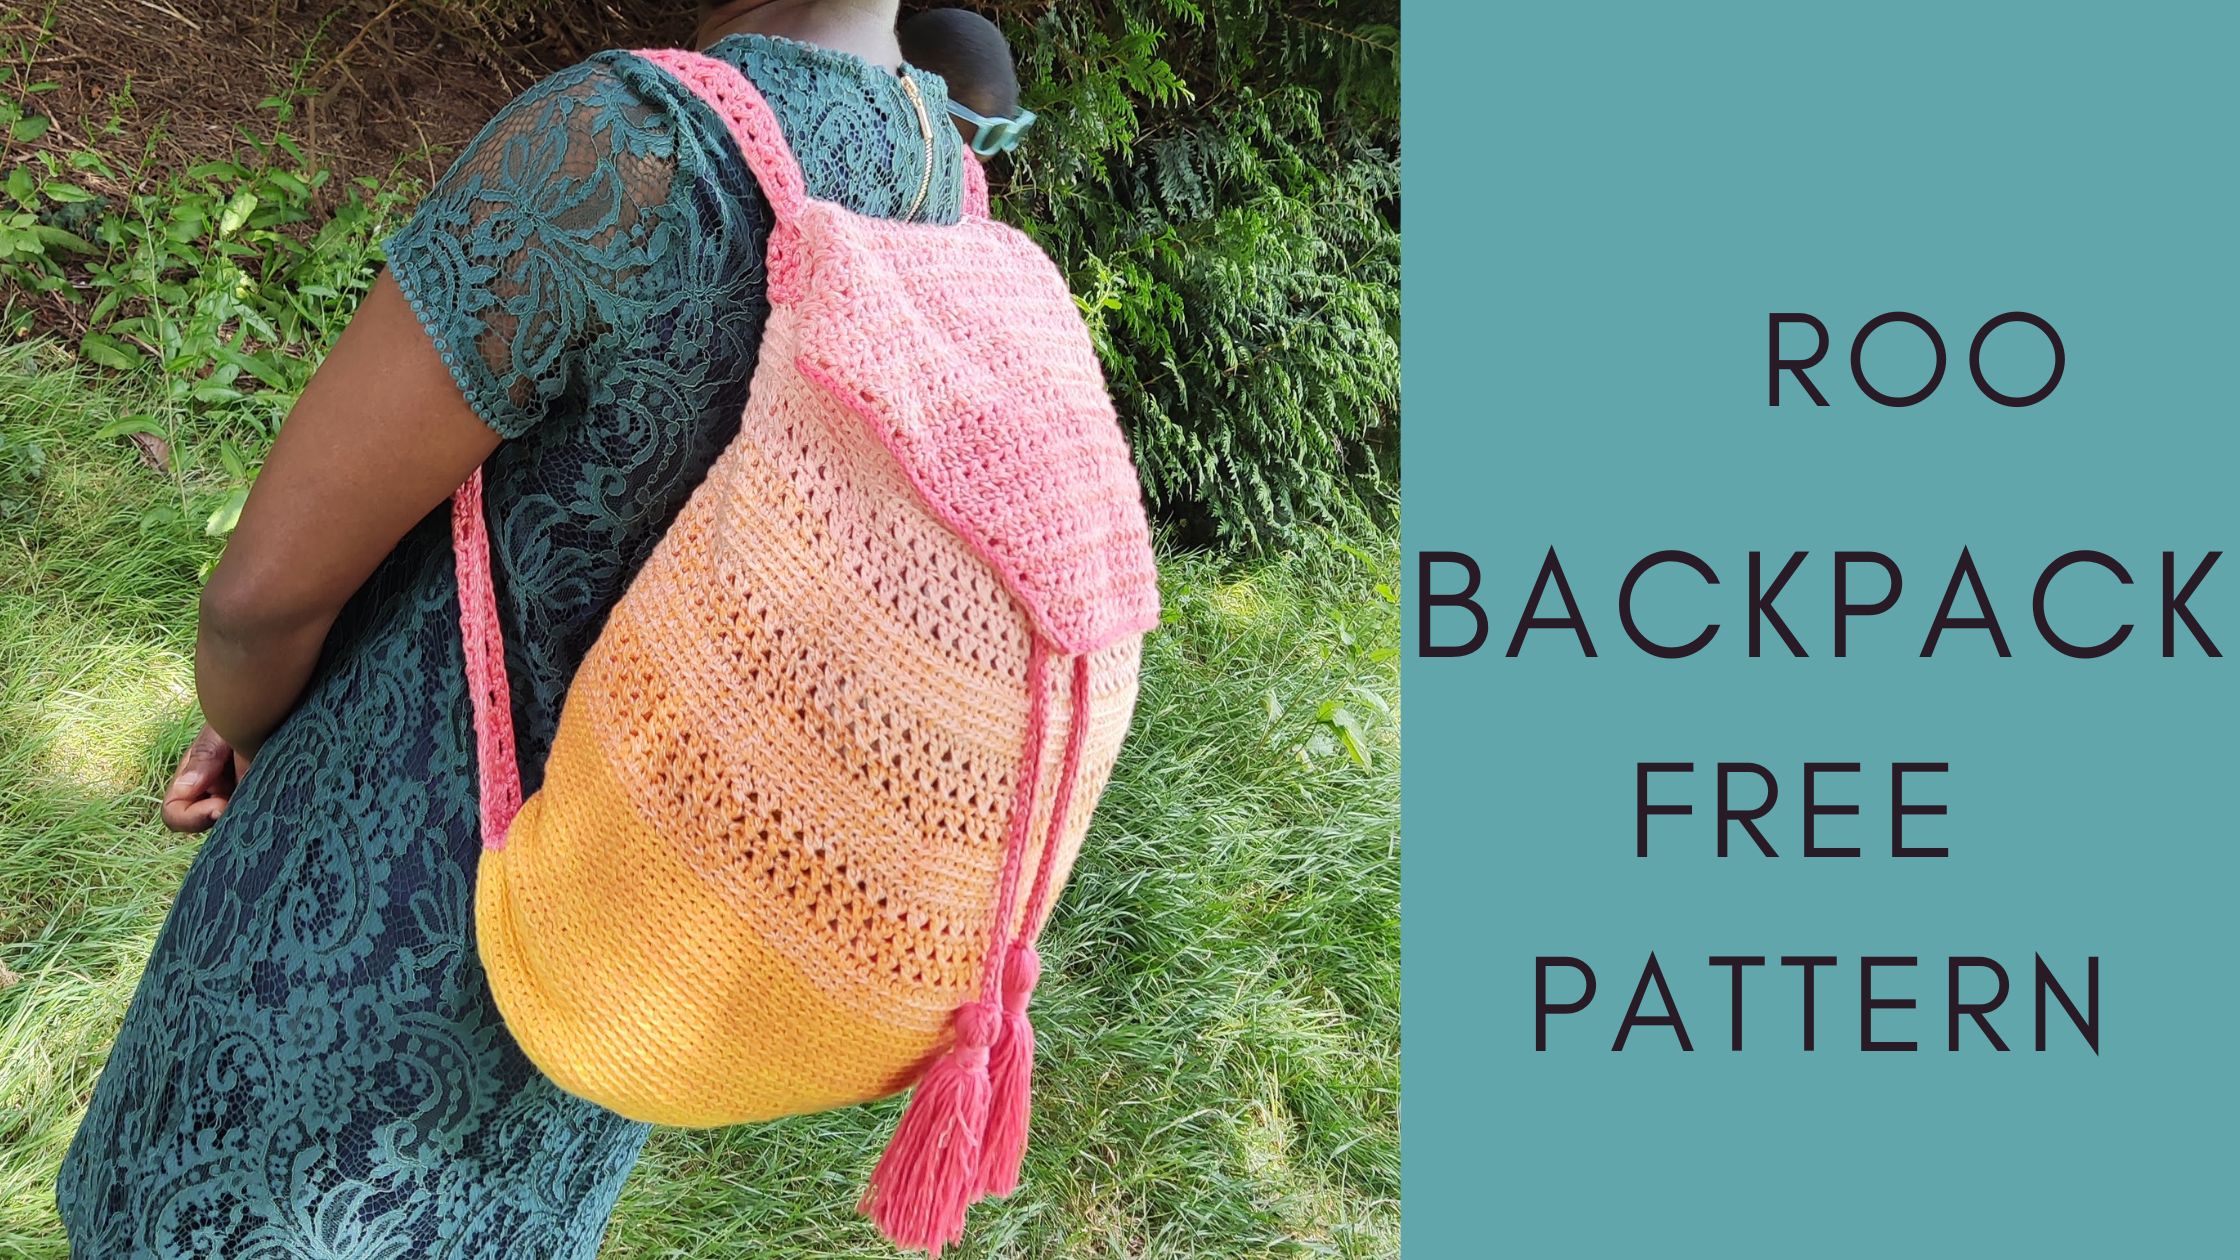
Lily-Roo Crochet Backpack Pattern
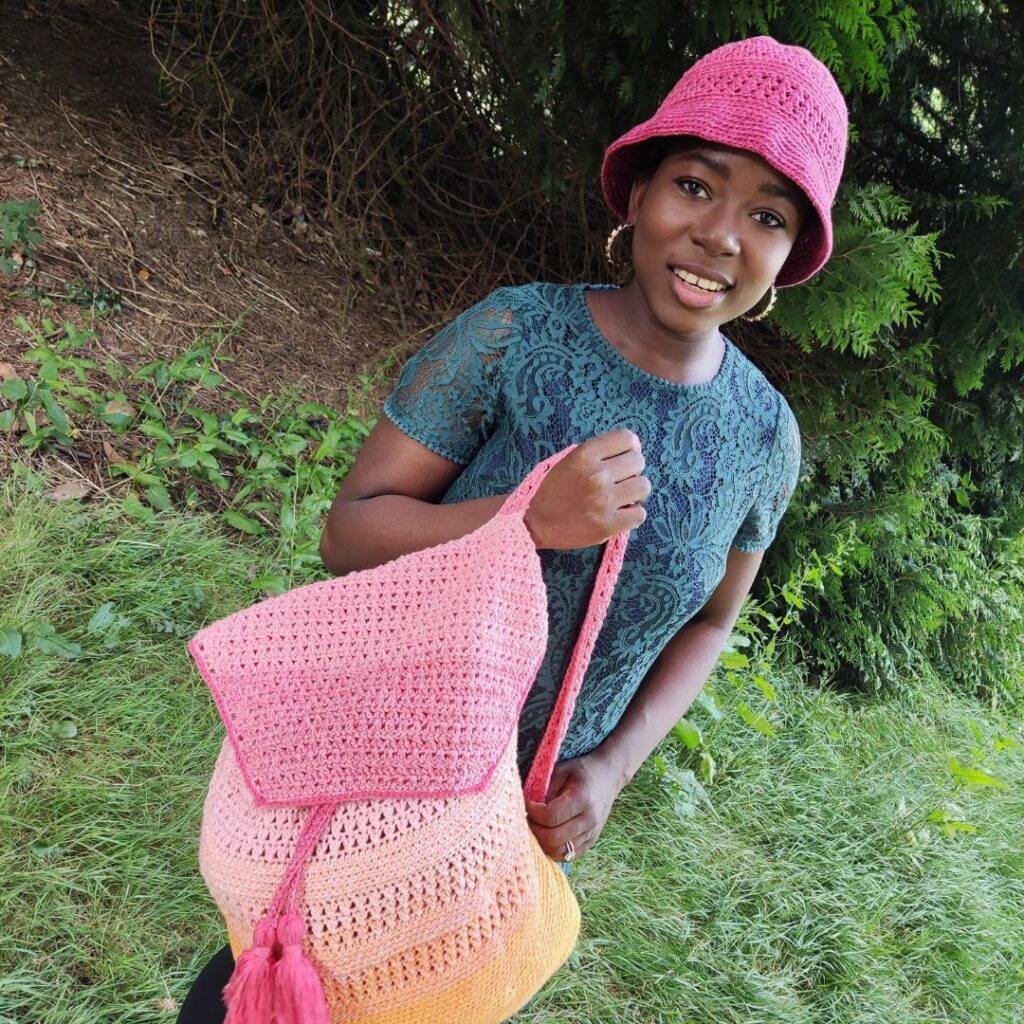
A crochet backpack is a fun way to use yarn to create a beautiful bag. I have always fancied backpacks. It’s easier to move around and get a hand free without having a lot of tiny pieces of stuff all hanging on me.
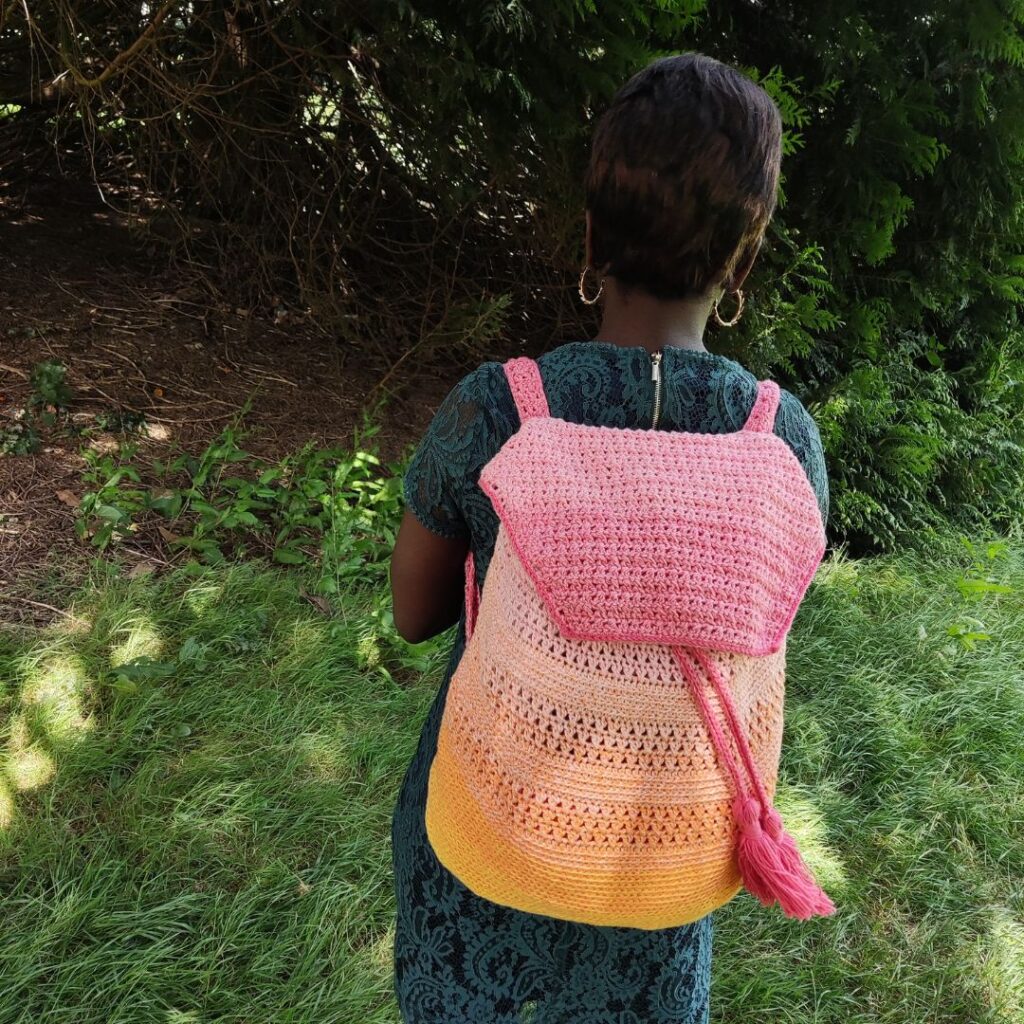
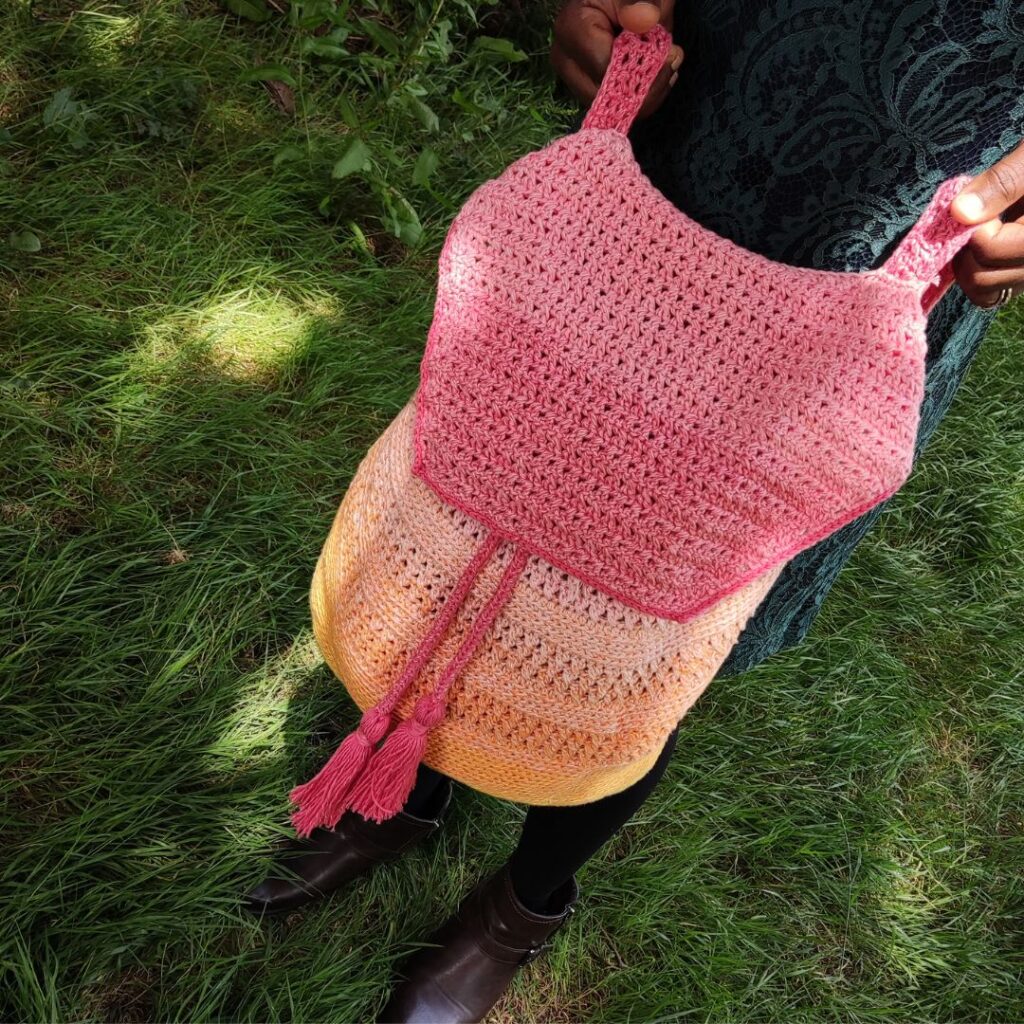
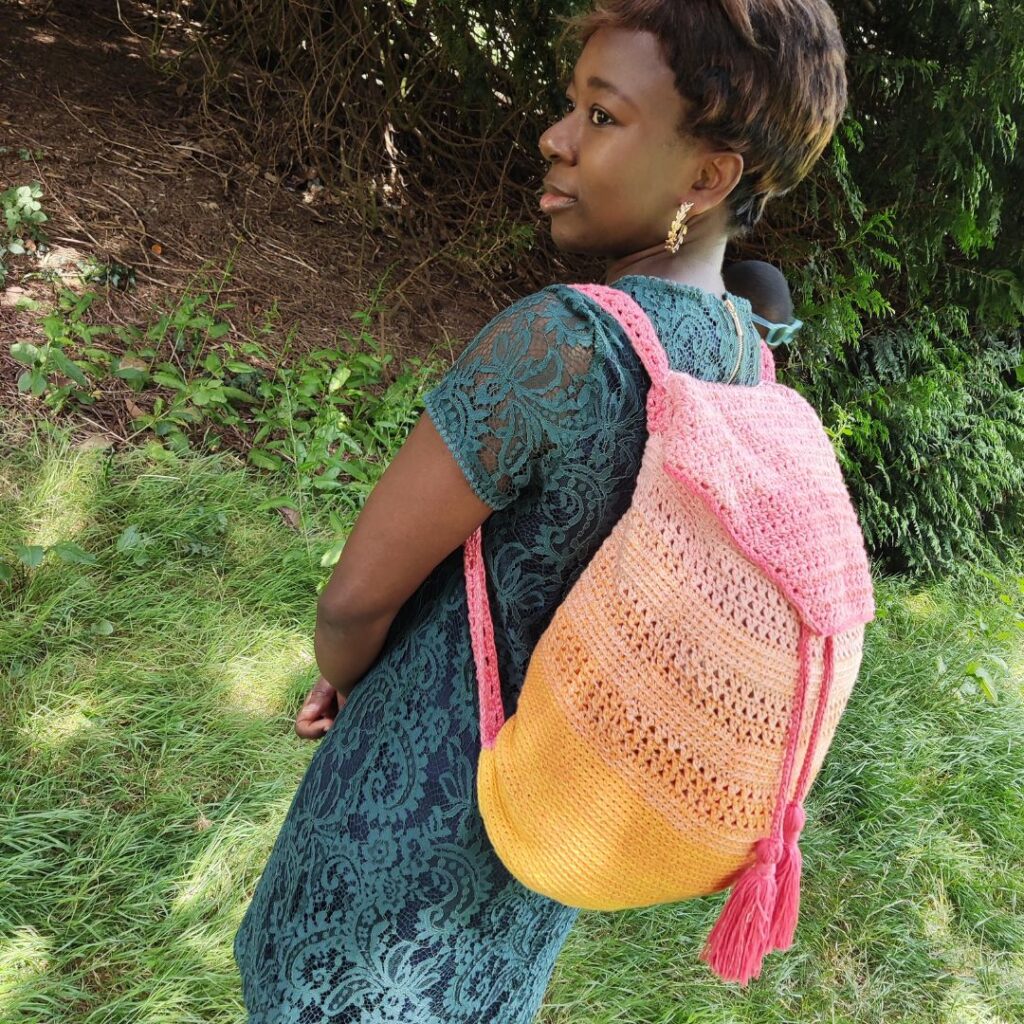
This backpack is unique in so many ways! I wanted a big backpack, so I made the sketch just like that and also added a POCKET! Yes, this backpack has a pocket, placed inside.
If you are a fan of crochet bags, you would love this backpack. you can totally customize this bag to your taste. There is no limit to what you can do. From having just, a single handle to adding another shorthand and even making a smaller version of this backpack.
This backpack is available as a free pattern, but you can grab the print-friendly pattern in PDF. You can get a copy from either ETSY or Ravelry, using the links below.
LIly-Roo Backpack pattern on Ravelry

Lily roo Backpack pattern on ETSY
The backpack was designed to go along with my Bucket hat, using a similar colorway.
If you love this backpack, you might also want to get the amazing crochet patterns in the ongoing summer vibes blog hop.
Materials needed for this easy backpack pattern
Yarn – Any DK-weight yarn can be used for this crochet backpack pattern. The prototype was made using 2 stands of Hobbii Twister Summer, fine, #2 (55% Cotton, 45% Acrylic, 1093 yards/1000m per 250g Cake)
Please note that 2 strands of the above yarn were used throughout. You can substitute with any DK (#3) yarn.
You are welcome to use any colors of your choice, the prototype was made using a cake with different colors.
Estimated Yardage
900 yards
Hook and other Materials
– 3.5 mm Crochet Hook
– Snap Button, 1 pair.
Gauge
17 sts over 12 rows = 4”/10 cm Square made in hdc, before blocking.
Adjust hook size if necessary, to obtain gauge.
Crochet Backpack Pattern Notes
1. Please kindly read through the pattern before starting.
2. Substitute with any #3 weight yarn, please check the gauge.
Difficulty Level – Intermediate
Terms – US Terminology
Stitches Abbreviations
Ch(s) – Chain(s)
Sl st – Slip stitch
Hdc – Half Double Crochet
Dc – Double Crochet
Dc2tog – Double Crochet 2 stitches together
3rd Loop
BLO – Back loop only
Special Stitch
Crossed double crochet (xdc) Here is a video tutorial I made for this stitch = https://youtu.be/oFuzFwMhjW8
Skip next st, dc in next st, crocheting over the dc just made into the skipped st, yarn over, insert hook into skipped stitch and yarn over (3 loops on the hook), yarn over, pull through 2 loops, yarn over, pull through the remaining 2 loops.
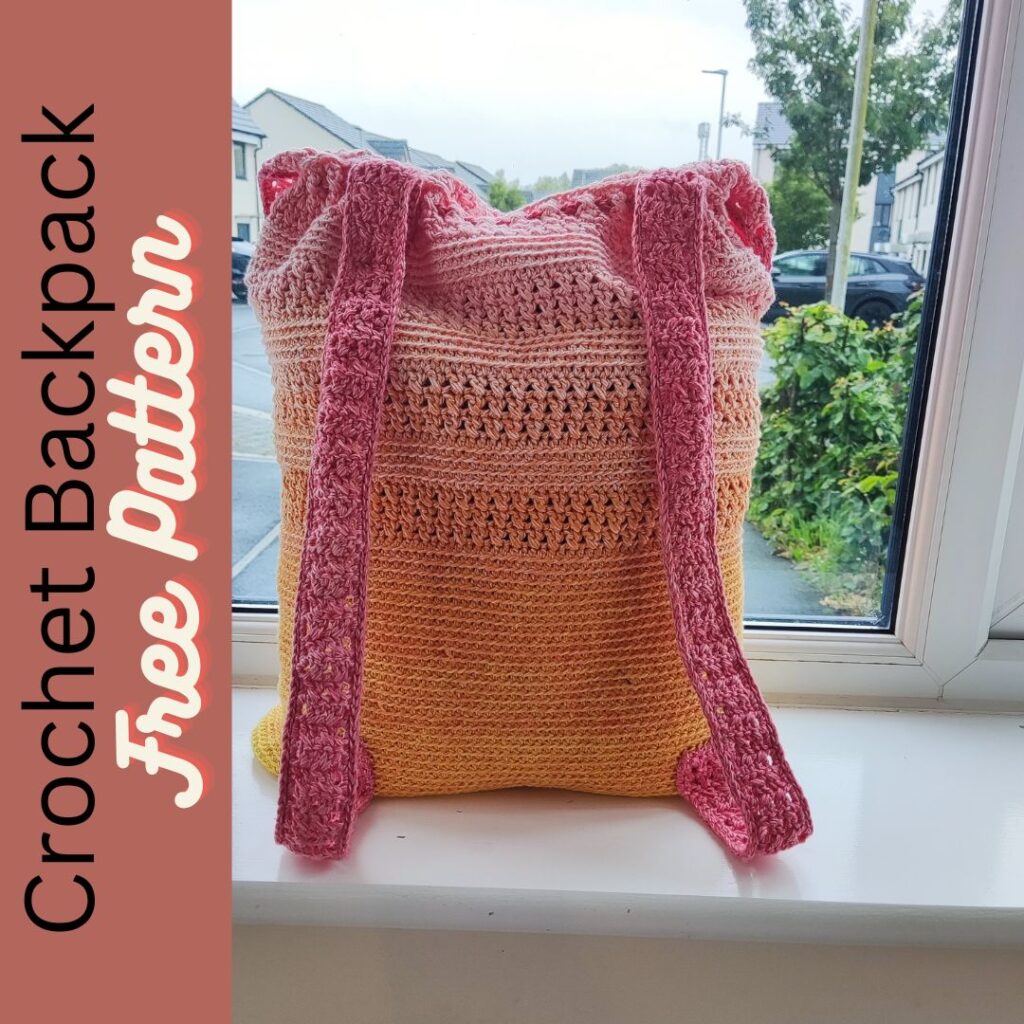
Finished Measurements for this crochet backpack = 13” by 18”
Instruction for Roo crochet backpack pattern
Part 1 – Base
Round 1: Chain 54, hdc in 3rd ch from hook and in next 50 chs, 3 hdc in the last ch, turn your work so as to crochet along the other side of the chains, hdc in next 50 chs, 2 hdc in last ch, join with a sl st to beginning ch. 106 hdc
Round 2: Ch 1, 2 hdc in first st, hdc in next 50 sts, 2 hdc in next 3 sts, hdc in next 50 sts, 2 hdc in next 2 sts, join with a sl st to beginning ch. 112 hdc
Round 3: Ch 1, 2 hdc in first st, hdc in next st, hdc in next 50 sts, *2 hdc in the next st, hdc in next st, rep from *2 more times, hdc in next 50 sts, *2 hdc in the next st, hdc in the next st, rep from *1 more time, join with a sl st to beginning ch. 118 hdc
Round 4: Ch 1, 2 hdc in first st, hdc in next 2 sts, hdc in next 50 sts, *2 hdc, hdc in next 2 sts, rep from *2 more times, hdc in next 50 sts, *2 hdc, hdc in next 2 sts, rep from *1 more time, join with a sl st to beginning ch. 124 hdc
Round 5: Ch 1, 2 hdc in first st, hdc in next 3 sts, hdc in next 50 sts, *2 hdc, hdc in next 3 sts, rep from *2 more times, hdc in next 50 sts, *2 hdc, hdc in next 3 sts, rep from *1 more time, join with a sl st to beginning ch. 130 hdc
Round 6: Ch 1, 2 hdc in first st, hdc in next 4 sts, hdc in next 50 sts, *2 hdc, hdc in next 4 sts, rep from *2 more times, hdc in next 50 sts, *2 hdc, hdc in next 4 sts, rep from *1 more time, join with a sl st to beginning ch. 136 hdc
Round 7: Ch 1, 2 hdc in first st, hdc in next 5 sts, hdc in next 50 sts, *2 hdc, hdc in next 5 sts, rep from *2 more times, hdc in next 50 sts, *2 hdc, hdc in next 5 sts, rep from *1 more time, join with a sl st to beginning ch. 142 hdc
Round 8: Ch 1, in BLO, hdc around, join with a sl st to beginning ch. 142 hdc
Part 2: Body
Rounds 1 – 25: Ch 1, in BLO, hdc around, join with a sl st to beginning ch. 142 hdc
Round 26: Ch 3, xdc across, join with a sl st to beginning ch. 71 xdc
Rounds 27 – 28: Repeat Round 26
Round 29: Ch 1, hdc in each st across, join with a sl st to beginning ch. 142 hdc
Rounds 30 – 33: Ch 1, in BLO, hdc around, join with a sl st to beginning ch. 142 hdc
Rounds 34 – 36: Repeat Rounds 26 – 28.
Rounds 37 – 41: Repeat rounds 29 – 33
Rounds 42 – 44: Repeat Rounds 26 – 28.
Rounds 45 – 49: Repeat rounds 29 – 33
Rounds 50 – 52: Repeat Rounds 26 – 28.
Round 53: Ch 1, hdc in each st across, join with a sl st to beginning ch. 142 hdc
Round 54: Ch 1, in 3rd loop, sc in each st around, join with a sl st to beginning ch. 142 hdc
Do not fasten off
Part 3: Cover
Row 1: Ch 3 (counts as a dc st from here on), xdc in next 70 sts, dc in next st, turn. 35 xdc, 2 dc
Row 2: Ch 3, Xdc across until the last st, dc in last st, turn. 35 xdc, 2 dc
Rows 3 – 5: Repeat Row 2
Row 6: Ch 3, dc2tog, xdc across until the last 3 sts, dc2tog, dc in last st, turn. 33 xdc, 4 dc
Row 7: Ch 3, dc2tog, dc in next st, xdc across until the last 4sts, dc in next st, dc2tog, dc in last st, turn.
Rows 8- 22: Repeat Rows 6 & 7
Note – you can increase or decrease the repeats as you prefer
Fasten off
Edging
Join yarn with a sl st to the edge of the first row of the cover.
Row 1: Ch 1, sc in each st across, turn. Aim for 2 sc in each ch 3 and dc space, turn.
Row 2: Ch 1, sl st in each st across, turn.
Fasten off
Make 2
Chain 8
Row 1: Hdc in 3rd ch from hook and in each ch across, turn. 6 hdc
Row 2: Ch 3, Xdc twice, dc in last st, turn. 2 dc, 2 xdc
Rows 3 – 49: Repeat Row 2
Row 50: Ch 1, sc in each st across, turn.
Strap Edging
Round 1: Ch 1, sc in each st around, aim for 2 sc in each ch 3 and dc space, ch 2 at each corner, join with a sl st to the beginning ch.
Row 2: Ch 1, sl st in each st across, aim for ch 2 at each corner, join.
Finishing/joining the straps to the Bag
On the back of the bag, count 10 sts away from the sides on either side
Place the strap on this point
Using both the front loop left unworked from the body of the pack and the loops created when working into the 3rd loop, sew the upper end of the strap to this point.
On the lower end, sew the strap
Note – To create a substantial/study handle make the sewing/joining in the form of a square (sew each point to the bag in at least 4 sides).
Repeat on for the second strap
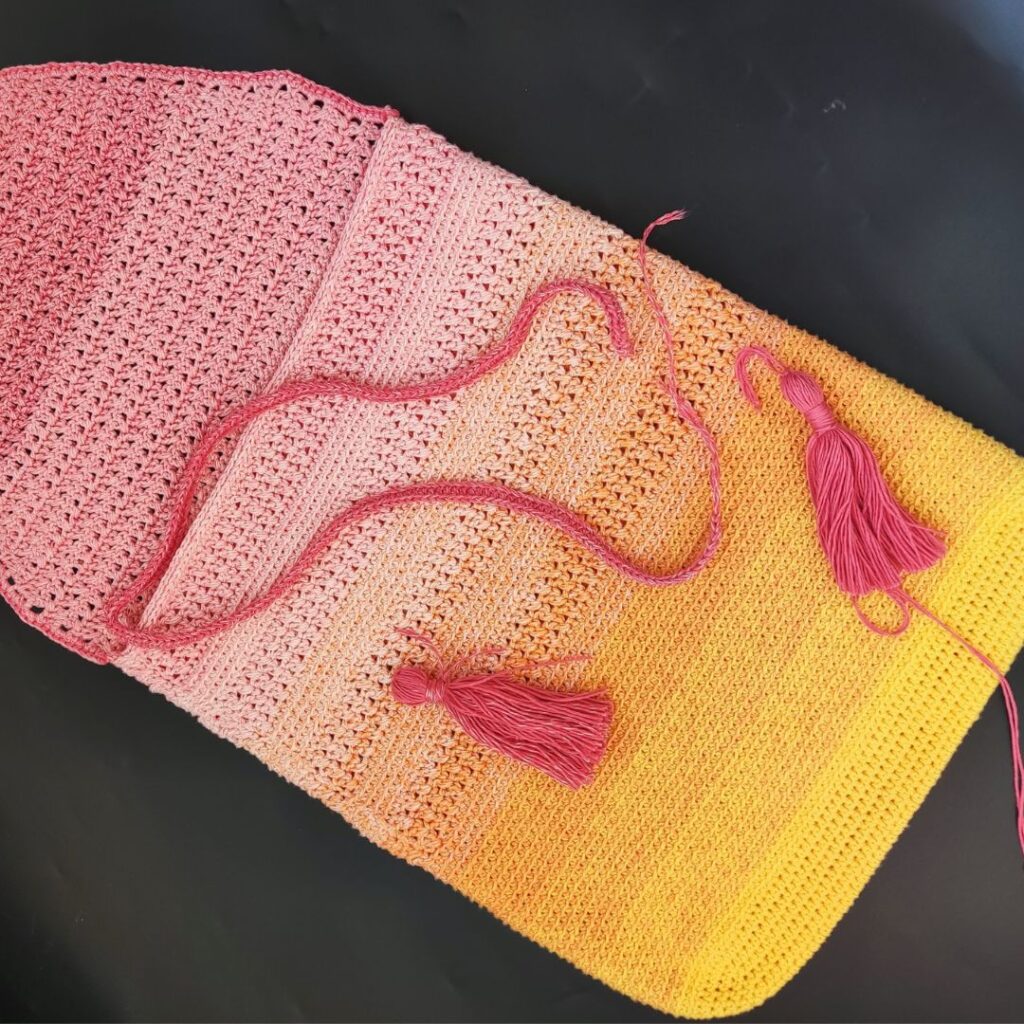
Drawstring
Chain 202, hdc in 3rd ch from hook and in each ch across
Fasten off.
Locate the middle part of the backpack
Using your hook, weave the drawstring through the spaces created by the xdc in the upper part of the body.
Make 2 tassels
Sew each tassel to the end of the drawstring.
Sew in ends.
Row 1: Chain 40, hdc in 3rd ch from the hook and in each ch across, turn. 38 hdc
Rows 2 – 22: Ch 1, hdc in each ch across, turn. 38 hdc
Fasten off.
Turn the backpack to the wrong side
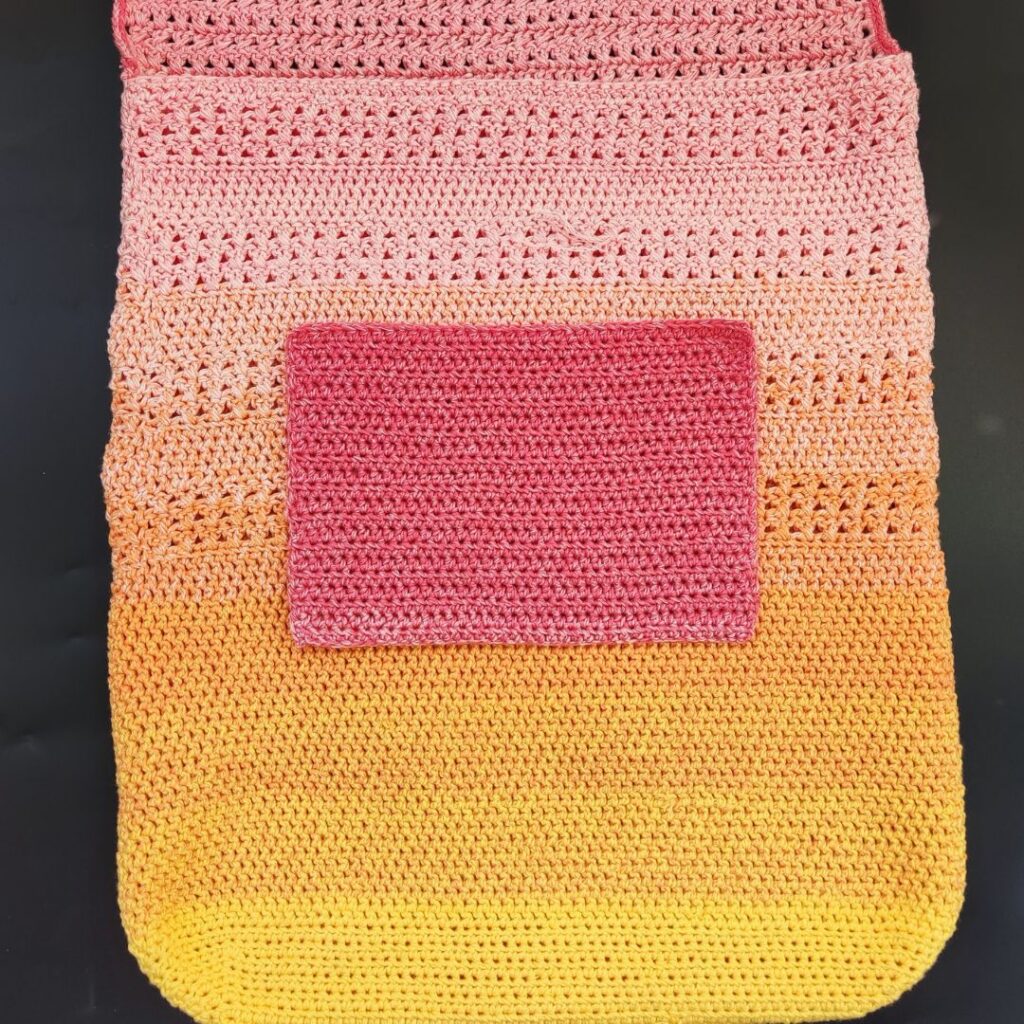
Pick your preferred spot on the pack and sew the 2 long and one short side of the pocket to the backpack’s body, leaving out the 4th opening.
Snap Button – Sew a snap on the cover of the bag and the other snap on the body of the bag.
I hope you have fun making this crochet backpack pattern!
I can’t wait to see your beautiful makes! Come share your projects with me and the crochet community on Facebook and on Instagram.
Fosbas
More crochet projects to check out on the blog.
Best yarn to crochet with and the ones to avoid
How to Crochet a Sweater for a Beginner
Real-time to crochet a sweater
Real-time it takes to crochet a hat
How to Crochet a Magic Ring