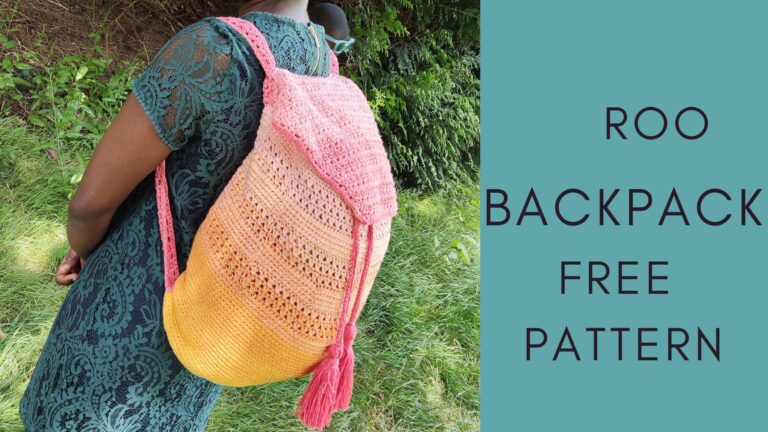
Simple Crochet Beach Bag Free Pattern
Introducing the simple crochet beach bag, this free pattern is super easy to follow and can be made in colors of your choice.
Looking for a stylish yet practical crochet project to take on your next seaside adventure? The Coastal Stripes Beach Bag is the perfect companion for sunny days and sandy toes.

This beginner-friendly pattern works up quickly and offers ample space for all your beach essentials—think towels, sunscreen, snacks, and more! With its clean stripes and sturdy rope handles, the design is both eye-catching and functional.
Whether you’re strolling along the shore or heading to a summer picnic, this bag blends versatility with handmade charm. Plus, it’s a free pattern available right here!
Simple Crochet Beach Bag Free Pattern Details


Crochet Summer Beach Bag Details
Materials
The stripy beach crochet bag is now available as a Kit with Lionbrand.
This means you can select your colors and download a PDF pattern right away. Have a look at the details here.
Yarn: Any Worsted weight yarns in colors of your choice.
Prototype made using 24/7 cotton, # 4, medium worsted weight, 100% Mercerized Cotton, 189 yards per 100g skein
Sample made using 2 colors
Estimated Yardage
Color A (Mint): 520 yards
Color B (White): 400 yards
Hook and other Materials
US size G (4 mm) Crochet Hook.
Darning Needles
16mm Grommet Eyelets and Twisted Cord Twine Cotton Rope (Eyelet size dependent on the size of the cord)

Gauge
Not crucial for this project
Pattern Notes
- Please kindly read through the pattern before starting.
- Similar #4 weight yarn can be substituted, please check the gauge.
Difficulty Level – Intermediate
Terms – US Terminology

Finished size: ~20″ width x 14″ height x 5″ depth.
Stitches Abbreviations
Ch(s) – Chain(s)
Sl st – Slip stitch
Sc – single crochet
Hdc – Half Double Crochet
Rep – Repeat
Hdc 3rd loop

Simple crochet beach bag free pattern
The crochet beach bag Crochet Along has been divided into parts, making it easy to complete within 2 weeks.
Section 1: Bag Base
Section 1 – Base
With Color A, chain 142, join with a sl st to the first ch, make sure not to have a twist.
Round 1: Ch 1, sc in each ch around, join with a sl st to the beginning chain. 142 sc
Rounds 2 – 24: Ch 1, sc in each st around, join with a sl st to the beginning chain. 142 sc
Round 25: Ch 1, hdc in each st around, join with a sl st to the beginning chain. 142 hdc
Fasten off color A, join color B with a sl st.
Round 26: Ch 1, in 3rd loop, hdc in each st around, join with a sl st to the beginning chain. 142 hdc
Fasten off color B, join color A with a sl st.

1 FREE DOWNLOAD PER MONTH
WITH JUST $3 PER MONTH!
- Pick your desired pattern each month.
- It can be a new or old pattern.

2 FREE DOWNLOADS PER MONTH
WITH JUST $5 PER MONTH!
- Pick your desired patterns each month.
- It can be a new or old pattern.
- You get 2 patterns per month.

3 FREE DOWNLOADS PER MONTH
WITH JUST $8 PER MONTH!
- Pick your desired patterns each month.
- You get 3 free patterns per month.
- It can be a new or old pattern.

Section 2: Body of the bag
The body of the bag is made in 3rd loop from here on.
Rounds 27 – 32: Ch 1, in 3rd loop, hdc in each st around, join with a sl st to the beginning chain. 142 hdc
Rounds 33 – 34: With B
Rounds 35 – 40: With A
Rounds 41 – 43: With B
Rounds 44 – 48: With A
Rounds 49 – 52: With B
Rounds 53 – 56: With A
Rounds 57 – 61: With B
Rounds 62 – 64: With A
Fasten off color A
Round 65: With B
Edging
Using color B
Stop working into the 3rd loop from here.
Round 1: Ch 1, sc in each st around, join with a sl st to the beginning chain. 142 sc
Rounds 2 – 3: Rep round 1
Grommet hole Opening
Round 4: Ch 1, sc in first 22 sts, ch 3, skip next 3 sts, sc in next 20 sts, ch 3, skip next 3 sts, sc in next 45 sts, ch 3, skip next 3 sts, sc in next 20 sts, ch 3, skip next 3 sts, sc in remaining sts, join with a sl st to the beginning chain. 142 sts
Fit check: If using a grommet eyelet, place it in the chain space created.
Adjust the number of chains and skipped stitches.
Round 5: Ch 1, sc in each st/ch sp around, join with a sl st to the beginning chain. 142 sc
Rounds 6 – 12: Ch 1, sc in each st around, join with a sl st to the beginning chain. 142 sc
Round 13: Ch 1, sl st in each st around, join with a sl st to the beginning chain. 142 sl st
Fasten off.
Finishing.
Step 1: Turn your bag to the wrong side. Lay the panel, arrange the eyelets with the 4 in line (2 on either side), and secure the lower end.
Step 2: Secure the lower end (foundation chain end) using either a darning needle or crochet hook and mattress stitch or sc.
Step 3: Spread out the lower end so that the tip is out, as shown in the image above. Measure 5” across and mark this point.
Step 4: Sew the point across
Repeat steps 3 – 4 on the other end.
Fixing the Grommet Eyelets
Handles
Option 1: Adding grommet eyelets
- Place the grommet eyelets on both sides of the eyelet opening created above.
- Secure the grommets with your hammer or tools.
- Cut out 2 cords as long as you would like.
- Pass the end of the cord through the first eyelet opening and make a knot.
- Pass the other end of the cord through the second eyelet on the same side, secure by making a tight knot.
- Repeat with the other cord.
Option 2: If making your own out of yarn.
Make 2
For straps 12” long, cut 64” of yarn
For straps 18” long, cut 100” of yarn. See stepwise photos in the PDF
- Cut 26 pieces of yarn, 64” long each, and set them aside, label this set as “A”.
- Cut 13 pieces of yarn, 64” long each, and set them aside = B.
- Cut a single 32” yarn and set aside.
- Fold the two sets into two equal halves and set aside.
- Intersect the two sets (A and B) in the middle, separate A into 2 places, and combine B into 1, this gives 3 separate lines.
- Braid the 3 cords.
To braid
- Lay the 3 strands side by side and label A, B, C
- Join the middle with something strong to withstand the braiding.
- Braid into a cord as seen in the picture.
- Place A over B, and C over A
- Place B over C and A over B
- Continue braiding till the end.
Photo of yarn and store bought straps
* To secure the end of the braided cord, wrap the last strand of yarn and cut off.
* Trim off the excess yarn.
Finishing
- Pass the first handle through the 1st and 2nd ch 3 sp. Make a knot to secure the rope on either end.
- Repeat with the second handle on the opposite side.
- Carry with Pride.
About the Designer
Say Hi on Instagram and Subscribe To my email List for pattern discounts and freebies. For questions, send such to [email protected]. Read more about me here.