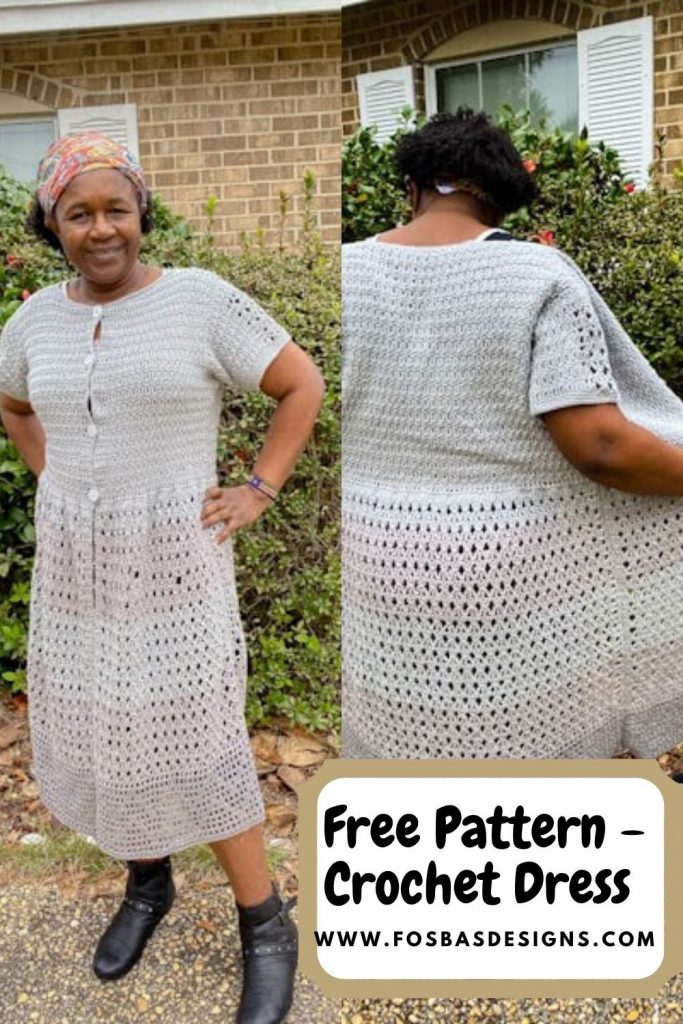
Crochet Flared Cardigan Pattern
About 2 years ago, I designed my very first crochet flared cardigan pattern. It was all I dreamt of! The detail in this cardigan is all I ever wanted. The Flare, the Zipper (do not worry if you do not want Zippers in yours, there’s an option for Buttons), and the class this cardigan portal is everything.
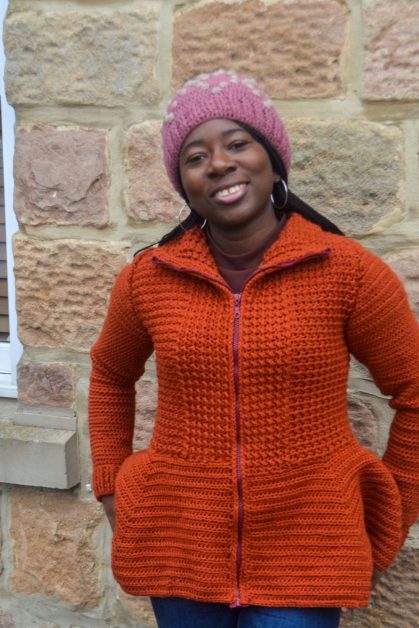
Since designing this flared cardigan, I have been able to put it to test the second time. This time, using Worsted weight yarn as opposed to having both options of Worsted weight and Chunky yarn as with the first. The new version has also been tech edited.
Can we talk about the details of this crochet flared cardigan pattern?
- The Texture is just perfect for the season
- the flare is classy and elegant.
- Zippers or Buttons can be added, the option is yours. I have both versions tested and explained in the pattern for you to make your choice.
- Each size is written out in different colors to help you focus on the size you are making.
- This pattern is size-inclusive – graded from XS to 5Xl using the bust measurement of 28″ to 64″
This crochet flared cardigan pattern was originally published on the joy of motion’s blog when I was a guest blogger on her blog and I thought to share this beauty with my audience also.
Please note that the flared cardigan pattern is now available as a free pattern, scroll down for the free pattern. You can also get the print firendly pattern that is color coded for each size and includes detailed stepwise photos via Etsy or Ravelry.
Come join my cochet community on facebook for my behinde the screen crochet related fun, join here.
Now, to the Materials needed for this flared crochet cardigan pattern


Stylecraft Special Aran (100% Acrylic 196 yd / 214 m per 3.5 oz / 100 g Skein)
Estimated Yardage
7Balls/ 24.5 oz /700 g/ 1,372 m / 1498 yd
8 Balls/ 28 oz / 800 g / 1,568 m / 1,712 yd
9 Balls/ 31.5 oz / 900 g /1764 m / 1,926 yd
10 balls / 35 oz /1000 g /1960 m / 2,140 yd
11 Balls / 38.5 oz / 1000 g/ 2156 m / 2,354 yd
12 Balls / 42 oz/ 1200 g /2352 m / 2,568 yd
13 Balls / 45.5 oz / 1300 g / 2,548 m / 2,782 yd
14 Balls/49 oz /1400 g / 2,744 m / 2,996 yd
15 Balls / 52.5 oz / 800 g / 2,940 m / 3,210 yd
Hook and other Materials needed to make your own version of this crochet flared cardigan pattern includes the following
– US size J (6 mm)
– Buttons (6 – 10) or Zipper (the length of which would be determined how long your flare is)
– Stitch markers – 4 pcs
Gauge
15 sts over 21 rows, see pattern below = 4”/10cm
Adjust hook size if necessary, to obtain gauge.
Gauge
Row 1: Chain 16, sc in 2nd ch from hook, *hdc in next, sl st in next, repeat from * to last st, sc, turn. 7 hdc, 6 sl st, 2 sc
Row 2: Ch 1, sc in first st, *sl st in next, hdc in next, repeat from * to last st, sc in last, turn – 6 hdc, 7 sl st, 2 sc
Row 3: Ch 1, sc in first st, *hdc in next, sl st in next, repeat from * to last st, sc, turn – 7 hdc, 6 sl st, 2 sc
Rows 4 – 21: Repeat Row 2 and 3
Pattern Notes
- Please kindly read through the pattern before starting.
- Similar #4 weight yarn can be substituted, please check gauge.
- Schematics shown below is a guide to how this pattern is made.
- This pattern has 1” of positive ease
- Stitch count in parenthesis is interpreted as follows – XS (S, M, L, XL, 2XL, 3XL, 4XL, 5XL).
- Chains at the beginning of the rows do not count as a stitch, unless stated.
- Section 1 is worked by alternating hdc and sl st, the texture is gotten over 2 rows, with hdc made on sl st from preceding row and vice versa.
- Pictures in the pattern are from 2 different finished items.
Difficulty Level – Intermediate
Terms – US Terminology
Stitches Abbreviations
Chain – ch
Slip stitch – sl st
Single Crochet – sc
Single crochet 2 together – sc2tog
Half double crochet – Hdc
Half double crochet 2 together – hdc2tog
Finished Measurements
Sizes/Color – XS(S, M, L, XL, 2XL, 3XL, 4XL, 5XL)
Bust: 30(34, 38, 42, 46, 50, 54, 58, 62)”
Sleeve Length – 21(21, 22, 22, 23, 23, 24, 24, 24)”
Armhole Depth – 15(16, 16.5, 17, 17.5, 18, 18, 18.5, 18.5)”
Length (Shoulder to waist): 21(21, 27, 27, 33, 33, 39, 39, 41)”
Modeled garment is shown in Medium.
Construction Notes
- This sweater is worked in 3 sections.
- Section 1 – Both panels (front and Back) are made in one piece in rows with split for sleeves made half way and the rest of the body is completed.
- Section 2 – Sleeve is then made in rounds and joined to the body.
- Section 3 – Flare made in rows.
Since you love this free crochet flared cardigan pattern, you might also love the following beautiful patterns on the blog.
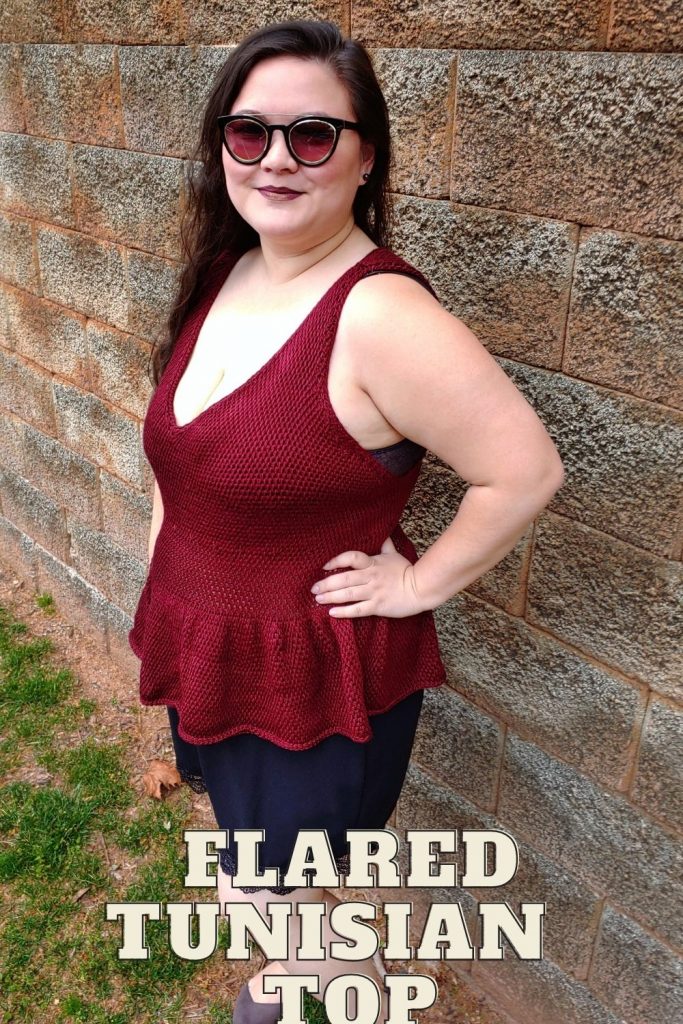
1. Flared peplum crochet top pattern
Adjustments/fittings
1. Length: increase or decrease the repeat rows on the front panel before splitting for the armpit and also adjust the number of repeats for the armhole to your preference.
2. For a shorter sleeve – decrease the number of rounds.
Get the PDF pattern of this flared crochet cardigan in my store using the buttons below.

The PDF print-friendly pattern also contains:
- Construction notes
- Schematics
- and lots of pictures.
I would love to see your makes from my crochet flared cardigan, do tag with @crochet_fosbas.
Instructions for this crochet cardigan free pattern
Instructions
Section 1: Waist upwards
Row 1: Chain 114(130, 146, 160, 174, 190, 204, 220, 234), sc in 2nd ch from hook, *hdc in next, sl st in next, repeat from * to last st, sc, turn. 56(64, 72, 79, 86, 95, 101, 109, 116) hdc 55(63, 71, 78, 85, 94, 100, 108, 115) sl st, 2 sc
Row 2: Ch 1, sc in first st, *sl st in next, hdc in next, repeat from * to last st, sc in last, turn – 56(64, 72, 79, 86, 95, 101, 109, 116) sl st 55(63, 71, 78, 85, 94, 100, 108, 115) hdc, 2 sc
Row 3: Ch 1, sc in first st, *hdc in next, sl st in next, repeat from * to last st, sc, turn – 56(64, 72, 79, 86, 95, 101, 109, 116) hdc 55(63, 71, 78, 85, 94, 100, 108, 115) sl st, 2 sc
Rows 4 – 33 (33, 33, 33, 33, 37, 37, 37, 37): Repeat Row 2 and 3
Row 34 (34, 34, 34, 34, 38, 38, 38, 38): Rep. Row 2.
Do not Fasten off.
Split for sleeve opening
Place stitch markers on the 28th and 85th (32nd and 97th, 36th and 109th, 40th and 119th, 44th and 129th, 46th and 143rd, 50th and 153rd, 54th and 165th, 58th and 175th) stitches respectively.
Front panels
Right side: Arm-pit shaping.
Row 1: Working toward the 1st stitch marker, ch 1, sc in first st, *hdc in next, sl st in next, repeat from * to last 2 sts before stitch marker, hdc in next st, sc2tog, turn –
Hdc before last 2 sts
27(31, 35, 39, 43, 45, 49, 53, 57) sts
Row 2: Ch 1, sc2tog, *hdc in next, sl st in next, repeat from * to last st, sc, turn – 26(30, 34, 38, 42, 44, 48, 52, 56) sts
Row 3: Ch 1, sc in first st, *hdc in next, sl st in next, repeat from * to last 3 sts, hdc in next st, sc2tog, turn – 25(29, 33, 37, 41, 43, 47, 51, 55) sts
Row 4: Ch 1, sc2tog, *hdc in next, sl st in next, repeat from * to last st, sc, turn – 24(28, 32, 36, 40, 42, 46, 50, 54) sts
Row 5: Ch 1, sc in first st, *hdc in next, sl st in next, repeat from * to last 3 sts, hdc in next st, sc2tog, turn – 23(27, 31, 35, 39, 41, 45, 49, 53) sts
Stop reducing.
Row 6: Ch 1, sc in first st, *sl st in next, Hdc in next, repeat from * to last st, sc in last, turn – 23(27, 31, 35, 39, 41, 45, 49, 53) sts
Row 7: Ch 1, sc in first st, *hdc in next, sl st in next, repeat from * to last st, sc, turn – 23(27, 31, 35, 39, 41, 45, 49, 53) sts
Row 8 – 27 (29, 31, 31, 33, 33, 35, 37, 37): Repeat Rows 6 – 7
Do not fasten off.
Shape neckline
Row 1: Ch 1, sc in first st, *sl st in next, hdc in next, repeat from * to last st, sc in last, turn – 23(27, 31, 35, 39, 41, 45, 49, 53) sts
Row 2: Ch 1, sc in first 5 sts, (place stitch marker on the 4th st) *hdc in next, sl st in next, repeat from * to last st, sc, turn – 23(27, 31, 35, 39, 41, 45, 49, 53) sts
Row 3: Ch 1, sc in first st, *sl st in next, hdc in next, repeat from * to last 5 sts, sc in next st, leave last 4 sts unworked, turn. 19(23, 27, 31, 35, 37, 41, 45, 49) sts
Row 4: Ch 1, sc2tog, *sl st in next, hdc in next, repeat from * to last st, sc in last st, turn. 18(22, 26, 30, 34, 36, 40, 44, 48) sts
Row 5: Ch 1, sc in first st, * sl st in next, hdc in next, repeat from * to last 2 sts, sc2tog, turn. 17(21, 25, 29, 33, 35, 39, 43, 47) sts
Row 6: Repeat Row 4. 16(20, 24, 28, 32, 34, 38, 42, 46) sts
Fasten off
Left Panel – Arm-pit shaping.
Working from the 2nd stitch marker towards the edge.
Join yarn with a slip stitch.
Row 1: Ch 1, sc2tog, * hdc in next, sl st in next, repeat from * to last st, sc, turn – 27(31, 35, 39, 43, 45, 49, 53, 57) sts
Row 2: Ch 1, sc in first stitch, * sl st in next, hdc in next, repeat from * to last 2 sts, sc2tog, turn – 26(30, 34, 38, 42, 44, 48, 52, 56) sts
Row 3: Ch 1, sc2tog, * hdc in next, sl st in next, repeat from * to last st, sc, turn – 25(29, 33, 37, 41, 43, 47, 51, 55) sts
Row 4: Ch 1, sc in first st, * sl st in next, hdc in next, repeat from * to last 2 sts, sc2tog, turn – 24(28, 32, 36, 40, 42, 46, 50, 54) sts
Row 5: Ch 1, sc2tog, * hdc in next, sl st in next, repeat from * to last st, sc, turn – 23(27, 31, 35, 39, 41, 45, 49, 53) sts
Stop reducing.
Row 6: Ch 1, sc in first st, *sl st in next, hdc in next, repeat from * to last st, sc in last, turn –23(27, 31, 35, 39, 41, 45, 49, 53) sts
Row 7: Ch 1, sc in first st, * hdc in next, sl st in next, repeat from * to last st, sc, turn – 23(27, 31, 35, 39, 41, 45, 49, 53) sts
Row 8 – 27 (29, 31, 31, 33, 33, 35, 37, 37): Repeat Rows 6 – 7
Shape neckline
Row 1: Ch 1, sc in first st, *sl st in next, hdc in next, repeat from * to last st, sc in last, turn – 23(27, 31, 35, 39, 41, 45, 49, 53) sts
Row 2: Ch 1, sc in first st,*hdc in next, sl st in next, repeat from * to last 5 sts, sc in next st, leave last 4 sts unworked, turn – 19(23, 27, 31, 35, 37, 41, 45, 49) sts
Row 3: Ch 1, sc2tog, *hdc in next, sl st in next, repeat from * to last st, sc in last st, turn. 18(22, 26, 30, 34, 36, 40, 44, 48) sts
Row 4: Sc in first st, * hdc in next, sl st in next, repeat from * to 2 sts, sc2tog, turn – 17(21, 25, 29, 33, 35, 39, 43, 47) sts
Row 5: Ch 1, sc2tog, *hdc in next st, sl st in next, hdc in next, repeat from * to last st, sc in last st, turn – 16(20, 24, 28, 32, 34, 38, 42, 46) sts
Row 6: Repeat Row 4. 15(19, 23, 27, 31, 33, 37, 41, 45) sts
Back Panel
Working between 1st and 2nd stitch markers, join yarn with a slip stitch to stitch with 1st stitch marker, and work the following stitches –
Row 1: Ch 1, sc2tog, *hdc in next, sl st in next, repeat from * to last 1st before 2nd stitch marker, sc2tog, turn. 55(63, 71, 77, 83, 95, 101, 109, 115) sts
Row 2: Ch 1, sc2tog, *hdc in next, sl st in next, repeat from * to last 2 sts, sc2tog, turn. 53(61, 69, 75, 81, 93, 99, 107, 113) sts
Row 3: Ch 1, sc2tog, *hdc in next, sl st in next, repeat from * to last 2 sts, sc2tog, turn. 51(59, 67, 73, 79, 91, 97, 105, 111) sts
Row 4: Repeat Row 2. 49(57, 65, 71, 77, 89, 95, 103, 109) sts
Row 5: Repeat Row 3 – 47(55, 63, 69, 75, 87, 93, 101, 107) sts
Stop Reducing
Row 6: Ch 1, sc in first st, *sl st in next, hdc in next, repeat from * to last st, sc in last st, turn – 47(55, 63, 69, 75, 87, 93, 101, 107) sts
Row 7: Ch 1, sc in first st, *hdc in next st, sl st in next, repeat from * to last st, sc in last, turn – 47(55, 63, 69, 75, 87, 93, 101, 107) sts
Rows 8 – 33 (35, 37, 37, 39, 39, 41, 43, 43): Repeat Rows 6 and 7
Match the height with that of the front panels.
Shoulder seam
On both sides – sew/join from the shoulder tip towards the neck, stop joining 2” from the front panels and the neck opening (adjust appropriately, if the neck is too wide, increase the length joined)
Collar
Working in Row, across 2” left un-joined from both panels and the back.
Have a look at the Print-friendly PDF of this crochet flared cardigan pattern for more detailed photos of the steps
With right side – Join yarn with a slip stitch, to first st of skipped sts from the front panel in Row 3 of the front panel.
Row 1: Ch 1, sc in each across, turn.
Row 2: Ch 1, sc in first st, *hdc in next, sl st in next, repeat from * to last st, sc, turn.
Row 3: Ch 1, sc in first st, * sl st in next, hdc in next, repeat from * to last st, sc, turn.
Rows 4 – 11: Repeat Row 2 – 3.
Section 2: Sleeves
Round 1: Ch 26(30, 30, 30, 34, 34, 36, 36, 36), join to form a ring, ch 2, dc in each ch around. 26(30, 30, 30, 33, 33, 36, 36, 36) dc
Round 2: Ch 2, *fpdc in next 2, bpdc in next, repeat from * to the end of round, join with a sl st to beginning chain. 18(20, 20, 20, 22, 22, 24, 24, 24) FPdc, 8(10, 10, 10, 11, 11, 12, 12, 12) BPdc
Rounds 3 – 7: Repeat Round 2
Round 8: Ch 2, hdc in each st across, join to beginning ch. 26(30, 30, 30, 33, 33, 36, 36, 36) Hdc
Round 9: Ch 2, *hdc in next 2 sts, 2 hdc, repeat from * to end, join with a sl st to beginning ch – 36(40, 40, 40, 44, 44, 48, 48, 48) hdc
Round 10: Ch 2, hdc in each st, join with beginning ch – 36(40, 40, 40,44, 44, 48, 48, 48) hdc
Rounds 11 – 24 (26, 28, 30, 32, 32, 34, 34, 34): Repeat Row 10; 36 (40, 40, 40, 44, 44, 48, 48, 48) hdc
At this point, the sleeve should be at your elbow, if not, repeat round 10 till you have the length of your elbow.
Do not Fasten off.
Round 1: Ch 2, hdc in next, 2 hdc in next st, hdc in next st, 2 hdc in next st, hdc in each of the remaining sts till last 4 sts, 2 hdc in next, hdc in next st, 2 hdc in next, hdc in last st, join with ch – 40 (44, 44, 44, 48, 48, 52, 52, 52) hdc
Round 2: Ch 2, hdc in each st, join with slip stitch – 40 (44, 44, 44, 48, 48, 52, 52, 52) hdc
Rounds 3 – 7: Repeat Round 1 – 2.
52(56, 56, 56, 60, 60, 64, 64, 64) hdc
Note
- If too tight, increase (repeat round 1 -2) till a convenient width i.e Repeat Round 2 till the start of your Armpit.
- Kindly remember that the stitch counts would be different as such you would need more rows when reducing.
Working in Rows
Row 1: Ch 2, hdc2tog, hdc in each st to last 2 sts, hdc2tog, turn – 50(54, 54, 54, 58, 58, 62, 62, 66) hdc
Rows 2 – 18 (20, 20, 20, 22, 22, 24, 24, 26): Repeat Row 1. 16(16, 16, 16, 16, 16, 16, 16, 16) hdc
Row 19 (21, 21, 21, 23, 23, 25, 25, 27): Ch 2, hdc2tog in each stitch across. 8(8, 8, 8, 8, 8, 8, 8, 8) hdc
Note – If you increased the number of stitches earlier, you would need to increase the number of repeats also.
Fasten off.
To join the sleeves to the body of your cardigan –
Turn both sleeves and the body of the cardigan to the wrong side, with the tip of the sleeve placed on the shoulder tip, work sc around both shoulder and body of the cardigan.
Section 3: Flare part of this free crochet pattern
Turn the bodice to the waist (foundation Row 1).
Join yarn with a sl st to the edge of Row 1.
XS, S and M size alone –
Row 1: Ch 1, sc in first 5 sts, sc2tog, sc in each st across, turn. 112(128, 144)
Large size alone –
Row 1: Ch 1, 2 sc in first st, sc in remaining sts across, turn. 160 sc.
XL, 2XL, 3XL, 4XL and 5XL alone –
Row 1: Ch 1, *sc in next 5 sts, sc2tog, rep from * (5, 5, 3, 3, 1) more time(s), sc in remaining sts across, turn. (168, 184, 200, 216, 232) sc
For all Sizes –
Row 2: Ch 2, hdc in next 14(16, 18, 20, 21, 23, 25, 27, 29) sts, *3 hdc in next, hdc in next 13(15, 17, 19, 20, 22, 24, 26, 28) sts, repeat from * 5 more times, 3 hdc in next st, hdc in remaining sts, turn. 126(142, 158, 174, 182, 198, 214, 230, 246) hdc.
Row 3: Ch 2, hdc in next 14(16, 18, 20, 21, 23, 25, 27, 29) sts, *3 hdc in next, hdc in next 15(17, 19, 21, 22, 24, 26, 28, 30) sts, repeat from * 5 more times, 3 hdc in next st, hdc in remaining sts, turn. 140(156, 172, 188, 196, 212, 228, 244, 260) hdc.
Row 4: Ch 2, hdc in next 16(18, 20, 22, 23, 25, 27, 29, 31) sts, *2 hdc in next, hdc in next 17(19, 21, 23, 24, 26, 28, 30, 32) sts, repeat from * 5 more times, 2 hdc in next st, hdc in remaining sts, turn. 147(163, 179, 195, 203, 219, 235, 251, 274) hdc.
Row 5: Ch 2, hdc 16(18, 20, 22, 23, 25, 27, 29, 31) sts, *2 hdc in next, hdc in next 18(20, 22, 24, 25, 27, 29, 31, 33) sts, repeat from * 5 more times, 2 hdc in next st, hdc in remaining sts, turn. 154(170, 186, 202, 210, 226, 242, 258, 281) hdc.
Row 6: Ch 2, hdc in next 17(19, 21, 23, 24, 26, 28, 30, 32) sts, *2 hdc in next, hdc in next 19 (21, 23, 25, 26, 28, 30, 32, 34) sts, repeat from * 5 more times, 2 hdc in next st, hdc in remaining sts, turn. 161(177, 193, 209, 217, 233, 249, 265, 288) hdc.
Row 7: Ch 2, hdc in next 17(19, 21, 23, 24, 26, 28, 30, 32) sts, *2 hdc in next, hdc in next 20(22, 24, 26, 27, 29, 31, 33, 35) sts, repeat from * 5 more times, Hdc in last 19(20, 21, 22, 23, 24, 25, 26, 27) sts, turn. 168(184, 200, 216, 224, 240, 256, 272, 295) hdc.
Row 8: Ch 2, hdc in next 18(21, 23, 25, 26, 28, 30, 32, 34) sts, *2 hdc in next, hdc in next 21(23, 25, 27, 28, 30, 32, 34, 36) sts, repeat from * 5 more times, 2 hdc in next st, hdc in remaining sts, turn. 175(191, 207, 223, 231, 247, 263, 279, 302) hdc.
Continue in this sequence till you have the desired length, Prototype made to Row 28 measuring 10”!
Finishing for this flared crochet cardigan pattern
- Please note that you can either use Buttons or Zippers.
- Kindly Follow the instructions for either.
Option 1: Zippers
Note:
· Tip: Make sure you don’t sew too close to the zipper tooth.
· The slip stitch gives a clean edge
· On the right side of the body –
Working on the sides/edges from last row of the collar towards the flare, join yarn with a slip stitch to the edge of the collar, ch 1, sc in first st, *Hdc in next, sl st in next, repeat from * to last stitch, sc, end, turn
- Ch 1, sc in first stitch, *sl st, Hdc, repeat from * to last st, sc
- Ch 1, sc in each st across, turn
- Ch 1, slip stitch in each stitch across.
Fasten off, repeat on the left side.
To add zipper –
- Measure from the tip of your flare to the edge of collar to get the required length for a zip. Some Testers preferred to stop their Zippers at the neck as they did not want a turtle neck collar.
- Place your zipper on your cardigan, secure both ends with needles
- On each side, with a sewing needle, sew the zipper and cardigan together, starting from the collar towards the flare.
Repeat on the other side.
I hope you have some fun making your own very first version of this beautiful flared Lillian crochet cardigan from this free pattern? When you do, kindly tag me with your makes.