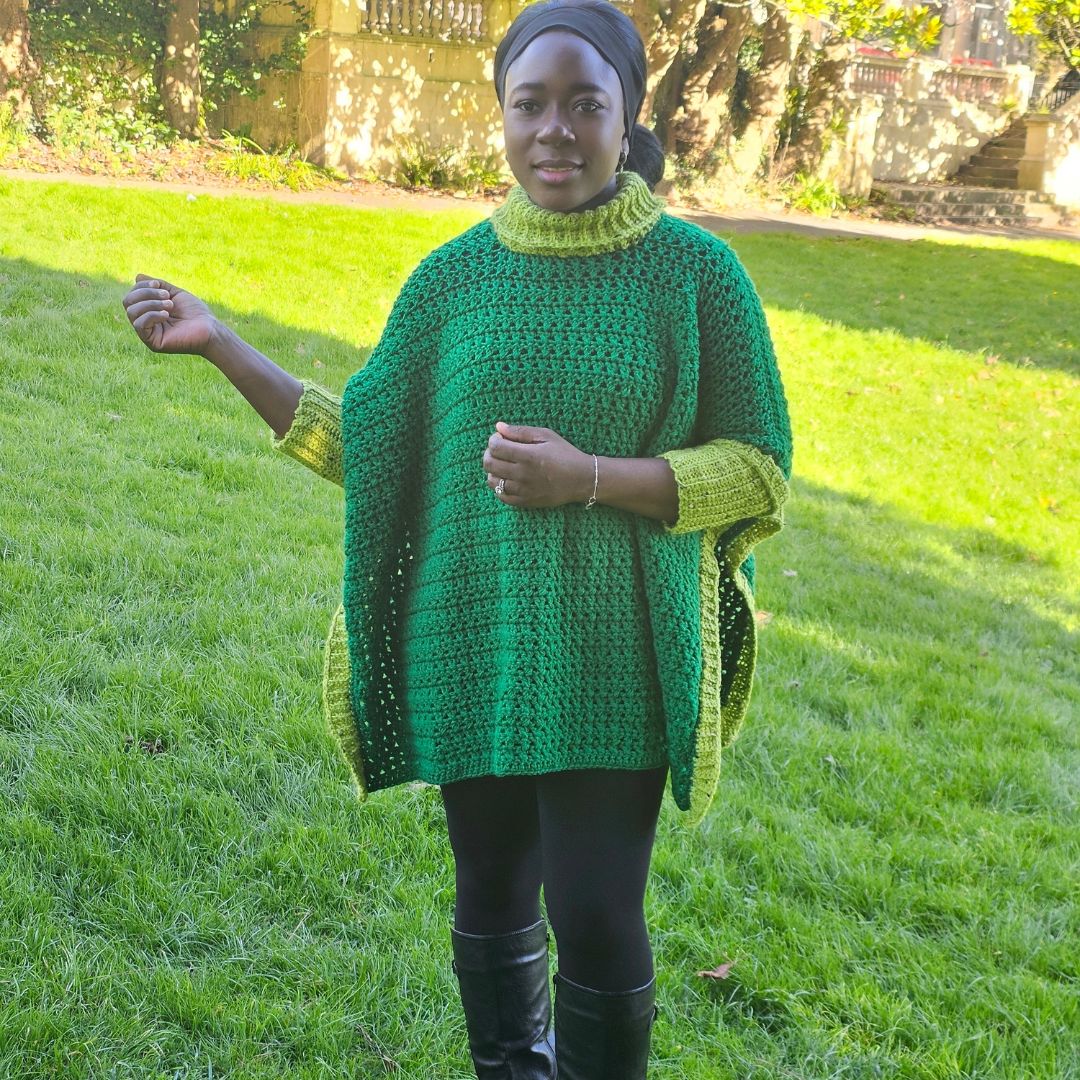
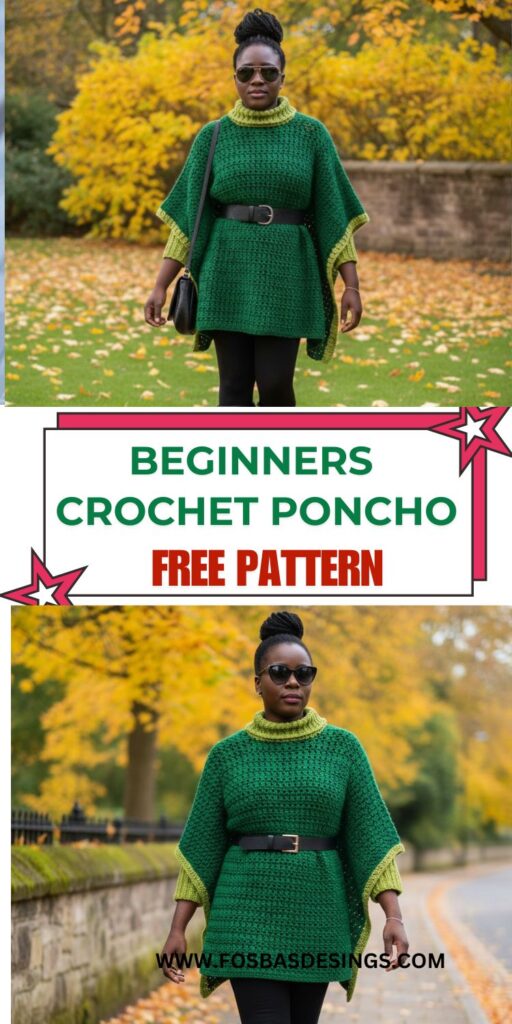
Crochet poncho with sleeves free pattern
The simple crochet poncho with sleeves-free pattern is a cute and easy garment that is perfect for the season.

This modern crochet poncho with sleeves blends clean lines with cozy comfort. Ideal for layering over dresses or jeans, it’s a wardrobe staple you’ll want in multiple colors. The free pattern includes sleeve instructions for a perfect fit.
This poncho is available as a free pattern; scroll down for the tutorial.
Grab the print-friendly option on Ravelry or Etsy.

Crochet poncho with sleeves measurement
Size(s) and color codes – S (M, L)
Bust Measurement: 30 – 38 (42 – 50), (54 – 62)”
Finished bust measurement = 40 (52, 60)”
Length of Poncho: 24 (28, 28)”
Sleeves length: 6 (6, 6)”
The modeled garment is shown in the smallest size, with 20” of Positive Ease.

More crochet ponchos on the blog:
Poncho, Lacy poncho and Asymentrical poncho
Materials needed for this sleeved poncho pattern
Yarn: Any worsted weight yarn in colors of your choice.
Prototype made using Styke craft Special Aran weight, #4, 60% Cotton, 28% Acrylic, 12% Wool, 120 m (131 yds) per 1.75 oz/50g skein)
Estimated Total Yardage
Color A = 1800 (2220, 2600) yards
Color B = 380 (500, 600) yards
Hook – 7 mm Crochet Hook

Gauge
10 sts over 6 rows = 4 x 4” made in xdc, before blocking.
Instructions for the gauge
Row 1: Chain 12, dc in 3rd ch and in each ch across, turn. 10 dc
Row 2: Ch 1, dc in first st, xdc across until the last st, dc in last st, turn. 4 xdc, 2 dc
Rows 3 – 6: Rep Row 2
Adjust hook size if necessary to obtain gauge.
Simple crochet poncho with sleeves,free pattern notes
- Please kindly read through the pattern before starting.
- Similar #4 weight yarn can be substituted; please check the gauge.
- Chains at the beginning of the rounds do not count as a stitch.
- The stitch count is written after each row/round, with the smallest written first and the others in the ().
- Stitch count written in black is for all sizes but at some points, the stitch counts are color coded for clarity.

Difficulty Level – Intermediate
Terms – US Terminology
Stitches Abbreviations
Chain(s) – ch(s)
Single Crochet – sc
Double crochet – dc
Crossed double crochet – xdc
Back loop only – BLO

Special stitch
Crossed dc – skip next st, dc in next st, crocheting over the dc just made, work dc into the skipped st

Construction Notes
This poncho is worked in 4 sections.
Section 1: You need to make two pieces for the main panel, which also makes up the front and back panels.
Section 2: The side extension, made in color B, across the long edge of the poncho.
Section 3: The sleeves are made in rows and then joined to the main panel just under the side extension for a chic look.
Section 4: The collar is made in rounds and can be adjusted for a better fit.
This Crochet poncho with sleeves-free pattern is featured in the ongoing 12 weeks of Christmas alongside other amazing projects.


How to crochet a poncho with sleeves
Section 1 – Using Color A
Make 2: Front and Back panels
Row 1: Chain 92 (106, 116), dc in 3rd ch and in each ch across, turn. 90 (104, 114) dc
Row 2: Ch 2, dc in first st, xdc across until the last st, dc in last st, turn. 44 (51, 56) xdc, 2 dc
Rows 3 – 38 (38, 42): Rep Row 2
Or Until Your Piece Measures 22 (26, 26)”
Neckline shaping
Right side
Row 39 (39, 43): Ch 2, dc in first st, xdc over the next 15 (20, 22) xdc, dc in next st, leave the remaining sts unworked, turn. 15 (20, 22) xdc, 2 dc
Row 40 (40, 44): Ch 2, dc in first st, xdc across until the last st, dc in last st, turn.15 (20, 22) xdc, 2 dc
Row 41 (41, 45): Rep Row 40 (40, 44)
Row 42 (42, 46): Ch 1, sc in each st across. 32 (42, 46) sc
Fasten off.
Left side
- Join yarn with a sl st to the other edge.
- Repeat as with the right side.
- Do not Fasten off.
Edging
- Crocheting around the whole panel.
- Aim for 2 sc, ch 2, 2 sc at each corner to prevent curlings.
- Add 2 sc in each dc edge.
Round 1: Ch 1, sc evenly around the whole panel, join with a sl st to the beginning ch.
Shoulder seam(s)
- Place the front panel over the back panel.
- With the wrong side facing out.
- Join yarn with a slip stitch to the edge, crocheting towards the stitch marker and over both panels.
- Sew the remaining sts on both panels together using a needle or hook and either mattress stitch or sl st.
- Repeat on the other side.
- Fasten off.
Section 2 – Side panels
Crocheting across the long edge of the cape.
With B, join with a sl st to the last st on the lower edge of the poncho.
Row 1: Chain 5, sc in 2nd ch from hook and in each chain across, skip corresponding st on the edge of the sweater, sl st into the next 2 sts on the sweater, turn. 4 sc
Row 2: In BLO, sc in each st across, turn. 4 sc
Row 3: Ch 1, in BLO, sc in each st across, skip corresponding st on the edge of the sweater, sl st into the next 2 sts on the sweater, and turn. 4sc
Repeat row 2 and 3 along the edge.
Continue the repeats until the long edge of the sweater has been completed.
Do not fasten off.
Edging: Side extension
Crocheting across the edges of the side extension.
Row 1: Ch 1, sc evenly in each st across.
Fasten off.
Repeat on the other long edge.
Section 3 – Sleeves
With B, chain 27
Row 1: Sc in 2nd ch and in each ch across, turn. 26 sc
Row 2: Ch 1, sc in first st, in BLO, sc across until the last st, sc in last st, turn. 26 sc
Rows 3 – 33: Rep Row 2
Increase or decrease the number of repeats for a comfortable fit around your forearm.
Do not fasten off.
Edging
Ch 1, sc in each st around the panel, ch 2 at each corner.
Joining
- Pick up your main panel.
- Fold the main panel into two (as if you are putting it on).
- The folded edge of the sleeves should be a continuation of the folded edge of the main panel.
- Place the short end of the sleeve under the side extension.
- Sew the short edge of the sleeve to the main panel.
- Sew the side edge of the sleeve together.
- Repeat on the other side.
The side of the poncho is left unjoined.
Weave in all ends
Section 4: Turtle Neck Collar.
- With the right side facing you, join yarn (Color A) with a sl st to any point on the neckline.
- Crocheting around the neckline.

Round 1: Ch 1, sc evenly around, join with a sl st to the beginning ch.
Fasten off A, join B
You can adjust the neckline length by increasing or decreasing the number of chains made.
Round 2: Ch 1, sc in each st around, join with a sl st to the beginning ch.
Fasten off A
Crocheting with B from here around the neckline and in rows.
Row 3: Ch 21, sc in 2nd ch from hook and in each chain across, skip corresponding st on the sweater, sl st into the next 2 sts on the sweater, turn. 20 sc
Row 4: In BLO, sc in each st across, turn
Row 5: Ch 1, in BLO, sc in each st across, skip corresponding st on the body of the sweater, sl st into the next 2 sts on the sweater and turn. 20 sc
Rows 6 – end: Repeat Rows 4 and 5 until you have crocheted into all the stitches on the last round of the sweater.
With a sl st, sew close the sides of the neckline.
Fasten off.
Edging
Join yarn with a sl st to any stitch on the edge of the collar.
Round 1: Ch 1, sc in each st around the edge, join with a sl st to the beginning ch.
Fasten off.
Sew in ends
Block to measurement.
There you have your version of this crochet poncho with sleeves!

More crochet projects that use more than one color
About the Designer
Say Hi on Instagram and Subscribe To my email List for pattern discounts and freebies. For questions, send such to [email protected]. Read more about me here.